Makita XJP03Z Makita XJP03 Instruction Manual
Makita XJP03Z Manual
 |
View all Makita XJP03Z manuals
Add to My Manuals
Save this manual to your list of manuals |
Makita XJP03Z manual content summary:
- Makita XJP03Z | Makita XJP03 Instruction Manual - Page 1
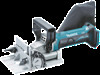
INSTRUCTION MANUAL MANUEL D'INSTRUCTION MANUAL DE INSTRUCCIONES Cordless Plate Joiner Lamelleuse Sans Fil Engalletadora Inalámbrica XJP03 014904 IMPORTANT: Read Before Using. IMPORTANT: Lire avant usage. IMPORTANTE: Leer antes de usar. 1 - Makita XJP03Z | Makita XJP03 Instruction Manual - Page 2
General Power Tool Safety Warnings WARNING Read all safety warnings and all instructions. Failure to follow the warnings and instructions may result in electric shock, fire and/or serious injury. Save all warnings and instructions for future reference. The term "power tool" in the warnings refers to - Makita XJP03Z | Makita XJP03 Instruction Manual - Page 3
28. Have your power tool serviced by a qualified repair person using only identical replacement parts. This will ensure that the safety of the power tool is maintained. 29. Follow instruction for lubricating and changing accessories. 30. Keep handles dry, clean and free from oil and grease. GEB093 - Makita XJP03Z | Makita XJP03 Instruction Manual - Page 4
failure to follow the safety rules stated in this instruction manual may cause serious personal injury. USD301-1 Symbols The 2. Never recharge a fully charged battery cartridge. Overcharging shortens the battery service life. 3. Charge the battery cartridge with room temperature at 10 ゚ - Makita XJP03Z | Makita XJP03 Instruction Manual - Page 5
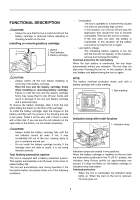
FUNCTIONAL DESCRIPTION CAUTION: • Always be sure that the tool is switched off and the battery cartridge is removed before adjusting or checking function on the tool. Installing or removing battery cartridge 1. Button 1 2. Red indicator 2 3. Battery cartridge 3 014905 CAUTION: • Always - Makita XJP03Z | Makita XJP03 Instruction Manual - Page 6
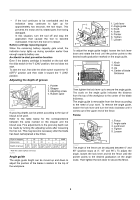
MAX 10 20 - - - 10 mm 12.3mm 13 mm 14.7mm 20 mm* (0.4") (0.48") (0.51") (0.58") (0.8") * With the rubber spikes removed. 012683 Angle guide The angle guide height can be moved up and down to adjust the position of the blade in relation to the top of the workpiece. 1 6 5 7 1. Lock lever - Makita XJP03Z | Makita XJP03 Instruction Manual - Page 7
angle of the fence adjusted to other than 0 ゚. When you need to use the angle guide under the above condition, be sure to adjust the depth of groove to get a proper position and maintain firm grasp on tool. CAUTION: • Use only Makita lock nut wrench provided to remove or install the blade. • Always - Makita XJP03Z | Makita XJP03 Instruction Manual - Page 8
bag's fastener out. Empty the dust bag by tapping it lightly to remove as much of the dust as possible. NOTE: • If you connect a Makita vacuum cleaner to your plate joiner, more efficient and cleaner operations can be performed. OPERATION How to make joints WARNING: • Always clamp the workpiece to - Makita XJP03Z | Makita XJP03 Instruction Manual - Page 9
groove according to the size of biscuit to be used. Refer to the table in the "Adjusting the depth of groove" section. 5. Adjust the angle guide height so that the blade is centered in the board thickness. 6. Align the center mark on the base with the pencil line on the workpiece. 9 - Makita XJP03Z | Makita XJP03 Instruction Manual - Page 10
so that the blade is facing down. For T-Butt Joint only Remove the angle guide from the tool. Place the tool on the workpiece so that the blade is Joint, Miter Joint, Frame Joint and EdgeTo-Edge Joint only • Remove the angle guide from the tool. Set the fence at 90° for Corner Joint, Frame Joint and - Makita XJP03Z | Makita XJP03 Instruction Manual - Page 11
in this manual. The use of any other accessories or attachments might present a risk of injury to persons. Only use accessory or attachment for its stated purpose. If you need any assistance for more details regarding these accessories, ask your local Makita Service Center. • Angle guide • Dust bag - Makita XJP03Z | Makita XJP03 Instruction Manual - Page 12
curité générales pour outils électriques MISE EN GARDE Veuillez lire toutes les mises en garde de sécurité et toutes les instructions. L'ignorance des mises en garde et des instructions comporte un risque de choc électrique, d'incendie et/ou de blessure grave. Conservez toutes les mises en garde et - Makita XJP03Z | Makita XJP03 Instruction Manual - Page 13
de se coincer et sera plus facile à maîtriser. 23. Utilisez l'outil électrique, ses accessoires, ses embouts, etc., en respectant les présentes instructions, en tenant compte des conditions de travail et du type de travail à effectuer. L'utilisation d'un outil électrique à des fins autres que celles - Makita XJP03Z | Makita XJP03 Instruction Manual - Page 14
des pièces de rechange identiques aux pièces d'origine. Le maintien de la sûreté de l'outil électrique sera ainsi assuré. 29. Suivez les instructions de lubrification et de changement des accessoires. 30. Maintenez les poignées de l'outil sèches, propres et exemptes d'huile ou de graisse. GEB093 - Makita XJP03Z | Makita XJP03 Instruction Manual - Page 15
IMPORTANTES POUR LA BATTERIE 1. Avant d'utiliser la batterie, lisez toutes les instructions et précautions relatives (1) au chargeur de batterie, (2) à la batterie. CONSERVEZ CE MODE D'EMPLOI. Conseils pour obtenir la durée de service maximale de la batterie 1. Rechargez la batterie avant qu'elle ne - Makita XJP03Z | Makita XJP03 Instruction Manual - Page 16
DESCRIPTION DU FONCTIONNEMENT ATTENTION: • Assurez-vous toujours que l'outil est hors tension et que sa batterie est retirée avant de l'ajuster ou de vérifier son fonctionnement. Installation ou retrait de la batterie 1 2 1. Bouton 2. Indicateur rouge 3. Batterie 3 014905 ATTENTION: • Mettez - Makita XJP03Z | Makita XJP03 Instruction Manual - Page 17
L D MAX 10 20 - - - 10 mm 12,3mm 13 mm 14,7mm 20 mm* (0,4") (0,48") (0,51") (0,58") (0,8") * Une fois les crampons en caoutchouc retirés. 012683 Guide d'angle La hauteur du guide d'angle peut être augmentée ou réduite pour régler la position de la lame en fonction de la hauteur de la pièce - Makita XJP03Z | Makita XJP03 Instruction Manual - Page 18
prudent lorsque vous verrouillez l'outil en position de marche, et maintenez une poigne solide sur l'outil. 1 1. Interrupteur à glissière NOTE: • Retirez le guide d'angle selon la tâche que vous devez effectuer lorsque vous utilisez l'outil avec l'angle de la plaque frontale ajusté sur une valeur - Makita XJP03Z | Makita XJP03 Instruction Manual - Page 19
le couvercle de lame et serrez la vis de serrage pour immobiliser le couvercle de lame. ATTENTION: • Utilisez exclusivement la clé à contre-écrou Makita fournie pour retirer ou installer la lame. • Vérifiez toujours la profondeur de la rainure avant de remplacer la lame. Ajustez son réglage au - Makita XJP03Z | Makita XJP03 Instruction Manual - Page 20
Assemblage en T (Fig. B) Fig. B 004585 Assemblage de cadre (Fig. D) Fig. D 004587 014910 014903 Assemblage à onglet (Fig. C) Fig. C 004586 014911 014912 Assemblage chant sur chant (Fig. E) Fig. E 004588 012506 Pour effectuer des assemblages, procédez comme suit : 1. Présentez les deux pièces dans - Makita XJP03Z | Makita XJP03 Instruction Manual - Page 21
la section « Réglage de la profondeur de rainure ». 5. Ajustez la hauteur du guide d'angle de sorte que la lame soit centrée sur le plan médian de l'é la lame soit orientée vers le bas. Pour assemblage en T uniquement Enlevez le guide d'angle de la machine. Placez la machine sur la pièce de façon - Makita XJP03Z | Makita XJP03 Instruction Manual - Page 22
ils ont été conçus. Si vous désirez obtenir plus de détails concernant ces accessoires, veuillez contacter le centre de service après-vente Makita le plus près. • Guide d'angle • Sac à poussières • Plaque de fixation • Clé à contre-écrou • Lames de la lamelleuse • Chargeur et batterie authentiques - Makita XJP03Z | Makita XJP03 Instruction Manual - Page 23
COMPLET, port payé, à une usine ou à un centre de service après-vente Makita. Makita réparera l'outil gratuitement (ou le remplacera, à sa discrétion) LA FOIS PENDANT ET APRÈS LA PÉRIODE COUVERTE PAR CETTE GARANTIE. MAKITA DÉCLINE TOUTE RESPONSABILITÉ QUANT À TOUTE GARANTIE TACITE, INCLUANT LES - Makita XJP03Z | Makita XJP03 Instruction Manual - Page 24
ESPAÑOL (Instrucciones originales) ESPECIFICACIONES Modelo XJP03 Tamaño del disco Disco de engalletadora (diámetro exterior x ancho x diámetro del eje) 100 mm x 4 mm x 22 mm (4" x 5/32" x 7/8") Profundidad máxima de ranurado 20 mm (3/4") Velocidad sin carga (RPM) 12 000 r/min Longitud - Makita XJP03Z | Makita XJP03 Instruction Manual - Page 25
9. Si no es posible evitar usar una herramienta eléctrica en condiciones húmedas, utilice un alimentador protegido con interruptor de circuito de falla en tierra (ICFT). El uso de un ICFT reduce el riesgo de descarga eléctrica. Seguridad personal 10. Manténgase alerta, preste atención a lo que está - Makita XJP03Z | Makita XJP03 Instruction Manual - Page 26
) sustituya la estricta observancia de las normas de seguridad para dicho producto. El MAL USO o el no seguir las normas de seguridad establecidas en este manual de instrucciones puede ocasionar graves lesiones personales. 26 - Makita XJP03Z | Makita XJP03 Instruction Manual - Page 27
USD301-1 Símbolos A continuación se muestran los símbolos utilizados para la herramienta. ・ volts o voltios ・ corriente directa o continua ・ velocidad en vacío o sin carga ・ revoluciones o alternaciones por minuto, frecuencia de rotación ENC007-8 INSTRUCCIONES IMPORTANTES DE SEGURIDAD PARA CARTUCHO - Makita XJP03Z | Makita XJP03 Instruction Manual - Page 28
DESCRIPCIÓN DEL FUNCIONAMIENTO PRECAUCIÓN: • Asegúrese siempre de que la herramienta esté apagada y el cartucho de batería extraído antes de realizar cualquier ajuste o comprobación en la herramienta. Instalación o desmontaje del cartucho de batería 1. Botón 1 2. Indicador rojo 2 3. Cartucho - Makita XJP03Z | Makita XJP03 Instruction Manual - Page 29
Luz indicadora de función múltiple 1. Luz indicadora 1 Se pueden preajustar 6 profundidades de ranurado según el tamaño de la galleta a ser utilizada. Consulte la tabla a continuación para la correspondencia entre los tamaños marcados sobre el cerco y el tamaño de la galleta. Las afinaciones en la - Makita XJP03Z | Makita XJP03 Instruction Manual - Page 30
Cerco 1. Cerco 1 2. Escala de medición de ángulo 5 3. Palanca de 4 bloqueo 4. Apretar 5. Aflojar 23 014897 El ángulo del cerco puede ajustarse entre 0° y 90° (topes positivos a los 0°, 45° y 90°). Para ajustar el ángulo, afloje la palanca de bloqueo e incline el cerco hasta que el - Makita XJP03Z | Makita XJP03 Instruction Manual - Page 31
la misma. Cierre la cubierta del disco cortador y apriete el tornillo de la abrazadera para dejarla fija. PRECAUCIÓN: • Use solamente la llave Makita para tuercas de bloqueo proporcionada para quitar o poner el disco cortador. • Siempre verifique la profundidad de la ranura antes de reemplazar el - Makita XJP03Z | Makita XJP03 Instruction Manual - Page 32
014910 Ranura de unión en forma de colilla-T (Fig. B) Fig. B 014911 Ranura de unión de marco (Fig. D) Fig. D 004585 004587 014910 014903 Ranura de unión ingleteada (Fig. C) Fig. C 014912 Ranura de unión de borde-a-borde (Fig. E) Fig. E 004588 004586 012506 32 - Makita XJP03Z | Makita XJP03 Instruction Manual - Page 33
Para hacer ranuras de unión, proceda como se indica a continuación: 1. Aproxime las piezas de la manera en como quedarían unidas con la ranura de unión. 2. Marque el centro de las ranuras hechas con la galleta que se planean hacer sobre la pieza de trabajo utilizando un lápiz. NOTA: • • El centro - Makita XJP03Z | Makita XJP03 Instruction Manual - Page 34
vuelva a colocar las tapas. PRECAUCIÓN: • Estos accesorios o aditamentos (incluidos o no) están recomendados para utilizar con su herramienta Makita especificada en este manual. El empleo de cualesquiera otros accesorios o acoplamientos conllevará un riesgo de sufrir heridas personales. Utilice los - Makita XJP03Z | Makita XJP03 Instruction Manual - Page 35
O CONSECUENCIAL DERIVADO DE LA VENTA O USO DEL PRODUCTO. ESTA RENUNCIA SERÁ APLICABLE TANTO DURANTE COMO DESPUÉS DEL TÉRMINO DE ESTA GARANTÍA. MAKITA RENUNCIA LA RESPONSABILIDAD POR CUALQUIER GARANTÍA IMPLÍCITA, INCLUYENDO GARANTÍAS IMPLÍCITAS DE "COMERCIALIDAD" E "IDONEIDAD PARA UN FIN ESPECÍFICO - Makita XJP03Z | Makita XJP03 Instruction Manual - Page 36
ventilada y póngase el equipo de seguridad indicado, tal como las máscaras contra polvo que están especialmente diseñadas para filtrar partículas microscópicas. 885356A947 Makita Corporation 3-11-8, Sumiyoshi-cho, Anjo, Aichi 446-8502 Japan www.ma36kita.com XJP03-2
-
 1
1 -
 2
2 -
 3
3 -
 4
4 -
 5
5 -
 6
6 -
 7
7 -
8
-
9
-
10
-
11
-
12
-
13
-
14
-
15
-
16
-
17
-
18
-
19
-
20
-
21
-
22
-
23
-
24
-
25
-
26
-
27
-
28
-
29
-
30
-
31
-
32
-
33
-
34
-
35
-
36
 |
 |
1
INSTRUCTION MANUAL
MANUEL D'INSTRUCTION
MANUAL DE INSTRUCCIONES
IMPORTANT:
Read Before Using.
IMPORTANT:
Lire avant usage.
IMPORTANTE:
Leer antes de usar.
Cordless Plate Joiner
Lamelleuse Sans Fil
Engalletadora Inalámbrica
XJP03
014904