Makita XRJ01Z Owners Manual - Page 6
Assembly - model
 |
View all Makita XRJ01Z manuals
Add to My Manuals
Save this manual to your list of manuals |
Page 6 highlights
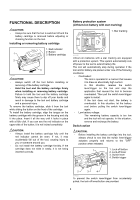
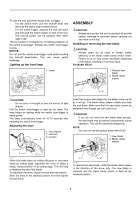
To start the tool, pull either switch lever or trigger. • For the switch lever, pull the lock-off lever and then pull the switch lever to start the tool. • For the switch trigger, depress the lock-off button and then pull the switch trigger to start to the tool. The lock-off button can be pressed from either right or left. The tool speed is increased by increasing pressure on the switch lever/trigger. Release the switch lever/trigger to stop. NOTICE: Do not pull the switch lever/trigger hard without pulling the lock-off lever/button. This can cause switch breakage. Lighting up the front lamp 1. Lamp 1 ASSEMBLY CAUTION: • Always be sure that the tool is switched off and the battery cartridge is removed before carrying out any work on the tool. Installing or removing the saw blade CAUTION: • Always clean out all chips or foreign matter adhering to the blade, blade clamp and/or slider. Failure to do so may cause insufficient tightening of the blade, resulting in a serious injury. For Model XRJ01 1. Recipro saw blade 2. Blade clamp sleeve 014053 CAUTION: • Do not look in the light or see the source of light directly. Pull the switch lever/trigger to light up the lamp. The lamp keeps on lighting while the switch lever/trigger is being pulled. The lamp automatically turns off 10-15 seconds after releasing the switch lever/trigger. Adjusting the shoe 1. Hex wrench 2. Hex bolt 3. Loosen 3 1 2 014058 Insert the recipro saw blade into the blade clamp as far as it will go. The blade clamp sleeve rotates and fixes the saw blade. Make sure that the saw blade cannot be extracted even though you try to pull it out. CAUTION: • If you do not insert the saw blade deep enough, the saw blade may be ejected unexpectedly during operation. This can be extremely dangerous. NOTE: • You can not use the jig saw blade with XRJ01 1. Saw blade 2. Blade clamp sleeve 2 1 014201 When the blade loses its cutting efficiency in one place along its cutting edge, reposition the shoe to utilize a sharp, unused portion of its cutting edge. This will help to lengthen the life of the blade. To reposition the shoe, loosen the bolt with hex wrench. Slide the shoe to the desired position and then tighten the bolt firmly. 1 2 014059 To remove the saw blade, rotate the blade clamp sleeve in the direction of the arrow fully. The saw blade is removed and the blade clamp sleeve is fixed at the released position. 6
-
 1
1 -
 2
2 -
 3
3 -
 4
4 -
 5
5 -
 6
6 -
 7
7 -
 8
8 -
 9
9 -
 10
10 -
 11
11 -
 12
12 -
13
-
14
-
15
-
16
-
17
-
18
-
19
-
20
-
21
-
22
-
23
-
24
-
25
-
26
-
27
-
28
 |
 |
