Makita XRM02W Instruction Manual - Page 8
Using Supplied AC power adaptor
 |
View all Makita XRM02W manuals
Add to My Manuals
Save this manual to your list of manuals |
Page 8 highlights
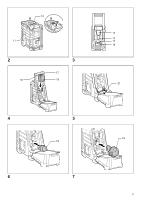
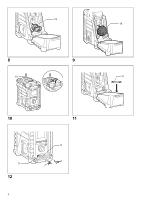
Note: The battery pack can't be charged via the supplied AC power adaptor. 6. When low battery sign appears and an "E" keeps on flashing is the time to replace the back up batteries. Installing the Soft bended rod antenna (Fig. 10 & 11) Install the Soft bended rod antenna as shown in the figure. Note: There is a click in the battery compartment designed to store the removed antenna. Using Supplied AC power adaptor (Fig. 12) Remove the rubber protector and insert the adaptor plug into the DC socket on the front side of the radio. Plug the adaptor into a standard mains socket outlet. Whenever the adaptor is used, the battery pack is automatically disconnected. The AC adaptor should be disconnected from the main supply when not in use. Note: When your radio has any interference in AM band by its adaptor, please move your radio away from its AC adaptor over 30 cm. Setting the clock 1. Clock can be set either when the radio is power on or off. 2. Display will show "-: - -" when the back up batteries are installed. 3. Long press the time set button for more than 2 seconds, display will flash time set symbol and also the hour digit, followed by a beep. 4. Rotate Tuning/Volume control knob to set the required hour. 5. Press button to confirm hour setting, the minute digit will flash. 6. Rotate Tuning/Volume control knob to set the required minute. 7. Press the button again to complete clock setting. Operating the radio This radio equips with three tuning methods - Scan tuning, Manual tuning and Memory presets recall. Scan Tuning 1. Press the Power button to turn on the radio. 2. Select the required waveband by pressing the Band button. Make sure the rubber bended rod antenna has been well placed for best FM reception. For AM (MW) band, rotate the radio to get best signal. Try to avoid to operate the radio next to computer screen and other equipment which will cause interference to the radio. 8 3. Press and release Scan button (long press Scan button more than 2 seconds will activate time setting), LCD display will flash Scan symbol and the radio will search and stop automatically when it finds a radio station. Press the Scan button again to pick up the found station. Note: A stereo symbol will appear on the display, if the station found is a stereo station. Note: The radio will continue to search next available stations if you do not press Scan button again when it finds a radio station. 4. Rotate the Tuning/Volume control knob to get required sound level. LCD display will show sound level changes. Note: During operating volume control, you can press in Tuning/Volume control knob to change volume control to tuning control status. 5. To turn off the radio, press the Power button. Display will show OFF. Manual Tuning 1. Press the Power button to turn on the radio. 2. Select the required waveband by pressing the Band button. Adjust the antenna as described above. 3. A single rotary to the Tuning/Volume control knob will change the frequency in the following increment: FM: 50 or 100 kHz AM (MW): 9 or 10 kHz Note: If the radio is in volume control status, press in the tuning/volume control to become Tuning status. 4. Keep on rotating the Tuning/Volume control knob until the required frequency shown on the display. 5. Rotate the Tuning/Volume control knob to get required sound level. 6. To turn off the radio, press the Power button. Display will show OFF. Storing stations in preset memories There are 5 memory presets for each waveband. 1. Press the Power button to turn on the radio. 2. Tune to required station using one of the methods previously described. 3. Press and hold down the required preset until radio beeps. The preset number will appear in the display and the station will be stored under chosen preset button. 4. Repeat this procedure for the remaining presets. 5. Stations stored in preset memories can be overwritten by following above procedures.
-
 1
1 -
2
-
 3
3 -
 4
4 -
 5
5 -
 6
6 -
 7
7 -
 8
8 -
 9
9 -
 10
10 -
 11
11 -
 12
12 -
 13
13 -
14
-
15
-
16
-
17
-
18
-
19
-
20
-
21
-
22
-
23
-
24
 |
 |
