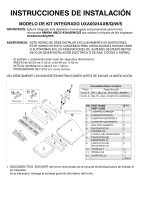
Maytag AMC5143AAS Installation Instructions - Page 3
b. Duct Upper & Back A, B Installation
 |
UPC - 719881136790
View all Maytag AMC5143AAS manuals
Add to My Manuals
Save this manual to your list of manuals |
Page 3 highlights
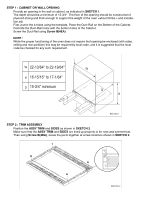
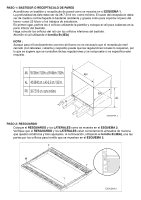
STEP 3 : DUCT INSTALLATION a. Duct Bottom Installation First, place the oven upside-down. Attach the DUCT BOTTOM to the oven base using Screw B(4EA) as shown in SKETCH 3. Carefully return the oven to it's original position. SKETCH 3 b. Duct Upper & Back A, B Installation 1. First, screw the Duct Upper & Duct Back-A using Screw B(1EA) and remove the Double-side tape of the Duct Upper. Remove the Double-Side tape of the Cushion. Stick it to the Duct Upper & Duct Back-A along the Duct Upper & Duct Back-A. Refer to the SKETCH 4. SKETCH 4 2. Place the Assembled parts(Duct Upper & Duct Back A) on the Microwave Oven in SKETCH 5. Screw the Assembled parts(Duct Upper & Duct Back A) using Screw B(2EA). Refer to the SKETCH 5. SKETCH 5
-
 1
1 -
 2
2 -
 3
3 -
 4
4 -
 5
5 -
 6
6 -
 7
7 -
 8
8
 |
 |

STEP 3 : DUCT INSTALLATION
a. Duct Bottom Installation
First, place the oven upside-down.
Attach the
DUCT BOTTOM
to the oven base using
Screw B(4EA)
as shown in
SKETCH 3
.
Carefully return the oven to it's original position.
b. Duct Upper & Back A, B Installation
1. First, screw the Duct Upper & Duct Back-A
using
Screw B(1EA)
and remove the
Double-side tape of the Duct Upper. Remove the Double-Side tape of the Cushion.
Stick it to the Duct Upper & Duct Back-A along the Duct Upper & Duct Back-A.
Refer to the
SKETCH 4.
2. Place the Assembled parts(Duct Upper & Duct Back A) on the Microwave Oven in
SKETCH 5.
Screw the Assembled parts(Duct Upper & Duct Back A) using
Screw B(2EA)
.
Refer to the
SKETCH 5.
SKETCH 3
SKETCH 4
SKETCH 5