Maytag MDB6769AWB Owners Manual - Page 8
Connecting the faucet adapter to faucets with, external threads, internal threads, Connecting - washer
 |
UPC - 883049181363
View all Maytag MDB6769AWB manuals
Add to My Manuals
Save this manual to your list of manuals |
Page 8 highlights
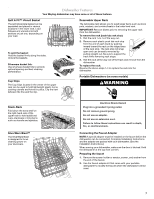
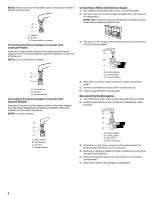
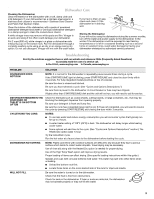
NOTE: Remove and save the washer, screen, and screen holder or aerator for future use. A B C A. Washer B. Screen C. Screen holder or aerator Connecting the faucet adapter to faucets with external threads Insert the 2 screens and then the thin washer from the faucet adapter kit into the faucet adapter. Attach the adapter onto the end of the faucet. NOTE: Do not use the thick washer. Connecting to Water and Electrical Supply 1. Run water at the faucet until it is hot. Turn off the water. 2. Pull the hoses out of their storage compartment on the back of the dishwasher. NOTE: Make sure the hoses are not kinked or twisted. Kinked hoses reduce washing performance. 3. Pull down on the locking collar while lifting the hose connector onto the faucet adapter. A B C A B C A. Thin washer B. Screens C. Faucet adapter Connecting the faucet adapter to faucets with internal threads Insert the 2 screens, the thin washer, and then the thick washer from the faucet adapter kit into the faucet adapter. Attach the adapter onto the end of the faucet. NOTE: Use both washers. A B C D A. Thick washer B. Thin washer C. Screens D. Faucet adapter A. Faucet adapter B. Locking collar C. Hose connector 4. When the connector snaps into place, release the locking collar. 5. Turn the hot water on slowly until it is all the way on. 6. Plug into a grounded 3 prong outlet. Disconnecting the Dishwasher 1. Turn off the hot water. (This can be done after the last rinse.) 2. Press the red button on the connector to release the water pressure. A B C D A. Faucet adapter B. Locking collar C. Red button D. Hose connector 3. Lift slightly on the hose connector while pulling down the locking collar. Pull down on the connector. 4. Empty any remaining water from the connector by turning the connector upside down. 5. Unplug the power supply cord and return it to the storage compartment. 6. Return the hoses to the storage compartment. 8
-
 1
1 -
2
-
 3
3 -
 4
4 -
 5
5 -
 6
6 -
 7
7 -
 8
8 -
 9
9 -
 10
10 -
 11
11 -
 12
12 -
 13
13 -
14
-
15
-
16
-
17
-
18
-
19
-
20
-
21
-
22
-
23
-
24
 |
 |
