Maytag MEDE300VF Use and Care Guide
Maytag MEDE300VF - Performance Series Front Load Electric Dryer Manual
 |
UPC - 883049135649
View all Maytag MEDE300VF manuals
Add to My Manuals
Save this manual to your list of manuals |
Maytag MEDE300VF manual content summary:
- Maytag MEDE300VF | Use and Care Guide - Page 1
ELECTRIC DRYER USE & CARE GUIDE SÉCHEUSE ÉLECTRIQUE GUIDE D'UTILISATION ET D'ENTRETIEN FOR QUESTIONS ABOUT FEATURES, OPERATION/PERFORMANCE, PARTS, ACCESSORIES OR SERVICE CALL: 1.800.688.9900 IN CANADA, CALL: 1.800.807.6777 VISIT OUR WEBSITE AT WWW.MAYTAG.COM IN CANADA, WWW.MAYTAG.CA W10057349A SI - Maytag MEDE300VF | Use and Care Guide - Page 2
26 Drying Rack Option 26 DRYER CARE 27 Cleaning the Dryer Location 27 Cleaning the Lint Screen 27 Cleaning the Dryer Interior 28 Removing Accumulated Lint 28 Vacation and Moving Care 28 Changing the Drum Light 28 TROUBLESHOOTING 29 Dryer Operation 29 Dryer Results 30 ASSISTANCE OR SERVICE - Maytag MEDE300VF | Use and Care Guide - Page 3
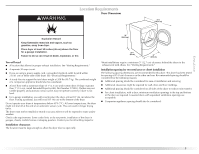
Do not install or store the dryer where it will be exposed to the weather. ■ Do not tamper with controls. ■ Do not repair or replace any part of the dryer or attempt any servicing unless specifically recommended in this Use and Care Guide or in published user-repair instructions that you understand - Maytag MEDE300VF | Use and Care Guide - Page 4
you will need to purchase a Stack Kit. To order, call the dealer from whom you purchased your dryer or refer to the "Assistance or Service" section. Ask for Part Number 8212640. Door Reversal Kit Are you planing to reverse the door swing direction on your PERFORMANCE SERIES dryer? To do so, you will - Maytag MEDE300VF | Use and Care Guide - Page 5
floor to support the total dryer weight of 200 lbs (90.7 kg). The combined weight of a companion appliance should also be considered. „ A level floor with a maximum slope of 1" (2.5 cm) under entire dryer. If slope is greater than 1" (2.5 cm), install Extended Dryer Feet Kit, Part Number 279810 - Maytag MEDE300VF | Use and Care Guide - Page 6
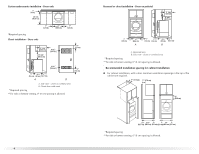
) (80 cm) (12.7 cm) A B A. Side view - closet or confined area B. Closet door with vents *Required spacing **For side or bottom venting, 0" (0 cm) spacing is allowed. 3"* (7.6 cm) Recessed or closet installation - Dryer on pedestal 14" max.* (35.6 cm) 18" min.* (45.72 cm) 1" (2.5 cm) 27" (68 - Maytag MEDE300VF | Use and Care Guide - Page 7
and follow the instructions provided for it here. „ This dryer is manufactured ready to install with a 3-wire electrical supply connection. The neutral ground conductor is permanently connected to the neutral conductor (white wire) within the dryer. If the dryer is installed with a 4-wire electrical - Maytag MEDE300VF | Use and Care Guide - Page 8
identified by a white cover. If your service representative or personnel if you are in doubt as to whether the dryer is properly grounded. Do not modify the plug on the power supply cord: if it will not fit the outlet, have a proper outlet installed by a qualified electrician. SAVE THESE INSTRUCTIONS - Maytag MEDE300VF | Use and Care Guide - Page 9
electrician or service representative or personnel if you are in doubt as to whether the dryer is properly grounded. Do not modify the plug provided with the dryer: if it will not fit the outlet, have a proper outlet installed by a qualified electrician. SAVE THESE INSTRUCTIONS 4-wire receptacle - Maytag MEDE300VF | Use and Care Guide - Page 10
strain relief. Disconnect power before making electrical connections. Connect neutral wire (white or center wire) to center terminal (silver). Ground wire (green block screw B D. Terminal block cover and holddown screw A 3. Install strain relief. Style 1: Power supply cord strain relief „ Remove - Maytag MEDE300VF | Use and Care Guide - Page 11
following instructions for your type of electrical connection: 4-wire (recommended) 3-wire (if 4-wire is not available) Electrical Connection Options If your home has: 4-wire receptacle (NEMA Type 14-30R) And you will be connecting to: A UL listed, 120/240volt minimum, 30-amp, dryer power - Maytag MEDE300VF | Use and Care Guide - Page 12
neutral ground wire and the neutral wire (white or center wire) of power supply cord Insert tab of terminal block cover into slot of dryer rear panel. Secure cover with hold- down screw. wire IMPORTANT: A 4-wire connection is required for mobile homes and where local codes do not permit the use - Maytag MEDE300VF | Use and Care Guide - Page 13
D. Center silver-colored terminal block screw E. Neutral ground wire F. Neutral wire (white or center wire) 4. Place the hooked ends of the other direct wire cable relief screw. 6. Insert tab of terminal block cover into slot of dryer rear panel. Secure cover with hold- E down screw. 7. You - Maytag MEDE300VF | Use and Care Guide - Page 14
neutral wire. Direct wire cable must have 5 ft (1.52 m) of extra length so dryer can be moved if needed. Strip 31/2" (8.9 cm) of outer covering from end ground wire C. Center silver-colored terminal block screw D. Neutral wire (white or center wire) E. ¾" (1.9 cm) UL listed strain relief 1. - Maytag MEDE300VF | Use and Care Guide - Page 15
external ground conductor screw. Connect neutral ground wire and the neutral wire (white or center wire) of power supply cord/cable under center, silver-colored relief screw. 5. Insert tab of terminal block cover into slot of dryer rear panel. Secure cover with holddown screw. 6. You have completed - Maytag MEDE300VF | Use and Care Guide - Page 16
or flexible heavy metal vent. „ Review vent system chart. Modify existing vent system if necessary to achieve the best drying performance. 4" 10.2 cm 4" (10.2 cm) heavy metal exhaust vent Vent products can be purchased from your dealer or by calling Maytag Services. For more information, see the - Maytag MEDE300VF | Use and Care Guide - Page 17
exhaust installation insects from entering the home. „ Exhaust hood installations Typical installations vent the dryer from the rear of the dryer. Other installations are possible. B C D A E F G H A. Dryer installations This dryer dryer converted Improper venting can cause moisture and lint - Maytag MEDE300VF | Use and Care Guide - Page 18
offset elbow) B. Periscope installation NOTE: The following kits for close clearance alternate installations are available for purchase. Please see the "Assistance or Service" section to order. „ Over-the-Top Installation: Part Number 4396028 „ Periscope Installation (For use with dryer vent to wall - Maytag MEDE300VF | Use and Care Guide - Page 19
duct tape, screws or other fastening devices that extend into the interior of the vent to secure vent. Install Leveling Legs WARNING Excessive Weight Hazard Use two or more people to move and install dryer. Failure to do so can result in back or other injury. 1. To protect the floor, use a large - Maytag MEDE300VF | Use and Care Guide - Page 20
has not tripped. „ Dryer door is closed. This dryer automatically runs an installation diagnostic routine at the start of its first cycle. „ If you receive an L2 code, there may be a problem with your home power supply keeping the dryer's heater from turning on. See "Troubleshooting". „ If you - Maytag MEDE300VF | Use and Care Guide - Page 21
and features described. The following is a guide to starting your dryer. Please refer to specific sections of this manual for more detailed information. 1. Clean lint screen before each load. See "Cleaning the Lint Screen." 2. Place laundry in dryer and shut door. 3. Press the POWER/CANCEL button - Maytag MEDE300VF | Use and Care Guide - Page 22
NOTE: Most loads may be dried using Normal. Normal is the energy preferred dryness level and will use the least energy. TIME ADJUST, and the time and choosing More Dry, Normal, or Less Dry. Selecting More Dry, Normal, or Less Dry automatically adjusts the dryness level at which the dryer will shut - Maytag MEDE300VF | Use and Care Guide - Page 23
door. Pausing or Restarting To pause the dryer at any time Open the door or press START/PAUSE once. To restart the dryer Close the door and press and hold START/PAUSE button until dryer starts. NOTE: Drying " section) for a guide to drying various loads. „ Drying temperature and Sensor Cycles Dryness - Maytag MEDE300VF | Use and Care Guide - Page 24
dryer with the drying Status indicator lights. Cycles Select the drying cycle that matches the type of load you are drying. See Sensor Preset or Manual the cool down part of the cycle. Laundry is cooling down for ease in handling. Dry The Dry light illuminates when the drying cycle is finished. - Maytag MEDE300VF | Use and Care Guide - Page 25
dried using Timed Dry on a Low temperature setting. Quick Dry Use this cycle for drying small loads or loads that need a short drying time. Manual „ Stop at any time by pressing the WRINKLE PREVENT feature or opening the dryer door. „ For the Casual Cycle, the WRINKLE PREVENT feature is preset to " - Maytag MEDE300VF | Use and Care Guide - Page 26
on ordering, please refer to the front page of the manual or contact the dealer from whom you purchased your dryer. To use the drying rack Do not remove the lint screen. 1. Open dryer door. A A. Front edge 2. Place drying rack inside dryer drum, positioning the back wire on the ledge of the - Maytag MEDE300VF | Use and Care Guide - Page 27
drying rack. DRYER CARE Cleaning the Dryer Location Keep dryer area clear and free from items that would obstruct the flow of combustion and ventilation air. WARNING Cleaning the Lint Screen Every load cleaning The lint screen is located in the door opening of the dryer. A screen blocked by lint - Maytag MEDE300VF | Use and Care Guide - Page 28
the Lint Screen." Moving care For power supply cord-connected dryers: 1. Unplug the power supply cord. 2. Make sure leveling legs are secure in dryer base. 3. Use masking tape to secure dryer door. For direct-wired dryers: WARNING Electrical Shock Hazard Disconnect power before servicing. Replace - Maytag MEDE300VF | Use and Care Guide - Page 29
persists, consult a qualified electrician. „ "AF" (low airflow condition): The dryer will continue to run when this diagnostic code is present. Press any key to clear the code from the display and return to the estimated time remaining. Try the following: Clean lint screen. Check to see if the vent - Maytag MEDE300VF | Use and Care Guide - Page 30
not drying satisfactorily, drying times are too long, or load is too hot „ Is the lint screen clogged with lint? Lint screen should be cleaned before each load. WARNING Fire Hazard Use a heavy metal vent. Do not use a plastic vent. Do not use a metal foil vent. Failure to follow these instructions - Maytag MEDE300VF | Use and Care Guide - Page 31
. „ Installation information. „ Use and maintenance procedures. „ Accessory and repair parts sales. „ Specialized customer assistance (Spanish speaking, hearing impaired, limited vision, etc.). „ Referrals to local dealers, repair parts distributors and service companies. Maytag® appliances - Maytag MEDE300VF | Use and Care Guide - Page 32
by an authorized Maytag servicer is not available. 10. The removal and reinstallation of your major appliance if it is installed in an inaccessible location or is not installed in accordance with published installation instructions. 11. Major appliances with original model/serial numbers that - Maytag MEDE300VF | Use and Care Guide - Page 33
: DANGER Risque possible de décès ou de blessure grave si vous ne suivez pas immédiatement les instructions. AVERTISSEMENT Risque possible de décès ou de blessure grave si vous ne suivez pas les instructions. Tous les messages de sécurité vous diront quel est le danger potentiel et vous disent - Maytag MEDE300VF | Use and Care Guide - Page 34
d'une recommandation spécifique dans le guide d'utilisation et d'entretien, ou publiée dans les instructions de réparation par l'utilisateur que vous instructions d'installation pour les exigences de liaison de l'appareil à la terre. CONSERVEZ CES INSTRUCTIONS INSTRUCTIONS D'INSTALLATION - Maytag MEDE300VF | Use and Care Guide - Page 35
service". Demander la pièce numéro W10200372. Dosseret Si l'on installe la laveuse et la sécheuse PERFORMANCE installation dans un garage. Le non-respect de ces instructions peut causer un décès, une explosion ou un incendie. Il vous faudra „ Un emplacement permettant une installation de supporter le - Maytag MEDE300VF | Use and Care Guide - Page 36
L'emplacement doit être assez grand pour permettre d'ouvrir complètement la porte de la sécheuse. Dimensions de la sécheuse 51½" (130,81 cm) 38" (96,52 cm) *31½" (80 cm) 27" (68,6 cm) *La plupart des installations requièrent un espace minimum de 5" (12,7 cm) derrière la sécheuse pour le conduit - Maytag MEDE300VF | Use and Care Guide - Page 37
Espacement recommandé pour une installation dans un encastrement ou dans un placard, avec une laveuse et une sécheuse superposées Les dimensions indiquées sont pour 4 alvéoles reliée à la terre. Le non-respect de cette instruction peut causer un décès ou un choc électrique. C'est à l'utilisateur - Maytag MEDE300VF | Use and Care Guide - Page 38
d'information, veuillez consulter les numéros de service qui se trouvent à la section "Assistance ou service". INSTRUCTIONS DE LIAISON À LA TERRE ■ Pour une à un électricien qualifié d'installer une prise de courant appropriée. CONSERVEZ CES INSTRUCTIONS Risque d'incendie Utiliser un conduit - Maytag MEDE300VF | Use and Care Guide - Page 39
du marchand ou en téléphonant à Maytag Services. Pour plus de renseignements, voir la section "Assistance ou service". Conduit métallique rigide „ Pour un de réduire la capacité d'évacuation et le rendement. „ Ne pas installer le conduit métallique flexible dans les cavités fermées des murs, plafonds - Maytag MEDE300VF | Use and Care Guide - Page 40
instructions du fabricant. A B A. Installation au-dessus de la sécheuse (aussi disponible avec un coude décalé) B. Installation de périscope REMARQUE : On peut acheter les trousses suivantes pour les installations où le dégagement est réduit. Veuillez consulter la section "Assistance ou service - Maytag MEDE300VF | Use and Care Guide - Page 41
. Le tableau des systèmes d'évacuation fournit les exigences d'évacuation qui vous aideront à atteindre la meilleure performance de séchage. Tableau des systèmes d'évacuation REMARQUE : Les installations d'évacuation du conduit par le côté ou par le bas comportent un changement de direction à 90 - Maytag MEDE300VF | Use and Care Guide - Page 42
des pieds de nivellement AVERTISSEMENT Risque du poids excessif Utiliser deux ou plus de personnes pour déplacer et installer la sécheuse. Le non-respect de cette instruction peut causer une blessure au dos ou d'autre blessure. 1. Pour protéger le plancher, utiliser une grande pièce de carton - Maytag MEDE300VF | Use and Care Guide - Page 43
, caoutchouc ou plastique doivent être séchés sur une corde à linge ou par le programme de séchage à l'air. Le non-respect de ces instructions peut causer un décès ou un incendie. 3. Appuyer sur le bouton POWER/CANCEL (mise sous tension/annulation) puis faire tourner le cadran pour sélectionner un - Maytag MEDE300VF | Use and Care Guide - Page 44
fonction de la charge, en appuyant sur SENSOR CYCLES DRYNESS et en choisissant More Dry (plus sec), Normal (normal) ou Less Dry (moins sec). La sélection de More Dry (plus sec), Normal (normal) ou Less Dry (moins sec) ajuste automatiquement le degré de séchage qui commandera l'arrêt de la sécheuse - Maytag MEDE300VF | Use and Care Guide - Page 45
l'utilisateur de sélectionner un autre programme. Air Dry (séchage à air) Utiliser le réglage Air Dry (séchage à air) pour les articles qui doivent d'assouplissant de tissus, si désiré. Suivre les instructions sur l'emballage. „ Retirer la charge de la guide de séchage de charges diverses. 45 - Maytag MEDE300VF | Use and Care Guide - Page 46
de séchage du programme de détection) et en choisissant More Dry (plus sec), Normal (normal) ou Less Dry (moins sec). „ Pour ajuster la durée d'un programme règle automatiquement la durée pour un séchage optimal. Heavy Duty (service intense) Utiliser ce programme pour le séchage à température élevée - Maytag MEDE300VF | Use and Care Guide - Page 47
détection Type de charge Temp. Durée* (Minutes) HEAVY DUTY (service intense) Articles lourds, serviettes, jeans Élevée 40 NORMAL Velours ADJUST (réglage de la durée) vers le haut ou vers le bas. Timed Dry (séchage minuté) Utiliser ce programme pour achever le séchage si des articles sont encore - Maytag MEDE300VF | Use and Care Guide - Page 48
tous les programmes de détection. Les réglages de degré de séchage des programmes de détection peuvent être modifiés pour s'adapter à différentes installations, conditions environnementales ou selon vos préférences personnelles. Il existe 3 réglages de séchage : 1 (degré de séchage préréglé en usine - Maytag MEDE300VF | Use and Care Guide - Page 49
au moyen du réglage de température Air Only (Air seulement). 6. Il faut sélectionner une durée de séchage en appuyant sur les boutons (- ou +) MANUAL DRY TIME (durée de séchage manuel). Régler de nouveau la durée au besoin pour compléter le séchage. Se référer au tableau suivant. 7. Appuyer environ - Maytag MEDE300VF | Use and Care Guide - Page 50
l'essence, loin de la sécheuse. Placer la sécheuse au moins 46 cm (18 po) au-dessus du plancher pour une installation dans un garage. Le non-respect de ces instructions peut causer un décès, une explosion ou un incendie. Nettoyage du filtre à charpie Nettoyage à chaque charge Le filtre à charpie se - Maytag MEDE300VF | Use and Care Guide - Page 51
fixer la porte de la sécheuse. 3. Tourner l'ampoule dans le sens antihoraire. Remplacer l'ampoule seulement par une ampoule de 10 watts pour appareil électroménager. Réinstaller le couvercle et le fixer avec la vis. 4. Brancher la sécheuse ou reconnecter la source de courant électrique. 51 - Maytag MEDE300VF | Use and Care Guide - Page 52
), ce qui vous évitera peut-être le coût d'une visite de service...www.whirlpool.ca Fonctionnement de la sécheuse La sécheuse ne fonctionne pas La sécheuse peut vibrer si elle n'est pas correctement installée. Voir les Instructions d'installation. „ Les vêtements sont-ils emmêlés ou en boule - Maytag MEDE300VF | Use and Care Guide - Page 53
trop long ou ne comporte pas trop de changements de direction. Un long conduit augmentera les durées de séchage. Voir les Instructions d'installation. „ Le diamètre du conduit d'évacuation a-t-il la taille correcte? Utiliser un composant de 4" (10,2 cm) de diamètre. AVERTISSEMENT Risque d'explosion - Maytag MEDE300VF | Use and Care Guide - Page 54
une visite de service. Si vous avez encore besoin d'aide, suivez les instructions ci-dessous. Maytage Services, LLC au : 1-800-688-9900. Nos consultants fournissent de l'assistance pour : „ Caractéristiques et spécifications de notre gamme complète d'appareils ménagers „ Renseignements d'installation - Maytag MEDE300VF | Use and Care Guide - Page 55
dans une région éloignée où un service d'entretien Maytag autorisé n'est pas disponible. 10. La dépose et la réinstallation de votre gros appareil si celui-ci est installé dans un endroit inaccessible ou n'est pas installé conformément aux instructions d'installation fournies. 11. Les gros appareils - Maytag MEDE300VF | Use and Care Guide - Page 56
© 2008 All rights reserved. Tous droits réservés. ®Registered trademark/™ Trademark of Maytag Corporation or its related companies. Used under license by Maytag Limited in Canada ®Marque déposée/™Marque de commerce of Maytag Corporation ou de ses compagnies affiliées. Emploi sous licence par
-
 1
1 -
 2
2 -
 3
3 -
 4
4 -
 5
5 -
 6
6 -
 7
7 -
8
-
9
-
10
-
11
-
12
-
13
-
14
-
15
-
16
-
17
-
18
-
19
-
20
-
21
-
22
-
23
-
24
-
25
-
26
-
27
-
28
-
29
-
30
-
31
-
32
-
33
-
34
-
35
-
36
-
37
-
38
-
39
-
40
-
41
-
42
-
43
-
44
-
45
-
46
-
47
-
48
-
49
-
50
-
51
-
52
-
53
-
54
-
55
-
56
 |
 |

ELECTRIC DRYER
USE & CARE GUIDE
SÉCHEUSE ÉLECTRIQUE
GUIDE D’UTILISATION ET D’ENTRETIEN
FOR QUESTIONS ABOUT FEATURES, OPERATION/PERFORMANCE,
PARTS, ACCESSORIES OR SERVICE CALL: 1.800.688.9900
IN CANADA, CALL: 1.800.807.6777
SI TIENE PREGUNTAS RESPECTO A LAS CARACTERÍSTICAS,
FUNCIONAMIENTO, RENDIMIENTO, PARTES, ACCESORIOS O
SERVICIO TÉCNICO, LLAME AL: 1.800.688.9900
EN CANADÁ, LLAME AL: 1.800.807.6777
AU CANADA, POUR ASSISTANCE, INSTALLATION OU SERVICE,
COMPOSEZ LE : 1.800.807.6777
VISIT OUR WEBSITE AT WWW.MAYTAG.COM
IN CANADA, WWW.MAYTAG.CA
VISITE NUESTRO SITIO WEB EN
WWW.MAYTAG.COM
EN CANADÁ, WWW.MAYTAG.CA
OU VISITEZ NOTRE SITE INTERNET À
WWW.MAYTAG.CA
W10057349A