Maytag MEDE300VW User Guide
Maytag MEDE300VW - Performance Series 27 Inch Electric Dryer Manual
 |
UPC - 883049135632
View all Maytag MEDE300VW manuals
Add to My Manuals
Save this manual to your list of manuals |
Maytag MEDE300VW manual content summary:
- Maytag MEDE300VW | User Guide - Page 1
orrnance [] ELECTRIC DRYER USE & CARE GUIDE p p SECHEUSE ELECTRIQUE GUIDE D'UTILISATION ET D'ENTRETIEN FOR QUESTIONS ABOUI FEATURES, OPER,a(IION/PERFORMANCE, PARTS, ACCESSORIES OR SERVICE CAI.I.: 1.800.688.9900 IN CANADA, CAll: 1.800.807.6777 VISIT OUR WEBSITE AT WWW.MAYTAG.COM IN CANADA, WWW. - Maytag MEDE300VW | User Guide - Page 2
26 Drying Rack Option 26 DRYER CARE 27 Cleaning the Dryer I.ocation 27 Cleaning the Lint Screen 27 Cleaning the Dryer Interior 28 Removing Accumulated Lint 28 Vacation and Moving Care 28 Changing the Drum Light 28 TROUBLESHOOTING 29 Dryer Operation 29 Dryer - Maytag MEDE300VW | User Guide - Page 3
door to the drying compartment. [] Do not reach into the dryer if the drum is moving. [] Do not install or store the dryer where it will be exposed to the weather. [] Do not repair or replace any part of the dryer or attempt any servicing unless specifically recommended in this Use and Care Guide - Maytag MEDE300VW | User Guide - Page 4
or Service" section. Pedestal Height Color Part Number 10" (25.4 cm) White MH P1000SQ 15.5" (39.4 cm) 15.5" (39.4 cm) White Crimson XHP1550VW XHP1550VF 15.5" (39.4 cm) 15.5" (39.4 cm) Evergreen Oxide XH P1550VP XHP1550VJ Stack Kit Are you planning to stack your washer and dryer? To - Maytag MEDE300VW | User Guide - Page 5
install Extended [)ryer Feet Kit, Part Number 279810. Clothes may not tumble properly and automatic sensor cycles may not operate correctly if dryer is not level. • For a garage installation, you will need to place the dryer at least 18" (46 cm) above the floor. If using a pedestal, you will need 18 - Maytag MEDE300VW | User Guide - Page 6
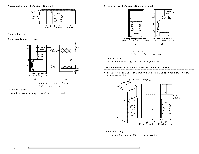
) (80cm) (12.7cm) A A. Side view - closet or confined area B. Closet door with vents * Required spacing **For side or bottom venting, 0" (0 cm) spacing is allowed. (7.6 cm) + Recessed or closet installation - Dryer on pedestal I oloo (2.5 crn) 27" >I (68.6crn) B A. Recessed area B. Side view - Maytag MEDE300VW | User Guide - Page 7
recessed or closet installation, with stacked washer and dryer The dimensions shown are for the recommended spacing Electrical Code, ANSI/NFPA 70-latest edition and all local codes and ordinances. The National Electric Code requires a 4-wire power supply connection for homes built after 1996, dryer - Maytag MEDE300VW | User Guide - Page 8
kit marked for use with clothes dryers. The kit be identified by a white cover. If your outlet codes and ordinances. [] For a permanently connected dryer: This dryer electric shock. Check with a qualified electrician or service representative or personnel if you are in doubt as to whether the dryer - Maytag MEDE300VW | User Guide - Page 9
it is recommended that you use Power Supply Cord Replacement Part Number 983131 7. For further information, please reference the service numbers located in the "Assistance or Service" section. GROUNDING INSTRUCTIONS m For a grounded, cord-connected dryer: This dryer must be grounded, in the event of - Maytag MEDE300VW | User Guide - Page 10
Wire Fire Hazard Use a new UL listed 30 amp power supply cord. Use a UL listed strain relief. Disconnect power before making electrical connections. Connect neutral wire (white or center wire) to center terminal (silver). Ground wire (green or bare wire) must be connected to green ground connector - Maytag MEDE300VW | User Guide - Page 11
electrical connection: If your home has: 4-wire receptacle (NEMA Type 14-30R) And you will be connecting to: A UI_ listed, 120/240volt minimum, 30-amp, dryer or 3-wire connection: circuit breaker box* Direct Wire *If local codes do not permit the connection of a cabinet-ground wire, go to - Maytag MEDE300VW | User Guide - Page 12
wire I] Neutral wire (white or center wire) 4. dryer rear panel. Secure cover with hold- down screw. 7. You have completed your electrical connection. Now go to "Venting Requirements." 4-wire connection: Direct wire IMPORTANT: A 4-wire connection is required for mobile homes and where local codes - Maytag MEDE300VW | User Guide - Page 13
Neutral wire (white or center wire) E. 3/4" ( 1.9 cm) UL listed strain relief 5. Tighten strain relief screw. 6. Insert tab of terminal block cover into slot of dryer rear panel. Secure cover with hold- down screw. 7. You have completed your electrical connection. Now go to "Venting Requirements." - Maytag MEDE300VW | User Guide - Page 14
dryer rear panel. Secure cover with hold- down screw. 6. You have completed your electrical connection. Now go to "Venting Requirements." 3-wire connection: Direct wire Use where local codes C. Center silver-cokJred terminal block screw D. Neutra/ wire (white or center wire) E. V4" ( 1.9 cm) UL - Maytag MEDE300VW | User Guide - Page 15
cover into slot of dryer rear panel. Secure cover with hold- down screw. 6. You have completed your electrical connection. Now go to "Venting Requirements." A. External ground conductor screw B. Center silver-colored terminal block screw C. Neutral ground wire D. Neutral wire (white or center wire - Maytag MEDE300VW | User Guide - Page 16
not plugged with lint. Replace any plastic or metal foil vent with rigid or flexible heavy metal vent. Review vent system chart. Modify existing vent system if necessary to achieve the best drying performance. If this is a new vent system Vent material • Use a heavy metal vent. I)o not use plastic - Maytag MEDE300VW | User Guide - Page 17
local dealer to have the dryer converted ;7ii!i!ii ;ZI Fire Hazard Cover unused exhaust holes with one of the following kits: 279818 (white) W10186596 (midnight grey) Contact your local dealer. Failure to fellow these instructions can result in death, fire, electrical shock, or serious injury. - Maytag MEDE300VW | User Guide - Page 18
NOTE: The following kits for close clearance alternate installations are available for purchase. Please see the "Assistance or Service" section to order. • Over-the-Top Installation: Part Number 4396028 • Periscope Installation (For use with dryer vent to wall vent mismatch): Part Number 4396037 - Maytag MEDE300VW | User Guide - Page 19
joints. Do not use duct tape, screws or other fastening devices that extend into the interior of the vent to secure vent. Excessive Weight Hazard Use two or more people to move and install dryer. Failure to do so can result in back or other injury. 1. To protect the floor, use a large flat - Maytag MEDE300VW | User Guide - Page 20
. • Dryer door is closed. This dryer automatically runs an installation diagnostic routine at the start of its first cycle. • If you receive an 1_2code, there may be a problem with your home power supply keeping the dryer's heater from turning on. See "Troubleshooting". • If you receive an AF code - Maytag MEDE300VW | User Guide - Page 21
and features described. The following is a guide to starting your dryer. Please refer to specific sections of this manual for more detailed information. 1. Clean lint screen before each load. See "Cleaning the I.int Screen." 2. Place laundry in dryer and shut door. 3. Press the POWER/CANCEl. button - Maytag MEDE300VW | User Guide - Page 22
be changed. How Sensor Cycles Work This feature improves drying with Auto Moisture Sensing Plus, which advances the cycle as moisture is extracted from clothing. A thermistor (electronic temperature sensor) and moisture sensing strips in the dryer drum help measure the amount of moisture in the - Maytag MEDE300VW | User Guide - Page 23
, add a fabric softener sheet. Follow package instructions. Remove the load from the dryer as soon as tumbling stops to reduce wrinkling. This is especially important for permanent press, knits and synthetic fabrics. Avoid drying heavy work clothes with lighter fabrics. This could cause overdrying - Maytag MEDE300VW | User Guide - Page 24
that part of the cycle is occurring. This cycle lasts for 120 minutes. Select the drying cycle that matches the type of load you are drying. See Sensor Preset or Manual Preset Cycle Settings chart. super delicate delicate casual sensor cycles timed c, timed dr_ quick dry check lint screen Cycle - Maytag MEDE300VW | User Guide - Page 25
specific amount of drying time and a drying dryer door has been open for 20 minutes, the dryer door is closed or DRUM I.IGHT is pressed again. Press DRUM I_IGHT at any time to turn the drum light ON or OFF. WRINKLE PREVENT Feature When you are unable to remove a load of clothes from the dryer - Maytag MEDE300VW | User Guide - Page 26
audible sound will be emitted every 5 minutes until the clothes are removed, or the WRINKI.E PREVENT feature is manual or contact the dealer from whom you purchased your dryer. To use the drying rack Do not remove the lint screen. 1. Open dryer door. A. hont edge 2. Place drying rack inside dryer - Maytag MEDE300VW | User Guide - Page 27
to shape and lay flat on Dry the drying rack. Time* (Minutes) 60 Every load cleaning The lint screen is located increase drying time. To clean in the door opening of the dryer. A screen blocked by lint can 1. Pull the lint screen straight up. Roll lint off the screen with your fingers. Do not - Maytag MEDE300VW | User Guide - Page 28
the I_int Screen." Moving care For power supply cord-connected dryers: 1. Unplug the power supply cord. 2. Make sure leveling legs are secure in dryer base. 3. Use masking tape to secure dryer door. Electrical Shock Hazard Disconnect power before servicing. Replace all parts and panels - Maytag MEDE300VW | User Guide - Page 29
the recommended run length and number of elbows for the type of vent you are using. Refer to "Plan Vent System" for details. Select a Timed Dry heated cycle, and restart the dryer. If the message persists, have your entire home venting run cleaned. "E" Variable (El, E2, E3) service codes: Call for - Maytag MEDE300VW | User Guide - Page 30
are not drying satisfactorily, drying times are too long, or load is too hot • Is the lint screen clogged with lint? I.int screen should be cleaned before each load. Fire Hazard Use a heavy metal vent. Do not use a plastic vent. Do not use a metal foil vent. Failure to follow these instructions or - Maytag MEDE300VW | User Guide - Page 31
from the area, rewash and dry the clothing. Is the dryer being used for the first time? The new electric heating element may have an odor. The odor will be gone after the first cycle. ASSISTANCE OR SERVICE Before calling for assistance or service, please check "Troubleshooting." It may save you the - Maytag MEDE300VW | User Guide - Page 32
not in accordance with electrical or plumbing codes, or use of consumables or cleaning products not approved by Maytag. 5. Cosmetic damage, If you need service, first see the "Troubleshooting" section of the Use & Care Guide. After checking "Troubleshooting," section or by calling Maytag. In the - Maytag MEDE300VW | User Guide - Page 33
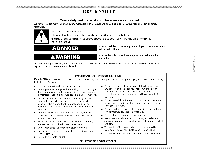
signifient • Risque possible de d_cbs ou de blessure grave si vous ne suivez pas imm_diatement les instructions. Risque possible de d_cbs ou de blessure grave si vous ne suivez pas les instructions. Tousles messages de s_curit_ vous diront quel est le danger potentiel et vous disent comment r_duire - Maytag MEDE300VW | User Guide - Page 34
utilisee pres d'eux. [] Avant d'enlever la secheuse du service ou la jeter, enlever la porte du compartiment de sechage. dans le guide d'utilisation et d'entretien, ou publiee dans les instructions de reparation par . Pi6ces n_cessaires Consulter les codes Iocaux. V6rifier I'alimentation 6lectrique - Maytag MEDE300VW | User Guide - Page 35
avez achet6 votre s6cheuse ou consulter [a section "Assistance ou service". Hauteur du pi_destal 10" (25,4 cm) 15,5" (39 . Le non-respect de ces instructions peut causer un d_c_s, une . Voir "Sp6cifications 61ectriques". Un plancher robuste capable de supporter le poids total de 200 Ib (90,7 kg) - Maytag MEDE300VW | User Guide - Page 36
_ I'eau et/ou aux intemp6ries. V6rifier les r6glements Iocaux. Certains codes limitent ou n'autorisent pas I'installation des s6cheuses dans un garage, un dans un encastrement ou dans un placard On recommande les dimensions d'espacement suivantes pour cette s6cheuse. Cette s6cheuse a 6t6 test6e - Maytag MEDE300VW | User Guide - Page 37
laveuse et une s_cheuse superpos_es I.es dimensions indiqu6es sont pour I'espacement recommand6. 48 . Le non-respect de cette instruction peut causer un d_c_s ou un Code canadien de ['6[ectricit6, C22.1 - derni6re 6dition et _ tous [es codes [ocaux. Pour obtenir un exemp[aire de [a norme des codes - Maytag MEDE300VW | User Guide - Page 38
information, veuillez consulter les num6ros de service qui se trouvent _ la section "Assistance ou service". iNSTRUCTiONS DE LIAISON A LA TERRE [] qui est bien install6e et reli6e & la terre conform6ment & tousles codes et r_glements Iocaux. AVERTISSEM ENT : Le raccordement incorrect de cet appareil - Maytag MEDE300VW | User Guide - Page 39
aupr6s du marchand ou en t6[6phonant b_ Maytag Services. Pour plus de renseignements, voir [a section "Assistance ou service". Conduit m6tallique rigide • Pour un mei[[eur , meubles, peinture, papier-peint, tapis, etc. [] Problemes de nettoyage dans la maison et problemes de sante. Bride de senage - Maytag MEDE300VW | User Guide - Page 40
gris de minuit) Contacter votre marchand local. Le non-respect de ces instructions peut causer un d6ces, un incendie, un choc 6iectrique ou une biessure le d6gagement est r6duit. Veui[[ez consulter [a section "Assistance ou service" pour passer une commande. • Installation au-dessus de [a s6cheuse - Maytag MEDE300VW | User Guide - Page 41
Dispositions sp6ciales pour les installations dans une maison mobile I.e syst&me d'6vacuation doit &tre solidernent fix6 _ une section non combustible de la structure de [a maison mobile et ne doit passe terminer en dessous de [a maison mobile. en sorte que [e syst_me d'6vacuation se termine _ [' - Maytag MEDE300VW | User Guide - Page 42
de personnes pour d_placer et installer la s_cheuse. Le non=respect de cette instruction peut causer une blessure au dos ou d'autre blessure. 1. Pour prot6ger le une proc6dure de diagnostic au d6but du premier • Si ['on re_:oit un code 1_2,it y a peut-@re un prob[6me au niveau de ['a[imentation 6[ - Maytag MEDE300VW | User Guide - Page 43
, caoutchouc ou plastique doivent _tre s_ch_s sur une corde & linge ou par le programme de s_chage & I'air. Le non-respect de ces instructions peut causer un d_c_s ou un incendie. ...).p......... {dP'ili, 3. Appuyer sur le bouton POWER/CANCEl_ (mise sous tension/annulation) puis faire tourner - Maytag MEDE300VW | User Guide - Page 44
de s6chage 6co6nerg6tique et uti[ise [e moins d'6nergie. Z more dry normal less dry sendsroyrnecsyscles i I.e r6g[age de s6chage par d6faut est Normal [ d6sir6 s'i[[umine en jaune. S high regular S medium g tow air dry timetdemcpycles }_ I.es r6glages de temp6rature ne peuvent 6tre modifi6s qu'avec - Maytag MEDE300VW | User Guide - Page 45
uti[isateur de s6[ectionner un autre programme. Air Dry (s_chage _ air) Utiliser le r6glage Air Dry (s6chage _ air) pour les articles qui doivent 6tre feuille d'assouplissant de tissus, si d6sir6. Suiwe les instructions sur I'emballage. • Retirer la charge de la guide de s6chage de charges diverses. - Maytag MEDE300VW | User Guide - Page 46
delicate delicate sensor cycles timed c timed dry quickdr check lint screen Bouton de commando des programmes Programmes automatiques et r6g[e automatiquement [a dur6e pour un s6chage optimal. Heavy Duty (service intense) Utiliser ce programme pour le s6chage _ temp6rature serviettes en coton - Maytag MEDE300VW | User Guide - Page 47
pr_r_gl_s Programmes de d_tection Type de charge HEAVY DUTY (service intense) Articles [ourds, serviettes, jeans Temp. Elev6e Dur_e ADJUST (r6g[age de [a dur6e) vers [e haut ou vers [e bas. Timed Dry (s_chage minute) Utiliser ce programme pour achever le s6chage si des articles sont encore - Maytag MEDE300VW | User Guide - Page 48
Retouche Utiliser cette caract6ristique pour r6duire les plis sur les v&tements qui ont 6t6 charg6s dans une valise ou [aiss6s dans [a s6cheuse pendant trop [ongtemps.. [ touchup 1 Appuyer sur POWER/CANCEl_ (mise sous tension/annulation). Appuyer une fois sur TOUCHUP (retouche) pour activer - Maytag MEDE300VW | User Guide - Page 49
du r6g[age de temp6rature Air Only (Air seu[ement). 6. I[ faut s6[ectionner une dur6e de s6chage en appuyant sur [es boutons (- ou +) MANUAl .... DRY TIME (dur6e de s6chage manuel). R6g[er de nouveau [a dur6e au besoin pour comp[6ter [e s6chage. Se r6f6rer au tableau suivant. 7. Appuyer environ - Maytag MEDE300VW | User Guide - Page 50
on[ever ['accumulation de r6sidus. @ Le non-respect de ces instructions peut causer un d6c6s, une explosion ou un incendie. 4. Rincer le filtre b_I'eau chaude. 5. Bien s6cher le filtre b_charpie avec une serviette propre. Replacer le filtre dans la s6cheuse. Nettoyage/_ chaque charge l e filtre - Maytag MEDE300VW | User Guide - Page 51
ta Dans la caisse de la s_cheuse II faut retirer la charpie accumul6e dans la caisse de la s6cheuse tousles 2 ans ou plus souvent, selon I'utilisation de la s6cheuse. I.e nettoyage dewait &tre fait par une personne qualifi6e. Dans le conduit d'_vacuation I.a charpie dewait &trenettoy6e tous - Maytag MEDE300VW | User Guide - Page 52
transversalement? I.a s6cheuse peut vibrer si die n'est pas correctement install6e. Voir [es Instructions d'insta[[ation. Les v_tements sont-ils emm_l_s ou en boule? Une charge en boule Si le message persiste, faire nettoyer I'ensemble Codes de service variables "E" (El, E2, E3) : Faire tin appel de - Maytag MEDE300VW | User Guide - Page 53
de programme trop court Risque du poids excessif UtJHser deux ou plus de personnes pour d_piacer et installer la s_cheuse. Le non-respect de cette instruction peut causer une blessure au dos ou d'autre blessure. Le programme automatique se termine-t-il trop t6t? La charge n'est peut-_tre pas en - Maytag MEDE300VW | User Guide - Page 54
b_la client61e de Maytage Services, I.l.C au : 1-800-688-9900. Nos consultants foumissent de I_assistance pour : • Caract6ristiques et sp6cifications de notre gamme comp[@e d'apparei[s m6nagers • Renseignements d'insta[[ation • Consignes d'uti[isation et d'entretien • Vente d'accessoires et de - Maytag MEDE300VW | User Guide - Page 55
situ6 dans une r6gion 61oign6e o_ un service d'entretien Maytag autoris6 n'est pas disponible. 10. I_a d6pose et la r6installation de votre gros appareil si celui-ci est install6 dans un endroit inaccessible ou n'est pas install6 conform6ment aux instructions d'installation fournies. 11. I.es gros - Maytag MEDE300VW | User Guide - Page 56
©2008 All rights reserved. Tous droits r6serv6s. ®Registered trademark/r_ Trademark of Maytag Corporation or its related companies. Used under license by Maytag I_imited in Canada ®Marque d6pos6e/r_'_Marque de commerce of Maytag Corporation ou de ses compagnies affi[i6es. Emp[oi sous [icence par
-
 1
1 -
 2
2 -
 3
3 -
 4
4 -
 5
5 -
 6
6 -
 7
7 -
8
-
9
-
10
-
11
-
12
-
13
-
14
-
15
-
16
-
17
-
18
-
19
-
20
-
21
-
22
-
23
-
24
-
25
-
26
-
27
-
28
-
29
-
30
-
31
-
32
-
33
-
34
-
35
-
36
-
37
-
38
-
39
-
40
-
41
-
42
-
43
-
44
-
45
-
46
-
47
-
48
-
49
-
50
-
51
-
52
-
53
-
54
-
55
-
56
 |
 |
orrnance
[]
ELECTRIC DRYER
USE & CARE GUIDE
p
p
SECHEUSE ELECTRIQUE
GUIDE
D'UTILISATION
ET D'ENTRETIEN
FOR
QUESTIONS
ABOUI
FEATURES,
OPER,a(IION/PERFORMANCE,
PARTS, ACCESSORIES
OR
SERVICE
CAI.I.:
1.800.688.9900
IN
CANADA,
CAll:
1.800.807.6777
VISIT
OUR
WEBSITE
AT WWW.MAYTAG.COM
IN CANADA,
WWW.MAYIAG.CA
SI TIENE
PREGUNFAS
RESPECTO
A IAS
CARACTERiSTICAS,
FUNCIONAMIENTO,
RENDIMIENTO,
PARTES,
ACCESORIOS
O
SERVICIO
TECNICO,
IIAME
AI.:
1.800.688.9900
EN CANADA,
IIAME
AI:
1.800.807.6777
VISITE
NUESTRO
SITIO
WEB
EN
WWW.
M AYTAG. COM
EN CANAl)A,
WWW.MAYTAG.CA
AU
CANADA,
POUR
ASSISTANCE,
INSTAI.I
ATION
OU
SERVICE,
COMPOSE
IE
: 1.800.807.6777
OU
VISITEZ
NOTRE
SITE INTERNET
,_
WWW.
MAYTAG.
CA
W10057349A