Maytag MGD9700SB Use and Care Manual
Maytag MGD9700SB - 27" Front-Load Gas Dryer Manual
 |
UPC - 883049033693
View all Maytag MGD9700SB manuals
Add to My Manuals
Save this manual to your list of manuals |
Maytag MGD9700SB manual content summary:
- Maytag MGD9700SB | Use and Care Manual - Page 1
GAS DRYER USE & CARE GUIDE SÉCHEUSE À GAZ GUIDE D'UTILISATION ET D'ENTRETIEN FOR QUESTIONS ABOUT FEATURES, OPERATION/PERFORMANCE, PARTS, ACCESSORIES OR SERVICE CALL: 1.800.688.9900 IN CANADA, CALL: 1.800.807.6777 VISIT OUR WEBSITE AT WWW.MAYTAG.COM IN CANADA, WWW.MAYTAG.CA AU CANADA, POUR - Maytag MGD9700SB | Use and Care Manual - Page 2
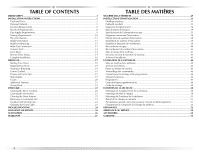
...22 Cleaning the Dryer Interior 23 Removing Accumulated Lint 23 Vacation and Moving Care 23 Changing the Drum Light 23 TROUBLESHOOTING...24 ASSISTANCE OR SERVICE...26 ACCESSORIES ...26 WARRANTY ...27 TABLE DES MATIÈRES SÉCURITÉ DE LA SÉCHEUSE 29 INSTRUCTIONS D'INSTALLATION 31 Outillage - Maytag MGD9700SB | Use and Care Manual - Page 3
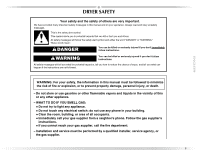
DRYER SAFETY Your safety and the safety of others are very important. We have provided many important safety messages in this manual and on your appliance. Always read and obey all safety messages. This is the safety alert symbol. This symbol alerts you to potential hazards that can kill or hurt - Maytag MGD9700SB | Use and Care Manual - Page 4
be exposed to the weather. ■ Do not tamper with controls. ■ Do not repair or replace any part of the dryer or attempt any servicing unless specifically recommended in this Use and Care Guide or in published user-repair instructions that you understand and have the skills to carry out. ■ Do not use - Maytag MGD9700SB | Use and Care Manual - Page 5
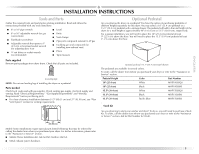
the required tools and parts before starting installation. Read and follow the instructions provided with any washer and dryer? To do so, you will need to purchase a Stack Kit. To order, call the dealer from whom you purchased your dryer or refer to the "Assistance or Service" section. Ask for Part - Maytag MGD9700SB | Use and Care Manual - Page 6
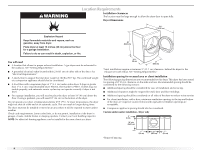
floor to support the total dryer weight of 200 lbs (90.7 kg). The combined weight of a companion appliance should also be considered. ■ A level floor with a maximum slope of 1" (2.5 cm) under entire dryer. If slope is greater than 1" (2.5 cm), install Extended Dryer Feet Kit, Part Number 279810 - Maytag MGD9700SB | Use and Care Manual - Page 7
Required spacing **For side or bottom venting, 0" (0 cm) spacing is allowed. Recessed or closet installation - Dryer on pedestal 14" max.* (35.6 cm) 18" min.* (45.72 cm) 1" (2.5 cm) 27" (68.6 cm) A 1" 1"* (2.5 cm) (2.5 cm) 31½" (80 cm) B 5"** (12.7 cm) A. Recessed area B. Side view - closet - Maytag MGD9700SB | Use and Care Manual - Page 8
with a qualified electrician or service representative or personnel if you are in doubt as to whether the dryer is properly grounded. Do not modify the plug provided with the dryer: if it will not fit the outlet, have a proper outlet installed by a qualified electrician. SAVE THESE INSTRUCTIONS - Maytag MGD9700SB | Use and Care Manual - Page 9
service personnel. ■ Must include a shutoff valve: In the U.S.A.: An individual manual shutoff valve must be installed within six (6) feet (1.8 m) of the dryer Service" section. LP gas conversion: Conversion must be made by a qualified technician. No attempt shall be made to convert the appliance - Maytag MGD9700SB | Use and Care Manual - Page 10
metal foil vent. Failure to follow these instructions can result in death or fire. or flexible heavy metal vent. ■ Review Vent system chart. Modify existing vent calling Maytag Services. For more information, see the "Assistance or Service" fully extended and supported when the dryer is in its - Maytag MGD9700SB | Use and Care Manual - Page 11
dryer from the rear of the dryer problems and health problems. H A. Dryer B. Elbow C. Wall D. Exhaust hood E. Clamps F. Rigid metal or flexible metal vent G. Vent length necessary to connect elbows H. Exhaust outlet Optional exhaust installations This dryer dryer converted - Maytag MGD9700SB | Use and Care Manual - Page 12
Two closeclearance installations are shown. Refer to the manufacturer's instructions. A B A. Over-the-top installation (also available with Service" section to order. ■ Over-the-Top Installation: Part Number 4396028 ■ Periscope Installation (For use with dryer vent to wall vent mismatch): Part - Maytag MGD9700SB | Use and Care Manual - Page 13
29 ft (8.8 m) Flexible metal 25 ft (7.6 m) 17 ft (5.2 m) 4 Rigid metal 27 ft (8.2 m) 21 ft (6.4 m) Flexible metal 23 ft (7 m) 15 ft (4.6 m) Service" section. Make Gas Connection 1. Remove the red cap from the gas pipe. 2. Using a wrench to tighten, connect the gas supply to the dryer. - Maytag MGD9700SB | Use and Care Manual - Page 14
there are no kinks in the flexible gas line. 4. Once the exhaust vent connection is made, remove the corner posts and cardboard. B C A. Dryer B. Do not remove. C. Dryer door 2. Lift and pull forward on the door so that the keyhole clears the screw head. Remove the door. †®TEFLON is a registered - Maytag MGD9700SB | Use and Care Manual - Page 15
3. Lay the dryer door on a flat, protected surface with the inside door assembly facing up. Remove the last screw from Step 1. Remove the 2 screws holding the handle to - Maytag MGD9700SB | Use and Care Manual - Page 16
Dryer door B. Dryer C. Insert this screw first. 7. Close the door and check that it latches securely. Complete Installation 1. Check that all parts are now installed. If there is an extra part use an extension cord. Failure to follow these instructions can result in death, fire, or electrical shock - Maytag MGD9700SB | Use and Care Manual - Page 17
3 prong outlet. ■ Electrical supply is connected. ■ Household fuse is intact and tight, or circuit breaker has not tripped. ■ Dryer door is closed. 11. When the dryer has been running for 5 minutes, open the dryer door and feel for heat. If you feel heat, cancel cycle and close door. If you do not - Maytag MGD9700SB | Use and Care Manual - Page 18
instructions can result in death, explosion, or fire. This manual covers several different models. Your dryer may not have all of the cycles and features described. The following is a guide to starting your dryer option is desired. 18 Fire Hazard No washer can completely remove oil. Do not dry - Maytag MGD9700SB | Use and Care Manual - Page 19
desired, add a fabric softener sheet. Follow package instructions. ■ Remove the load from the dryer as soon as tumbling stops to reduce wrinkling. . ■ Refer to the Automatic or Manual Preset Cycle Settings chart (in the "Cycles" section) for a guide to drying various loads. ■ Drying temperature - Maytag MGD9700SB | Use and Care Manual - Page 20
the damp dry level. NOTE: The Damp light is not used with Manual Cycles. Cool Down The Cool Down light illuminates during the cool down part of the cycle. Laundry is cooling down for ease in handling. Cycle clothes packed in a suitcase or items wrinkled from being left in the dryer too long. 20 - Maytag MGD9700SB | Use and Care Manual - Page 21
Time (Minutes) 40 20 27 Additional Features Extra Care Feature When you are unable to remove a load of clothes from the dryer as soon as it stops the Extra Care feature, the dryer stops after the cool down period. Temperature Temperature settings are used with the Manual Cycles. Press TEMP until the - Maytag MGD9700SB | Use and Care Manual - Page 22
Location Keep dryer area clear and free from items that would obstruct the flow of combustion and ventilation air. WARNING 4. Close the door. 5. Select a Manual cycle, and choose a temperature or Air Only (see following chart). Items containing foam, rubber or plastic must be dried on a clothesline - Maytag MGD9700SB | Use and Care Manual - Page 23
detergent and fabric softener residue can build up on the lint screen. This buildup can cause longer drying times for your clothes, or cause the dryer to stop before your load is completely dry. The screen is probably clogged if lint falls off the screen. Clean the lint screen with a nylon - Maytag MGD9700SB | Use and Care Manual - Page 24
appliance bulb only. Replace the cover and secure with the screw. 4. Plug in dryer or reconnect power. TROUBLESHOOTING First try the solutions suggested here or visit our website and reference FAQs (Frequently Asked Questions) to possibly avoid the cost of a service call... In U.S.A. www.maytag - Maytag MGD9700SB | Use and Care Manual - Page 25
at the top and bottom of the door. The front of the dryer requires a minimum of 1" (2.5 cm) of airspace, and, for most installations, the rear of the dryer requires 5" (12.7 cm). See the Installation Instructions. ■ Has the Air Only temperature setting been selected? Select the right temperature - Maytag MGD9700SB | Use and Care Manual - Page 26
maintenance procedures. ■ Accessory and repair parts sales. ■ Specialized customer assistance (Spanish speaking, hearing impaired, limited vision, etc.). ■ Referrals to local dealers, repair parts distributors and service companies. Maytag® appliances designated service technicians are trained to - Maytag MGD9700SB | Use and Care Manual - Page 27
, when this major appliance is operated and maintained according to instructions attached to or furnished with the product, Maytag Corporation or Maytag Limited (hereafter "Maytag") will pay for Factory Specified Parts and repair labor to correct defects in materials or workmanship. Service must be - Maytag MGD9700SB | Use and Care Manual - Page 28
Notes 28 - Maytag MGD9700SB | Use and Care Manual - Page 29
instructions. AVERTISSEMENT Risque possible de décès ou de blessure grave si vous ne suivez pas les instructions produire en cas de non-respect des instructions. AVERTISSEMENT : Pour votre sécurité, de gaz d'un téléphone voisin. Suivre ses instructions. • À défaut de joindre votre fournisseur de - Maytag MGD9700SB | Use and Care Manual - Page 30
la sécheuse est utilisée près d'eux. ■ Avant d'enlever la sécheuse du service ou la jeter, enlever la porte du compartiment de séchage. ■ Ne pas mettre d'une recommandation spécifique dans le guide d'utlilisation et d'entretien, ou publiée dans les instructions de réparation par l'utilisateur que - Maytag MGD9700SB | Use and Care Manual - Page 31
outils et pièces nécessaires avant de commencer l'installation. Lire et suivre les instructions fournies avec les outils indiqués ici. Piédestal facultatif ■ Clé à tuyau Pour plus de renseignements, veuillez consulter la section "Assistance ou service". Piédestal facultatif (modèle de 15,5" [39,4 - Maytag MGD9700SB | Use and Care Manual - Page 32
-dessus du plancher pour une installation dans un garage. Le non-respect de ces instructions peut causer un décès, une explosion ou un incendie. 38" (96,52 cm) installé dans le même placard que la sécheuse. *31½" (80 cm) 27" (68,6 cm) *La plupart des installations requièrent un espace minimum de - Maytag MGD9700SB | Use and Care Manual - Page 33
cm) est permis. Installation dans un encastrement ou placard - sécheuse sur piédestal 14" max.* (35,6 cm) 18" min.* (45,72 cm) 5"** 31¹ ₂" 1"* 1" 27" 1" (12,7 cm) (80,0 cm) (2,5 cm) (2,5 cm)(68,6 cm) (2,5 cm) *Espacement requis **Pour une évacuation par le côté ou par le fond, un espacement de - Maytag MGD9700SB | Use and Care Manual - Page 34
Espacement requis 5"* (12,7 cm) 1" (2,5 cm) 27" (68,6 cm) 1" (2,5 cm) Exigences supplé Part 3280 (anciennement Federal Standard for Mobile Home Construction and Safety, Title 24, HUD Part un câble de rallonge. Le non-respect de ces instructions peut causer un décès, un incendie ou un choc é - Maytag MGD9700SB | Use and Care Manual - Page 35
gaz, et le personnel d'entretien autorisé. Le non-respect de ces instructions peut causer un décès, un explosion ou un incendie. Canalisation d'arrivée composer les numéros de téléphone indiqués à la section "Assistance ou service". Conversion au gaz de pétrole liquéfié : Un technicien qualifié - Maytag MGD9700SB | Use and Care Manual - Page 36
utiliser un conduit d'évacuation en plastique. Ne pas utiliser un conduit d'évacuation en feuille de métal. Le non-respect de ces instructions peut causer un décès ou un incendie. AVERTISSEMENT : Pour réduire le risque d'incendie, cette sécheuse doit ÉVACUER L'AIR À L'EXTÉRIEUR. IMPORTANT : Observer - Maytag MGD9700SB | Use and Care Manual - Page 37
(10,2 cm) On peut se procurer les produits d'évacuation auprès du marchand ou en téléphonant à Maytag Services. Pour plus de renseignements, voir la section "Assistance ou service". Conduit métallique rigide ■ Pour un meilleur rendement de séchage, on recommande d'utiliser des conduits métalliques - Maytag MGD9700SB | Use and Care Manual - Page 38
280102 (bleu pacifique) Contacter votre marchand local. Le non-respect de ces instructions peut causer un décès, un incendie, un choc électrique ou une blessure le dégagement est réduit. Veuillez consulter la section "Assistance ou service" pour passer une commande. ■ Installation au-dessus de la sé - Maytag MGD9700SB | Use and Care Manual - Page 39
23 pi (7 m) 2 Métallique rigide 44 pi (13,4 m) 38 pi (11,6 m) Métallique souple 27 pi (8,2 m) 19 pi (5,8 m) 3 Métallique rigide 35 pi (10,7 m) 29 pi (8,8 m) Mé déplacer et installer la sécheuse. Le non-respect de cette instruction peut causer une blessure au dos ou d'autre blessure. 1. - Maytag MGD9700SB | Use and Care Manual - Page 40
l'installation de l'appareil dans une maison mobile. Pour d'autres informations, voir les numéros de téléphone mentionnés à la section "Assistance ou service". Raccordement au gaz 1. Retirer le capuchon rouge de la conduite de gaz. 2. À l'aide d'une clé pour serrer, raccorder l'alimentation en gaz - Maytag MGD9700SB | Use and Care Manual - Page 41
Raccordement du conduit d'évacuation 1. À l'aide d'une bride de serrage de 4" (10,2 cm), relier le conduit d'évacuation à la bouche d'évacuation de la sécheuse. Si on utilise un système d'évacuation existant, s'assurer qu'il est propre. Le conduit d'évacuation de la sécheuse doit être fixé sur la - Maytag MGD9700SB | Use and Care Manual - Page 42
la charnière à la porte. 3. Assembler de nouveau les parties interne et externe de la porte avec les 6 vis. 3. Enlever les 2 vis qui retiennent le support de la poignée à la porte. 4. Remettre les 2 vis de la poignée dans la porte. 5. Retirer la tringle des pitons d'obturation des trous ou - Maytag MGD9700SB | Use and Care Manual - Page 43
enlever la broche de liaison à la terre. Ne pas utiliser un adaptateur. Ne pas utiliser un câble de rallonge. Le non-respect de ces instructions peut causer un décès, un incendie ou un choc électrique. 5. Brancher la sécheuse sur une prise à 3 broches reliée à la terre. Mettre le courant. 6. Ôter - Maytag MGD9700SB | Use and Care Manual - Page 44
mousse, caoutchouc ou plastique doivent être séchés sur une corde à linge ou par le programme de séchage à l'air. Le non-respect de ces instructions peut causer un décès ou un incendie. 2. Charger les vêtements dans la sécheuse et fermer la porte. 3. Tourner le cadran pour sélectionner un programme - Maytag MGD9700SB | Use and Care Manual - Page 45
le degré de séchage sélectionné. Utilisation d'un programme manuel ■ Tourner le cadran pour sélectionner un programme manuel. Appuyer sur les boutons (- ou +) MANUAL DRY TIME (durée de séchage manuel) jusqu'à ce que la durée de séchage désirée s'affiche. Appuyer légèrement sur - ou + et la dur - Maytag MGD9700SB | Use and Care Manual - Page 46
une feuille d'assouplissant de tissus, si désiré. Suivre les instructions sur l'emballage. ■ Retirer la charge de la sécheuse ajuster la durée d'un programme manuel, il faut appuyer sur les boutons (- ou +) MANUAL DRY TIME (durée de séchage manuel). Ajuster la température d'un programme manuel en - Maytag MGD9700SB | Use and Care Manual - Page 47
à la température recommandée. Un capteur détecte l'humidité de la charge et règle automatiquement la durée pour un séchage optimal. Heavy Duty (service intense) Utiliser ce programme pour le séchage à température élevée des charges mixtes lourdes, des serviettes en coton ou des jeans. Normal - Maytag MGD9700SB | Use and Care Manual - Page 48
ée TOUCHUP (rafraîchissement) Aide à aplanir les faux plis Moyenne RAPID DRY (séchage rapide) Petites charges Élevée Durée par défaut (Minutes) 40 20 27 Caractéristiques supplémentaires Caractéristique Extra Care (ultra soin) Lorsqu'on ne peut pas enlever une charge de la sécheuse dès qu'elle - Maytag MGD9700SB | Use and Care Manual - Page 49
ou au moyen du réglage de température Air Only (Air seulement). 6. Il faut sélectionner une durée de séchage en appuyant sur les boutons (- ou +) MANUAL DRY TIME (durée de séchage manuel). Régler de nouveau la durée au besoin pour compléter le séchage. Se référer au tableau suivant. 7. Appuyer - Maytag MGD9700SB | Use and Care Manual - Page 50
Placer la sécheuse au moins 46 cm (18 po) au-dessus du plancher pour une installation dans un garage. Le non-respect de ces instructions peut causer un décès, une explosion ou un incendie. 2. Remettre le filtre à charpie fermement en place. IMPORTANT : ■ Ne pas faire fonctionner la sécheuse avec un - Maytag MGD9700SB | Use and Care Manual - Page 51
5. Bien sécher le filtre à charpie avec une serviette propre. Replacer le filtre dans la sécheuse. Nettoyage de l'intérieur de la sécheuse Nettoyage du tambour de la sécheuse 1. Préparer une pâte avec un détergent à lessive en poudre et de l'eau très chaude. 2. Appliquer la pâte sur un linge doux. - Maytag MGD9700SB | Use and Care Manual - Page 52
(Foire aux questions) pour éviter le coût d'une visite de service...www.maytag.ca. Fonctionnement de la sécheuse La sécheuse ne fonctionne pas ■ La sécheuse peut vibrer si elle n'est pas correctement installée. Voir "Instructions d'installation". ■ Les vêtements sont-ils emmêlés ou en boule? Une - Maytag MGD9700SB | Use and Care Manual - Page 53
sécheuse. Placer la sécheuse au moins 46 cm (18 po) au-dessus du plancher pour une installation dans un garage. Le non-respect de ces instructions peut causer un décès, une explosion ou un incendie. ■ La sécheuse se trouve-t-elle dans une pièce où la température ambiante est inférieure à 45 - Maytag MGD9700SB | Use and Care Manual - Page 54
service, consulter la section "Dépannage". Ce guide peut vous faire économiser le coût d'une visite de service. Si vous avez encore besoin d'aide, suivre les instructions que celles utilisées dans la fabrication de chaque nouvel appareil MAYTAG®. Pour localiser des pièces spécifiées par l'usine dans - Maytag MGD9700SB | Use and Care Manual - Page 55
installé dans un endroit inaccessible ou n'est pas installé conformément aux instructions d'installation fournies. 11. Le coût des pièces de rechange et de Maytag autorisé pour déterminer si une autre garantie s'applique. Si vous avez besoin de service, voir d'abord la section "Dépannage" du Guide - Maytag MGD9700SB | Use and Care Manual - Page 56
2007 All rights reserved. Tous droits réservés. MAYTAG and the "M" Symbol are registered trademarks of Maytag Limited in Canada. MAYTAG et le symbole "M" sont des marques déposées de Maytag Limited au Canada. All other marks are trademarks of Maytag Corporation or its related companies. Toutes les
-
 1
1 -
 2
2 -
 3
3 -
 4
4 -
 5
5 -
 6
6 -
 7
7 -
8
-
9
-
10
-
11
-
12
-
13
-
14
-
15
-
16
-
17
-
18
-
19
-
20
-
21
-
22
-
23
-
24
-
25
-
26
-
27
-
28
-
29
-
30
-
31
-
32
-
33
-
34
-
35
-
36
-
37
-
38
-
39
-
40
-
41
-
42
-
43
-
44
-
45
-
46
-
47
-
48
-
49
-
50
-
51
-
52
-
53
-
54
-
55
-
56
 |
 |
GAS DRYER
USE & CARE GUIDE
SÉCHEUSE À GAZ
GUIDE D’UTILISATION ET D’ENTRETIEN
FOR QUESTIONS ABOUT FEATURES, OPERATION/PERFORMANCE, PARTS, ACCESSORIES OR SERVICE
CALL: 1.800.688.9900
IN CANADA, CALL: 1.800.807.6777
AU CANADA, POUR ASSISTANCE, INSTALLATION OU SERVICE, COMPOSEZ LE : 1.800.807.6777
VISIT OUR WEBSITE AT WWW.MAYTAG.COM
IN CANADA, WWW.MAYTAG.CA
OU VISITEZ NOTRE SITE INTERNET À
WWW.MAYTAG.CA
PARA OBTENER ACCESO AL MANUAL DE USO Y CUIDADO EN ESPAÑOL, O PARA OBTENER INFORMACIÓN ADICIONAL ACERCA DE SU PRODUCTO, VISITE: WWW.MAYTAG.COM.
TENGA LISTO SU NÚMERO DE MODELO COMPLETO. PUEDE ENCONTRAR EL NÚMERO DE MODELO Y DE SERIE DENTRO DE LA CAVIDAD SUPERIOR DE LA PUERTA.
W10150638A