Maytag MSD2650HEQ Use and Care Guide - Page 7
Reinstallation of the Doors, Door Reversal, Handles
 |
View all Maytag MSD2650HEQ manuals
Add to My Manuals
Save this manual to your list of manuals |
Page 7 highlights
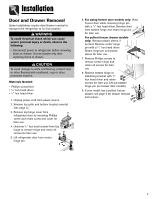
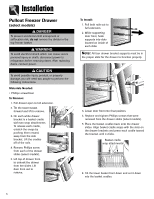
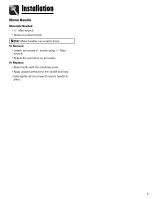
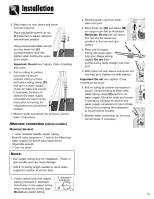
Installation Reinstallation of the Doors Materials Needed: • Phillips screwdriver • 5⁄16" hex head driver 1. Install hinge assemblies: • Install top hinge loosely with 5⁄16" hex head screws. • Install center hinge with Phillips screws. • Freezer door models: Install bottom hinge with 3⁄8" hex head screws. 2. Freezer door models: Insert bottom hinge pin. • Locate bottom hinge hole closest to outside edge of cabinet, and insert bottom hinge pin. Replace any door shims, if present. 3. Freezer door models: Place hinge side of freezer door on bottom hinge pin and hold freezer door upright while installing center hinge pin with 5⁄16" hex head driver. • Replace plastic sleeve. • Replace any applicable door shims. • Make sure the hinge pin is installed tightly. 4. Place hinge side of refrigerator door on center hinge pin. 5. While holding refrigerator door upright, tighten down top hinge with 5⁄16" hex head driver and replace hinge cover. Door Reversal In some installations, reversing the door swing allows for more convenient access to stored items. Both doors can be reversed on freezer door models and the fresh food door is reversible on freezer drawer models. Materials Needed: • Flat screwdriver • Phillips screwdriver • 5⁄16" hex head driver • 3⁄8" hex head driver 1. Remove door(s) (see page 4). 2. Transfer cabinet plugs and cabinet screws to opposite side of cabinet. • Remove cabinet plugs with flat blade of screwdriver tip wrapped in masking tape. • Remove center mullion screws with 5⁄16" hex head screwdriver. • Freezer door models: Remove bottom mullion screws with 3⁄8" hex head driver. CAUTION To avoid possible injury and damage to property: • Place doors on a nonabrasive surface protected by towels or rugs while working directly on doors. 3. Transfer door stops from bottom edge of fresh food door and freezer door, if applicable, to opposite side of door edge. • Use a Phillips screwdriver for removal and installation. 4. Install handles (see pages 6-8). 5. Reinstall the door(s). Handles Note: If not installed, the handle is located in the interior of the fresh food compartment or attached to the back of your refrigerator. Remove and discard handle packaging and tape. Handle design varies from refrigerator to refrigerator. Please reference the appropriate instructions for your model below. Fresh Food Handles Standard Front Mount Handle Materials Needed: • Phillips screwdriver • 5⁄16" hex head driver To Install: 1. Remove 1⁄4" hex head screws from door face with hex head driver, and Phillips screw from top of door. • If reversing door, remove door plugs from opposite side of door and insert in screw holes. 2. Align handle holes with screw holes on door face and secure with two door face screws from step 1. Cont. 6
-
 1
1 -
 2
2 -
 3
3 -
 4
4 -
 5
5 -
 6
6 -
 7
7 -
 8
8 -
 9
9 -
 10
10 -
 11
11 -
 12
12 -
13
-
14
-
15
-
16
-
17
-
18
-
19
-
20
-
21
-
22
-
23
-
24
-
25
-
26
-
27
-
28
-
29
-
30
-
31
-
32
-
33
-
34
-
35
-
36
-
37
-
38
-
39
-
40
-
41
-
42
-
43
-
44
-
45
-
46
-
47
-
48
-
49
-
50
-
51
-
52
-
53
-
54
-
55
-
56
-
57
-
58
-
59
-
60
-
61
-
62
-
63
-
64
-
65
-
66
-
67
-
68
-
69
-
70
-
71
-
72
-
73
-
74
-
75
-
76
-
77
-
78
-
79
-
80
-
81
-
82
-
83
-
84
-
85
-
86
-
87
-
88
-
89
-
90
-
91
-
92
-
93
-
94
-
95
-
96
-
97
-
98
-
99
-
100
-
101
-
102
-
103
-
104
 |
 |
