Maytag MVW5035M Owners Manual - Page 8
Connect Drain Hose, Connect Inlet Hoses, Attach drain hose to drain port
 |
View all Maytag MVW5035M manuals
Add to My Manuals
Save this manual to your list of manuals |
Page 8 highlights
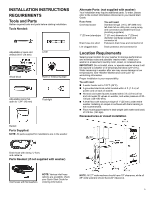
Connect Drain Hose 5. Attach drain hose to drain port 7. Remove drain hose form (floor drain installations only) If applicable, remove the red plastic plug from the black drain port on the back of the washer. If clamp is not already in place on elbow end of drain hose, slide it over end as shown. Squeeze clamp with pliers and slide black elbow end of drain hose onto black drain port and secure with clamp. For a laundry tub or standpipe drain, go to step 6. For a floor drain, remove the pre-installed drain hose form as shown in step 7. You may need additional parts with separate directions. See the "Alternate Parts" section. 6. Place drain hose in standpipe For floor drain installations, you will need to remove the drain hose form from the end of the drain hose. You may need additional parts with separate directions. See "Tools and Parts." It is the responsibility of the installer to install and secure the drain hose into the provided plumbing/drain in a manner that will avoid the drain hose coming out of and leaking from the plumbing/drain. Connect Inlet Hoses Washer must be connected to water faucets with new inlet hoses with flat washers (not provided). Do not use old hoses. NOTE: Both hoses must be attached and have water flowing to inlet valves. If you are only connecting to a cold water faucet, you must use a Y-adapter (not provided). 8. Connect inlet hoses to water faucets IMPORTANT: 4.5″ (114 mm) of drain hose should be inside standpipe; do not force excess hose into standpipe or lay on bottom of laundry tub. Drain hose form must be used. Place hose into standpipe (shown in picture) or over side of laundry tub. IMPORTANT: Do not overtighten hose or use tape or sealants on valve. Damage to the valves can result. Attach hose to hot water faucet. Screw on coupling by hand until it is seated on washer. Use adjustable pliers to tighten couplings an additional two-thirds turn. Repeat this step with second hose for cold water faucet. 8
-
 1
1 -
2
-
 3
3 -
 4
4 -
 5
5 -
 6
6 -
 7
7 -
 8
8 -
 9
9 -
 10
10 -
 11
11 -
 12
12 -
 13
13 -
14
-
15
-
16
-
17
-
18
-
19
-
20
 |
 |
