Memorex MMP8640 Manual
Memorex MMP8640 - 4 GB Digital Player Manual
 |
View all Memorex MMP8640 manuals
Add to My Manuals
Save this manual to your list of manuals |
Memorex MMP8640 manual content summary:
- Memorex MMP8640 | Manual - Page 1
of Controls 6 Charging the Battery 7 Installing the Software 8 • Installing the MyDJ Plug-In 9 • Installing Windows Media Player 10. . . . 11 • Installing the MusicIP Mixer 14 • Installing MediaCoder 17 Downloading and Transferring Files 20 Using the Software 25 • Using the MyDJ Plug-In 25 - Memorex MMP8640 | Manual - Page 2
cause harmful interference unless the modifications are expressly approved in the instruction manual. The user could lose the authority to operate this equipment if an unauthorized change or modification is made. This Class B digital apparatus complies with Canadian ICES-003. Cet appareil numérique de - Memorex MMP8640 | Manual - Page 3
user's authority to operate the equipment. NOTE: This equipment has been tested and found to comply with the limits for a Class B digital and used in accordance with the instructions, may cause harmful interference to radio TV technician for help. Shield cable must be used with this unit to ensure - Memorex MMP8640 | Manual - Page 4
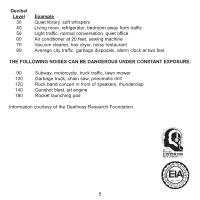
fine audio and video equipment such as want you to get the most out of your equipment by playing it at a safe level. One that lets the sound come Set the dial and leave it there. Taking a minute to do this now will help to prevent hearing damage or loss in the future. After all, we want you listening - Memorex MMP8640 | Manual - Page 5
Decibel Level 30 40 50 60 70 80 Example Quiet library, soft whispers Living room, refrigerator, bedroom away from traffic Light traffic, normal conversation, quiet office Air conditioner at 20 feet, sewing machine Vacuum cleaner, hair dryer, noisy restaurant Average city traffic, garbage disposals, - Memorex MMP8640 | Manual - Page 6
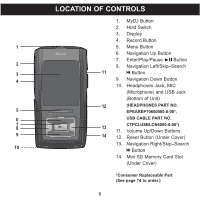
LOCATION OF CONTROLS 1. MyDJ Button 2. Hold Switch 3. Display 4. Record Button 5. Menu Button 6. Navigation Up Button 7. Enter/Play/Pause ®p Button 8. Navigation Left/Skip-Search o Button 9. Navigation Down Button 10. Headphones Jack, MIC (Microphone) and USB Jack (Bottom of Unit) (HEADPHONES PART - Memorex MMP8640 | Manual - Page 7
: • To disconnect this unit from your computer, make sure to follow the "Safely Remove Hardware" instructions on page 33. • It takes approx. 3 hours to charge the battery from empty to full. When fully charged, the unit can playback for approx. 20 hours in Music Playback mode. (Actual playback times - Memorex MMP8640 | Manual - Page 8
CD, you will first have to select to "Install PC Software" or "Install Mac OS X Software" (depending on your computer). Please note that the screens shown in the manual are for a PC. • For PC users, please only install Windows Media Player 10 OR MusicIP Mixer. Installing both may cause the unit to - Memorex MMP8640 | Manual - Page 9
Computer then double-click on the CD drive, then the installation screen will appear. After selecting "Install PC Software", click "Download & Install MyDJ Plug-in for Windows Media Player". 2. At the first pop-up screen, click "Save" to save "wmp_plugin.msi" onto your computer. Save in a convenient - Memorex MMP8640 | Manual - Page 10
INSTALLING THE MyDJ PLUG-IN 4. The "Select Installation Folder" screen will appear. It is recommended to keep the folder as is. Then click "Next". 5. At , the "Installation Complete" screen will appear. Click "Close" to exit the Setup Wizard. Please see page 25 for how to use the MyDJ Plug-In. 10 - Memorex MMP8640 | Manual - Page 11
then the installation screen will appear. After selecting "Install PC Software", click "Download Windows Media Player". 2. You will be directed to the Windows Media Download Center. Select Download (Windows Media Player), Version (Player 10 [for Windows XP] is recommended) and Language. Then, click - Memorex MMP8640 | Manual - Page 12
WINDOWS MEDIA PLAYER 10 INSTALLATION 4. Installation will continue. 5. At the Welcome screen, click NEXT. 6. Select the desired privacy options. 12 - Memorex MMP8640 | Manual - Page 13
7. Click on Privacy Statement to view the Statement, if desired. When finished, click "Next". 8. Read the instructions and tick the check boxes as desired. Then click on More Options and tick the check boxes as desired. 9. Click "Finish" to finish the installation of Windows Media Player 10. 13 - Memorex MMP8640 | Manual - Page 14
-click My Computer then double-click on the CD drive, then the installation screen will appear. After selecting "Install PC Software" or "Install Mac OS X Software", click "Download & Install MusicIP Mixer" (for Windows or for Mac OS X 10.3 or higher, depending on your computer). 2. For Windows, at - Memorex MMP8640 | Manual - Page 15
INSTALLING THE MUSICIP MIXER 4. The "License Agreement" screen will appear. Select "I accept the agreement" and then click "Next". 5. The "Select Destination Location" screen will appear. It is recommended to keep the folder as is. Then click "Next". 6. The "Select Start Menu Folder" screen will - Memorex MMP8640 | Manual - Page 16
appear. If the "Install Bonjour Service (to enable TiVo support)" is listed as an option, you do NOT need to select it. It is highly recommended that you select "View help file", so that after installation, you will immediately be directed to further instructions regarding the MusicIP Mixer. Click - Memorex MMP8640 | Manual - Page 17
-click My Computer then double-click on the CD drive, then the installation screen will appear. After selecting "Install PC Software", click "Download & Install MediaCoder for Windows". 2. The "Welcome" screen will appear. Click "Next". 3. The "License Agreement" screen will appear. Select "I agree - Memorex MMP8640 | Manual - Page 18
Information" screen will appear. Enter your user information and click "Next". 5. The "Installation Folder" screen will appear. It is recommended to keep the folder as is. Then click "Next". 6. The "Shortcut Folder" - Memorex MMP8640 | Manual - Page 19
INSTALLING MEDIACODER 7. The "Ready to Install" screen will appear. Click "Next". 8. After the program is done installing, the "Installation Successful" screen will appear. Click "Finish" to end installation. See page 32 for how to use MediaCoder. 19 - Memorex MMP8640 | Manual - Page 20
download digital music files from the Internet or use encoding software to convert music that you have on an audio CD into MP3 or WMA format. Once these files are stored on your computer you can easily copy them to your player. For Windows XP, if you have already installed WMP (Windows Media Player - Memorex MMP8640 | Manual - Page 21
of 48-192 kbps Video Formats: WMV-WMV 9 (simple profile, 220 x 176 resolution, 30 fps, 384 kbps max) + WMA 9 (sample rate of 8-48 kHz), MPEG-4-AVI (220 x 176 resolution, 30fps, 768 kbps max) + MP3 Photo Format: baseline JPEGs. IMPORTANT NOTE FOR MP3s: Windows Media Player Sync may remove MyDJ ready - Memorex MMP8640 | Manual - Page 22
DOWNLOADING AND TRANSFERRING FILES (CONT.) For Windows XP, you can also utilize the previously installed Windows Media Player 10 software to convert music on an audio CD into MP3 or WMA format as follows: 1. Open the Windows Media Player 10 Browser, then click on the "Rip" icon on the top tool bar. - Memorex MMP8640 | Manual - Page 23
the display. • If a song with the MyDJ feature is transferred to the unit, the MyDJ logo " " will appear in front of the file name on the unit. • VIDEO FILE TRANSFER: Open My Computer and then "MTP Player, "Aptitude" or "MMP8640". There will be two directories present: Media and Data. "Drag and drop - Memorex MMP8640 | Manual - Page 24
DOWNLOADING AND TRANSFERRING FILES (CONT.) CREATING A PLAYLIST USING WINDOWS MEDIA PLAYER 10 (FOR WINDOWS XP ONLY) Follow the steps below to create a playlist in the Music menu, using WMP (Windows Media Player) 10: 1. Connect your player in the Last Month" and "Music Played the Most" and click "OK". - Memorex MMP8640 | Manual - Page 25
WMP [Windows Media Player] library, you will first need to add some in order to use the MyDJ Plug-In.) The first time you start the MyDJ Plug-In, collection may be recognized during this "quick analysis" process. In this case, you may want to use the Extended Analysis capability of the MyDJ Plug-In, - Memorex MMP8640 | Manual - Page 26
this unit, you will need to add at least 25 tracks that have been analyzed using the MyDJ Plug-In. You can enable a column within WMP 10 that will indicate if the track is MyDJ ready by following the steps below: 1. In WMP 10, right-click on one of the column headings - Memorex MMP8640 | Manual - Page 27
USING THE MUSICIP MIXER For Mac OS X Step 1: Locate Music Files The first time the MusicIP Mixer is run, it will prompt you to import music from your iTunes database, Music folder or from another source folder of your choice. Based on your selection, tracks from the iTunes database, Music folder or - Memorex MMP8640 | Manual - Page 28
USING THE MUSICIP MIXER (CONTINUED) slightly altered to store MusicIP tags. Once the analysis data has been saved to your tracks, they are ready to be used for instant playlist creation on your device. Viewing Analysis Status (Optional) To view the progress of the analysis process, click on the - Memorex MMP8640 | Manual - Page 29
USING THE MUSICIP MIXER (CONTINUED) For Windows XP Step 1: Locate Music Files The first time the MusicIP Mixer is run, it will prompt you to import music from your My Music folder or from another source folder of your choice. Please note that if you have either iTunes or Winamp installed on your - Memorex MMP8640 | Manual - Page 30
USING THE MUSICIP MIXER (CONTINUED) Step 2: Analyze Your Music Once the import process is complete, the MusicIP Mixer will analyze your tracks and save the data to a cache file on your computer. During the analysis process, the Mixer will detect your audio files' unique acoustic characteristics for - Memorex MMP8640 | Manual - Page 31
USING THE MUSICIP MIXER (CONTINUED) Viewing Analysis Status (Optional) Analysis progress details are located in the bottom left corner of the Mixer's status bar. This data is visible at any time during the analysis process. Step 4: Transfer Analyzed Tracks to Your Device To transfer analyzed tracks - Memorex MMP8640 | Manual - Page 32
supported by the player. 1. Open the previously installed MediaCoder program. 2. Change the Interface mode from Simple mode to Normal mode in the Options>User the default settings. Make sure that the Video and Picture options are configured as below: Video: Backend: MEncoder; Codec: XviD; Format: - Memorex MMP8640 | Manual - Page 33
My Computer. Right click on "Removable Disk" and left click on "Eject". Then it is safe to remove the player from the computer. • If you are using Windows XP and the Windows Media Player 10 software is already installed, then you do not need to follow the above "Safely Remove Hardware" procedure. 33 - Memorex MMP8640 | Manual - Page 34
Memorex screen will take several seconds to several minutes to update the player's library depending on the number of songs that you have transferred to the player. When done, the Music Player enter the Now Playing screen. You can also press the Navigation Right/Skip-Search n or Enter/Play/ Pause ®p - Memorex MMP8640 | Manual - Page 35
during playback. NOTE: While changing the volume, the volume "pop up" indicator will be overlaid across the bottom of the existing screen (except in Video Playback mode) and will slide off screen after three seconds if neither Volume button is pressed. You can close the volume pop-u2p by pressing - Memorex MMP8640 | Manual - Page 36
GENERAL OPERATION (CONTINUED) HOLD SWITCH 1 DEFAULT/FULL SCREEN 1 Slide the Hold switch to the Lock position (down) to lock the buttons; "Locked" will appear briefly and then the Lock icon will appear in the lower left corner of the screen. This is useful, for example, when you do not want the - Memorex MMP8640 | Manual - Page 37
OPERATION-MUSIC PLAYBACK MODE TO LISTEN TO MP3s/WMAs This unit supports the following audio formats: MP3, MPEG 1/2/2.5 Layer 3 with a bit on page 34. Select Music using the Navigation Down button 1, followed by the Enter/Play/Pause ®p button 2. Use the Navigation Up 1 and/or Down 2 buttons to browse - Memorex MMP8640 | Manual - Page 38
buttons then press the Enter/Play/Pause ®p button 3 to start playback. NOTES: • See pages 20-24 for information on uploading MP3/WMA files to this unit. if the selection is MyDJ ready, the player will create a djMix. • You can pause playback at anytime by pressing the Enter/Play/Pause ®p button; the - Memorex MMP8640 | Manual - Page 39
37. To clear all tracks in the queue, use the Navigation Up 1 and/or Down 2 button to select Clear All and then press the Enter/Play/Pause ®p button 3. To clear one track at a time from the queue, use the Navigation Up 1 and/or Down 2 button to select Clear Track and then - Memorex MMP8640 | Manual - Page 40
During playback, press the Navigation Left/Skip-Search o button to move the player back to the beginning of the currently playing file. Press the Navigation Left/Skip-Search o button repeatedly to move the player back to lowernumbered files. During playback, press the Navigation Right/Skip-Search - Memorex MMP8640 | Manual - Page 41
, Jazz, Classical, Pop or Custom EQ) using the Navigation Right/Skip-Search n 1 or Left/o 2 button. Select the Custom EQ option by pressing the Enter/Play/Pause ®p button 3. NOTE: For the Custom EQ setting, please refer to page 59. NOTE: Setting an option in the Music Contextual menu, pressing the - Memorex MMP8640 | Manual - Page 42
] or Repeat One [to repeat the selected song continuously]) using the Navigation Right/Skip-Search n 1 or Left/o 2 button, followed by the Enter/Play/Pause ®p button 3 to confirm. NOTES: • Setting an option in the Music Contextual menu, pressing the Menu button or waiting three seconds without any - Memorex MMP8640 | Manual - Page 43
OPERATION-MUSIC PLAYBACK MODE (CONTINUED) MUSIC CONTEXTUAL MENU-COLOR THEME 1 2 1 2 While in Music Playback mode (Now Playing screen), press the Navigation Up button to open the Music Contextual menu. Scroll to "Color Theme" using the Navigation Up 1 and/or Down 2 buttons. 3 2 1 Select a - Memorex MMP8640 | Manual - Page 44
Up button to open the Music Contextual menu. Scroll to "Create djMix" using the Navigation Up 1 and/or Down 2 buttons, followed by the Enter/Play/Pause ®p button 3 to create a djMix (playlist) based on the current song. NOTE: Setting an option in the Music Contextual menu, pressing the Menu button - Memorex MMP8640 | Manual - Page 45
again to select djScan. The player will enter djScan mode. NOTE: You can also enter djScan mode by pressing and holding the MyDJ button at any time, except Radio playback, Radio/Voice Recording or Video/Photo playback modes. 3 2 1 Press the Enter/Play/Pause ®p button 1 or MyDJ button 2 to create - Memorex MMP8640 | Manual - Page 46
the Scan mode by pressing the Menu button or create a playlist by pressing the MyDJ button or Enter/Play/Pause ®p button. • For MyDJ information, enter the MyDJ menu as directed in Step 1 on the previous page, scroll to About MyDJ using the Navigation Up and/or Down buttons, followed by the Enter - Memorex MMP8640 | Manual - Page 47
main menu as described on page 34. Select MyDJ using the Navigation Down button 1, followed by the Enter/Play/Pause ®p button 2. Scroll to djMix using /Play/ Pause ®p button 3 to select it. The player will enter djMix Browse mode. Follow the Browse Music (All Songs, Albums, Artists) instructions - Memorex MMP8640 | Manual - Page 48
20 songs will be placed into the MyDJ playlists. • For MyDJ information, enter the MyDJ menu as directed in Step 1, scroll to About MyDJ using the Navigation Up and/or Down buttons, followed by the Enter/Play/Pause ®p button to select it. • djMoods allows the user to listen to songs based on the - Memorex MMP8640 | Manual - Page 49
48 kHz), MPEG-4-AVI (220 x 176 resolution, 30fps, 768 kbps max) + MP3 1 2 2 1 1 3 2 Turn the unit on and access the main menu as described on page 34. Select Video using the Navigation Down button 1, followed by the Enter/Play/Pause ®p button 2. Use the Navigation Up 1 and/or Down 2 buttons to - Memorex MMP8640 | Manual - Page 50
, the video track progress bar will appear on the bottom of the display.) When you release the button, normal playback will resume. FORWARD/REVERSE SKIP 1 2 During playback, press the Navigation Left/ Skip-Search o button to move the player back to the beginning of the currently playing file - Memorex MMP8640 | Manual - Page 51
supports baseline JPEGs. 1 2 2 1 1 3 2 Turn the unit on and access the main menu as described on page 34. Select Photos using the Navigation Down button 1, followed by the Enter/Play can also toggle between slideshow auto and manual mode by pressing the Enter/Play/Pause ®p button. • See pages 20 - Memorex MMP8640 | Manual - Page 52
you scrolled to Thumbnails in Step 2 on the previous page, press the Enter/Play/Pause ®p button 1; a thumbnail view of the photos will appear in the or Left/ o 2 buttons to browse the photos. Press the Enter/Play/Pause ®p button to view the desired photo. SLIDESHOW VIEW 1 If you scrolled to - Memorex MMP8640 | Manual - Page 53
the unit on and access the main menu as described on page 34. Select Radio using the Navigation Down button 1, followed by the Enter/Play/Pause ®p button 2. Select a station by pressing, or pressing and holding to search more quickly, the Navigation Right/Skip-Search n 1 or Left/o 2 button. When - Memorex MMP8640 | Manual - Page 54
FM Playback mode, and with a desired station selected, press and hold the Enter/Play/Pause ®p button and then release to save the station as Preset 1 (if no Record button 1 to start recording the desired station. Press the Enter/Play/Pause ®p button 2 to pause recording, and press again to resume - Memorex MMP8640 | Manual - Page 55
Enter/Play/Pause ®p button 3 to select. 3 2 3 1 Speak into the microphone and the player will create a voice recording. Press the Enter/Play/Pause , by pressing the Record button while in any menu or while in Music/Video/Photo/ Recording Playback mode. • Press and hold the Navigation Right/ Skip - Memorex MMP8640 | Manual - Page 56
/Pause ®p button 3. Use the Navigation Up 1 and/or Down 2 buttons to select the desired recording to delete. Then press the Enter/Play/Pause ®p button 3 to select. Repeat this step to delete additional recordings. TO LISTEN TO A RECORDING 1 2 1 3 2 2 1 Access the Recorder menu as described - Memorex MMP8640 | Manual - Page 57
the main menu as described on page 34. Select Settings using the Navigation Down button 1, followed by the Enter/Play/Pause ®p button 2. Press the Enter/Play/Pause ®p button to select "Color Theme". 3 4 1 3 2 Select a desired "Color Theme" setting (Blue, Cyan, Green, Gold, Purple or Red) using - Memorex MMP8640 | Manual - Page 58
a desired "Orientation" setting (Portrait, Landscape Left or Landscape Right) using the Navigation Up 1 and/or Down 2 buttons, followed by the Enter/Play/Pause ®p button 3 to confirm. NOTE: The Navigation button functions will rotate to match the "Orientation" setting that you have selected. Press - Memorex MMP8640 | Manual - Page 59
setting (None, Extra Bass, Rock, Jazz, Classical, Pop or Custom EQ) using the Navigation Up 1 and/or Down 2 buttons, followed by the Enter/Play/Pause ®p button 3 to confirm. 4 3 2 1 If you selected Custom EQ, adjust the Bass using the Navigation Right/Skip-Search n or Left/o 1 button. Press the - Memorex MMP8640 | Manual - Page 60
all songs continuously] or Repeat One [to repeat the selected song continuously]) using the Navigation Up 1 and/or Down 2 buttons, followed by the Enter/ Play/Pause ®p button 3 to confirm. Press the Menu button to go back to the Main menu. NOTES: • During playback, if the Shuffle mode is activated - Memorex MMP8640 | Manual - Page 61
Pause ®p button 2. Scroll to "Brightness" using the Navigation Up 1 and/or Down 2 buttons, followed by the Enter/Play/Pause ®p button 3 to select it. 3 4 3 2 1 Select a desired "Brightness" setting (10100%) using the Navigation Right/ Skip-Search n 1 or Left/o 2 buttons, followed by the Enter - Memorex MMP8640 | Manual - Page 62
it. 3 4 1 3 2 Select a desired "Power Savings" setting (Off; 1, 2, 5 or 10 minutes) using the Navigation Up 1 and/or Down 2 buttons, followed by the Enter/Play/Pause ®p button 3 to confirm. NOTE: This setting will turn off the display after the selected amount of time. Press the Menu button to - Memorex MMP8640 | Manual - Page 63
a desired "Backlight Timer" setting (Off; 5, 10 or 30 seconds; or Always On) using the Navigation Up 1 and/or Down 2 buttons, followed by the Enter/Play/Pause ®p button 3 to confirm. NOTE: This setting will dim the display after the selected amount of time. Press the Menu button to go back to - Memorex MMP8640 | Manual - Page 64
Set" using the Navigation Up 1 and/or Down 2 buttons, followed by the Enter/Play/Pause ®p button 3 to select it. 3 4 2 1 Set the current hour minute using the Navigation Up and/or Down 1 buttons. Then, press the Enter/Play/Pause ®p button 2 to confirm the time. Press the Menu button to go back - Memorex MMP8640 | Manual - Page 65
1 2 2 1 1 3 2 Turn the unit on and access the main menu as described on page 34. Select Settings using the Navigation Down button 1, followed by the Enter/Play/Pause ®p button 2. Scroll to "Language" using the Navigation Up 1 and/or Down 2 buttons, followed by the Enter - Memorex MMP8640 | Manual - Page 66
to "About" using the Navigation Up 1 and/or Down 2 buttons, followed by the Enter/Play/Pause ®p button 3 to select it. 3 The "About" screen will display the device information such as the Firmware version, Int. (Internal) Total Memory, Int. (Internal) Used Memory, Int. (Internal) Free Memory, Ext - Memorex MMP8640 | Manual - Page 67
button 2. Scroll to "Default" using the Navigation Up 1 and/or Down 2 buttons, followed by the Enter/Play/Pause ®p button 3 to select it. 3 4 2 1 Press the Enter/Play/Pause ®p button 1 to reset all of the unit's settings to the factory default settings. OR Press the Menu button 2 to cancel and - Memorex MMP8640 | Manual - Page 68
! Do not format this player unless it stops working and you are instructed to do so by technical support personnel. 1 2 2 1 1 3 2 Turn the unit on and access the main menu as described on page 34. Select Settings using the Navigation Down button 1, followed by the Enter/Play/Pause ®p button - Memorex MMP8640 | Manual - Page 69
TROUBLESHOOTING GUIDE If you experience a problem with this unit, check the chart below before calling for service. SYMPTOM Unit will not turn on. No sound. The computer is not recognizing the player. CAUSE Battery is low/empty. Power is not turned on. Headphones are not inserted. Volume is set - Memorex MMP8640 | Manual - Page 70
TROUBLESHOOTING GUIDE (CONTINUED) SYMPTOM No buttons work. Unit acting erratically. CAUSE SOLUTION The Lock feature is Deactivate Lock feature as activated. described on page 36. Unit needs to be reset Reset unit and/or or firmware needs to be update firmware, see updated. page 72. Unit - Memorex MMP8640 | Manual - Page 71
unless it stops working and you are instructed to do so by technical support personnel. 1. Use the USB cable to connect the player and the computer. 2. Double click on My Computer, then 3.72GB right click "MTP Player", "Aptitude", "MMP8640" or "Removable Disk" and left click on "Format". 3a - Memorex MMP8640 | Manual - Page 72
the recessed Reset button. For the Reset button, see page 6 for the button's location. FOR FIRMWARE UPGRADE Please visit our Web site at www.memorexelectronics.com to check if there is new firmware available. IMPORTANT NOTE: Before upgrading the firmware, please backup all of your media files on - Memorex MMP8640 | Manual - Page 73
Audio File Support FM Tuner General SPECIFICATIONS Frequency Range Headphones Output S/N Ratio 20Hz-20KHz 11mW, 32ohm (Max Vol) 90dB (MP3) MP3 WMA WMV MPEG-4 Picture MPEG 1/2/2.5 Layer 3 with a Bit Rate of 32-320 kbps Windows Media Audio (WMA file with DRM 9 or DRM 10) with a Bit Rate of 48-192 - Memorex MMP8640 | Manual - Page 74
VISIT OUR WEBSITE AT WWW.MEMOREXELECTRONICS.COM OR CONTACT CUSTOMER SERVICE AT (954) 660-7100. PLEASE KEEP ALL PACKAGING MATERIAL FOR AT LEAST 90 DAYS IN CASE YOU NEED TO RETURN THIS PRODUCT TO YOUR PLACE OF PURCHASE OR TO MEMOREX. FOR CONSUMER REPLACEABLE PART(S), SEE PART NUMBER(S) ON PAGES 6 AND
-
 1
1 -
 2
2 -
 3
3 -
 4
4 -
 5
5 -
 6
6 -
 7
7 -
8
-
9
-
10
-
11
-
12
-
13
-
14
-
15
-
16
-
17
-
18
-
19
-
20
-
21
-
22
-
23
-
24
-
25
-
26
-
27
-
28
-
29
-
30
-
31
-
32
-
33
-
34
-
35
-
36
-
37
-
38
-
39
-
40
-
41
-
42
-
43
-
44
-
45
-
46
-
47
-
48
-
49
-
50
-
51
-
52
-
53
-
54
-
55
-
56
-
57
-
58
-
59
-
60
-
61
-
62
-
63
-
64
-
65
-
66
-
67
-
68
-
69
-
70
-
71
-
72
-
73
-
74
 |
 |

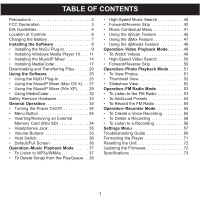
TABLE OF CONTENTS
1
Precautions . . . . . . . . . . . . . . . . . . . . . . . . . . 2
FCC Declaration . . . . . . . . . . . . . . . . . . . . . . 3
EIA Guidelines. . . . . . . . . . . . . . . . . . . . . . . . 4
Location of Controls
. . . . . . . . . . . . . . . . . . . 6
Charging the Battery . . . . . . . . . . . . . . . . . . . 7
Installing the Software
................
8
•
Installing the MyDJ Plug-In. . . . . . . . . . . . 9
•
Installing Windows Media Player 10. . . . 11
•
Installing the MusicIP Mixer . . . . . . . . . . 14
•
Installing MediaCoder. . . . . . . . . . . . . . . 17
Downloading and Transferring Files . . . . . . 20
Using the Software
..................
25
•
Using the MyDJ Plug-In . . . . . . . . . . . . . 25
•
Using the MusicIP Mixer (Mac OS X). . . 27
•
Using the MusicIP Mixer (Win XP) . . . . . 29
•
Using MediaCoder . . . . . . . . . . . . . . . . . 32
Safely Remove Hardware . . . . . . . . . . . . . . 33
General Operation
...................
34
•
Turning the Power On/Off. . . . . . . . . . . . 34
•
Menu Button . . . . . . . . . . . . . . . . . . . . . . 34
•
Inserting/Removing an External
Memory Card (Mini SD) . . . . . . . . . . . . . 34
•
Headphones Jack. . . . . . . . . . . . . . . . . . 35
•
Volume Buttons
...................
35
•
Hold Switch. . . . . . . . . . . . . . . . . . . . . . . 36
•
Default/Full Screen . . . . . . . . . . . . . . . . . 36
Operation–Music Playback Mode
......
37
•
To Listen to MP3s/WMAs. . . . . . . . . . . . 37
•
To Delete Songs from the PlayQueue . . 39
•
High-Speed Music Search . . . . . . . . . . . 40
•
Forward/Reverse Skip
. . . . . . . . . . . . . . 40
•
Music Contextual Menu
. . . . . . . . . . . . . 41
•
Using the djScan Feature. . . . . . . . . . . . 45
•
Using the djMix Feature . . . . . . . . . . . . . 47
•
Using the djMoods Feature
. . . . . . . . . . 48
Operation–Video Playback Mode
.......
49
•
To Watch Videos. . . . . . . . . . . . . . . . . . . 49
•
High-Speed Video Search
. . . . . . . . . . . 50
•
Forward/Reverse Skip
. . . . . . . . . . . . . . 50
Operation–Photo Playback Mode
......
51
•
To View Photos. . . . . . . . . . . . . . . . . . . . 51
•
Thumbnail View
. . . . . . . . . . . . . . . . . . . 52
•
Slideshow View. . . . . . . . . . . . . . . . . . . . 52
Operation–FM Radio Mode
............
53
•
To Listen to the FM Radio
. . . . . . . . . . . 53
•
To Add/Load Presets
. . . . . . . . . . . . . . . 54
•
To Record the FM Radio
. . . . . . . . . . . . 54
Operation–Recorder Mode
............
55
•
To Create a Voice Recording . . . . . . . . . 55
•
To Delete a Recording . . . . . . . . . . . . . . 56
•
To Listen to a Recording. . . . . . . . . . . . . 56
Settings Menu
......................
57
Troubleshooting Guide
................
69
Formatting the Player
. . . . . . . . . . . . . . . . . 71
Resetting the Unit . . . . . . . . . . . . . . . . . . . . 72
Updating the Firmware
. . . . . . . . . . . . . . . . 72
Specifications
. . . . . . . . . . . . . . . . . . . . . . . 73