Motorola 89271N User Guide - Page 7
Before you begin, Wearing your headset - ear cushion
 |
UPC - 723755892712
View all Motorola 89271N manuals
Add to My Manuals
Save this manual to your list of manuals |
Page 7 highlights
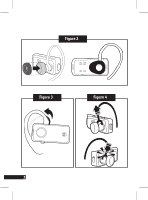
English Before you begin See figure 1 on page 1. Take a moment before you get started to familiarize yourself with your new H690 Bluetooth® Hands-free Headset. Along with your headset, a desktop charger is provided for both charging and storage Bluetooth headset 1. Speaker 2. Volume Buttons 3. Charging Contacts (on reverse side) 4. Power Switch 5. Call Button 6. Indicator Light 7. Microphone Desktop charger 8. Charging Contacts 9. Charger Port Wearing your headset See figure 2 on page 2 The ear cushion is fitted onto the end of your headset's earpiece speaker and placed onto your ear when using your headset. Your H690 headset is supplied with multiple ear cushions. Your headset's performance is greatly dependent upon achieving a good fit on your ear. Therefore, we recommend trying all the supplied ear cushions with your headset. You can wear your H690 headset on your left or right ear. The headset comes ready for the right ear. Placing the headset on your ear: see figure 3 on page 2 Placing the headset on the left ear: see figure 4 on page 2 4
-
 1
1 -
 2
2 -
 3
3 -
 4
4 -
 5
5 -
 6
6 -
 7
7 -
 8
8 -
 9
9 -
 10
10 -
 11
11 -
 12
12 -
13
-
14
-
15
-
16
-
17
-
18
-
19
-
20
-
21
-
22
-
23
-
24
-
25
-
26
-
27
-
28
-
29
-
30
-
31
-
32
-
33
-
34
-
35
-
36
-
37
-
38
-
39
-
40
-
41
-
42
-
43
-
44
-
45
-
46
-
47
-
48
-
49
-
50
-
51
-
52
-
53
-
54
-
55
-
56
-
57
-
58
-
59
-
60
-
61
-
62
-
63
-
64
-
65
-
66
-
67
-
68
-
69
-
70
-
71
-
72
-
73
-
74
-
75
-
76
-
77
-
78
-
79
-
80
-
81
-
82
-
83
-
84
-
85
-
86
-
87
-
88
-
89
-
90
-
91
-
92
-
93
-
94
-
95
-
96
-
97
-
98
-
99
-
100
-
101
-
102
-
103
-
104
-
105
-
106
-
107
-
108
-
109
-
110
-
111
-
112
-
113
-
114
-
115
-
116
-
117
-
118
-
119
-
120
-
121
-
122
-
123
-
124
-
125
-
126
-
127
-
128
-
129
-
130
-
131
-
132
-
133
-
134
-
135
-
136
-
137
-
138
-
139
-
140
-
141
-
142
-
143
-
144
-
145
-
146
-
147
-
148
-
149
-
150
-
151
-
152
-
153
-
154
-
155
-
156
-
157
-
158
-
159
-
160
-
161
-
162
-
163
-
164
-
165
-
166
-
167
-
168
-
169
-
170
-
171
-
172
-
173
-
174
-
175
-
176
-
177
-
178
-
179
-
180
-
181
-
182
-
183
-
184
-
185
-
186
-
187
-
188
-
189
-
190
-
191
-
192
-
193
-
194
-
195
-
196
-
197
-
198
-
199
-
200
-
201
-
202
-
203
-
204
 |
 |
