Motorola i580 User Manual - Page 57
Editing Entries, Viewing the Contacts List
 |
View all Motorola i580 manuals
Add to My Manuals
Save this manual to your list of manuals |
Page 57 highlights
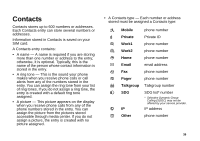
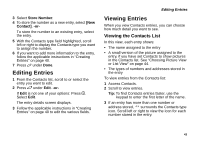
3 Select Store Number. 4 To store the number as a new entry, select [New Contact]. -or- To store the number to an existing entry, select the entry. 5 With the Contacts type field highlighted, scroll left or right to display the Contacts type you want to assign the number. 6 If you want to add more information to the entry, follow the applicable instructions in "Creating Entries" on page 40. 7 Press A under Done. Editing Entries 1 From the Contacts list, scroll to or select the entry you want to edit. 2 Press A under Edit. -or- If Edit is not one of your options: Press m. Select Edit. The entry details screen displays. 3 Follow the applicable instructions in "Creating Entries" on page 40 to edit the various fields. Editing Entries Viewing Entries When you view Contacts entries, you can choose how much detail you want to see. Viewing the Contacts List In this view, each entry shows: • The name assigned to the entry • A small version of the picture assigned to the entry, if you have set Contacts to show pictures in the Contacts list. See "Choosing Picture View or List View" on page 44. • The types of numbers and addresses stored in the entry To view entries from the Contacts list: 1 Access Contacts. 2 Scroll to view entries. Tip: To find Contacts entries faster, use the keypad to enter the first letter of the name. 3 If an entry has more than one number or address stored, surrounds the Contacts type icon. Scroll left or right to view the icon for each number stored in the entry. 43
-
 1
1 -
2
-
3
-
4
-
5
-
6
-
7
-
8
-
9
-
10
-
11
-
12
-
13
-
14
-
15
-
16
-
17
-
18
-
19
-
20
-
21
-
22
-
23
-
24
-
25
-
26
-
27
-
28
-
29
-
30
-
31
-
32
-
33
-
34
-
35
-
36
-
37
-
38
-
39
-
40
-
41
-
42
-
43
-
44
-
45
-
46
-
47
-
48
-
49
-
50
-
51
-
 52
52 -
 53
53 -
 54
54 -
 55
55 -
 56
56 -
 57
57 -
 58
58 -
 59
59 -
 60
60 -
 61
61 -
 62
62 -
63
-
64
-
65
-
66
-
67
-
68
-
69
-
70
-
71
-
72
-
73
-
74
-
75
-
76
-
77
-
78
-
79
-
80
-
81
-
82
-
83
-
84
-
85
-
86
-
87
-
88
-
89
-
90
-
91
-
92
-
93
-
94
-
95
-
96
-
97
-
98
-
99
-
100
-
101
-
102
-
103
-
104
-
105
-
106
-
107
-
108
-
109
-
110
-
111
-
112
-
113
-
114
-
115
-
116
-
117
-
118
-
119
-
120
-
121
-
122
-
123
-
124
-
125
-
126
-
127
-
128
-
129
-
130
-
131
-
132
-
133
-
134
-
135
-
136
-
137
-
138
-
139
-
140
-
141
-
142
-
143
-
144
-
145
-
146
-
147
-
148
-
149
-
150
-
151
-
152
-
153
-
154
-
155
-
156
-
157
-
158
-
159
-
160
-
161
-
162
-
163
-
164
-
165
-
166
-
167
-
168
-
169
-
170
-
171
-
172
-
173
-
174
-
175
-
176
-
177
-
178
-
179
-
180
-
181
-
182
-
183
-
184
-
185
-
186
-
187
-
188
-
189
-
190
-
191
-
192
-
193
-
194
-
195
-
196
-
197
-
198
-
199
-
200
-
201
-
202
-
203
-
204
-
205
-
206
-
207
-
208
-
209
-
210
-
211
-
212
-
213
-
214
-
215
-
216
-
217
-
218
-
219
-
220
-
221
-
222
-
223
-
224
-
225
-
226
-
227
-
228
-
229
-
230
-
231
-
232
-
233
 |
 |