Mr. Coffee BVMC-KG6 User Manual - Page 4
Parts Diagram - replacement parts
 |
View all Mr. Coffee BVMC-KG6 manuals
Add to My Manuals
Save this manual to your list of manuals |
Page 4 highlights
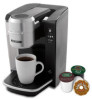
PARTS DIAGRAM 6 7 15 Controls and Indicators 1. Brew•Off Button 2. Pre-Heating Light 3. Serving Size Indicators 1 4. Serving Size Button 5. Add Water Light 6. Water Reservoir Lid 2 7. Water Reservoir 8. Drip Tray Base 9. Drip Tray 3 10.Drip Tray Plate 11.Brew Head 4 12.K-cup® Assembly Housing 13.Brew Head Needle 14.Brew Head Handle 5 15.Water Reservoir Lock Tab Slots 6 SET-UP & HOW TO BREW 14 1. Place Brewer upright on a flat surface, remove all product 13 packaging and plug into outlet. 12 11 10 2. Remove Water Reservoir and 9 Water Reservoir Lid, then fill with bottled or filtered water to the 8 MAX FILL line. NOTE: DO NOT overfill. 3. Replace Water Reservoir Lid and Water Reservoir to the left side of the Brewer. 4. Lift the Brew Head Handle to insert a K-Cup® pack. NOTE: DO NOT remove or puncture the foil lid of the K-Cup® pack. 7
-
 1
1 -
 2
2 -
 3
3 -
 4
4 -
 5
5 -
 6
6 -
 7
7 -
 8
8 -
 9
9 -
 10
10 -
11
-
12
-
13
-
14
-
15
-
16
-
17
-
18
-
19
-
20
-
21
-
22
 |
 |
