NEC LCD1700NX-BK-R MultiSync LCD1700NX User's Manual - Page 11
Installation
 |
UPC - 805736006315
View all NEC LCD1700NX-BK-R manuals
Add to My Manuals
Save this manual to your list of manuals |
Page 11 highlights
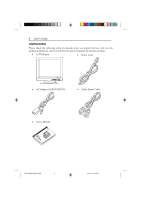
MultiSync LCD1700NX 9 INSTALLATION To install the monitor to your host system, please follow the steps as given below: Steps 1. Open the connector cover first. 2. And then open the cable cover. 3. Connect Video Cable a. Make sure both the monitor and computer are powered-OFF. b. Digital: Connect the DVI signal cable to the connector of the computer first, then to the monitor. Analog: Connect the 15-pin mini D-SUB signal cable to the connector of the computer first, then to the monitor. 4. Connect power cord Connect the power cord to the monitor, then to a properly grounded AC outlet. 5. Assemble the cable cover. 6. Cover the connector cover. 7. Power-ON Monitor and Computer Power-ON the monitor first, then power-ON the computer. This sequence is very important. 8. If the monitor still does not function properly, please refer to the trobleshooting section to diagnose the problem. Connector Cover D-SUB Cable DVI-D Cable(not included) PULL Cable Cover (This semi-circle opening is the Cables outlet) LCD1700NX(English).PM6 11 02.2.12, 3:50 PM
-
 1
1 -
2
-
3
-
4
-
5
-
 6
6 -
 7
7 -
 8
8 -
 9
9 -
 10
10 -
 11
11 -
 12
12 -
 13
13 -
 14
14 -
 15
15 -
 16
16 -
17
-
18
-
19
-
20
-
21
-
22
-
23
-
24
-
25
-
26
-
27
-
28
-
29
-
30
-
31
-
32
-
33
-
34
-
35
-
36
-
37
-
38
-
39
-
40
-
41
-
42
-
43
-
44
-
45
-
46
-
47
-
48
 |
 |
