NEC NP-PX800X-08ZL User Manual - Page 213
NEC NP-PX800X-08ZL Manual
 |
View all NEC NP-PX800X-08ZL manuals
Add to My Manuals
Save this manual to your list of manuals |
Page 213 highlights
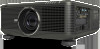
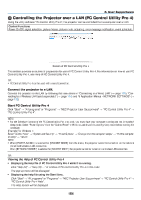
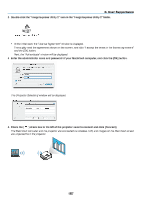
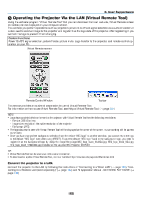
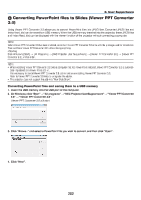
8. User Supportware Operating the Projector Via the LAN (Virtual Remote Tool) Using the software program "Virtual Remote Tool" that you can download from our web site, Virtual Remote screen (or toolbar) can be displayed on your computer screen. This will help you perform operations such as projector's power on or off and signal selection via a LAN connection. It is also used to send an image to the projector and register it as the logo data of the projector. After registering it, you can lock the logo to prevent it from changing. Control Functions Power On/Off, signal selection, picture freeze, picture mute, Logo transfer to the projector, and remote control operation on your PC. Virtual Remote screen Remote Control Window Toolbar This section provides an outline of preparation for use of Virtual Remote Tool. For information on how to use Virtual Remote Tool, see Help of Virtual Remote Tool. (→ page 201) NOTE: • Logo data (graphics) that can be sent to the projector with Virtual Remote Tool has the following restrictions: - File size: 256 KB or less - Image size (resolution): the native resolution of the projector - File format: JPEG • The logo data that is sent with Virtual Remote Tool will be displayed at the center of the screen. Its surrounding will be painted out in black. • Once you have changed the background selection from the default "NEC logo" to another selection, you cannot return the logo to the default "NEC logo" even after using [RESET]. To put the default "NEC logo" back in the background logo, you need to register it as the background logo by using the image file (\Logo\NEC_logo_black_WUXGA.jpg; NEC_logo_black_XGA.jpg; NEC_logo_black_1280x800.jpg) included on the supplied NEC Projector CD-ROM. TIP: • Virtual Remote Tool can be used also with a serial connection. • To download or update Virtual Remote Tool, visit our website: http://www.nec-display.com/dl/en/index.html Connect the projector to a LAN. Connect the projector to the LAN by following the instructions in "Connecting to a Wired LAN" (→ page 163), "Connecting to a Wireless LAN (sold separately)" (→ page 164) and "9 Application Menus - NETWORK SETTINGS" (→ page 133) 199
-
 1
1 -
2
-
3
-
4
-
5
-
6
-
7
-
8
-
9
-
10
-
11
-
12
-
13
-
14
-
15
-
16
-
17
-
18
-
19
-
20
-
21
-
22
-
23
-
24
-
25
-
26
-
27
-
28
-
29
-
30
-
31
-
32
-
33
-
34
-
35
-
36
-
37
-
38
-
39
-
40
-
41
-
42
-
43
-
44
-
45
-
46
-
47
-
48
-
49
-
50
-
51
-
52
-
53
-
54
-
55
-
56
-
57
-
58
-
59
-
60
-
61
-
62
-
63
-
64
-
65
-
66
-
67
-
68
-
69
-
70
-
71
-
72
-
73
-
74
-
75
-
76
-
77
-
78
-
79
-
80
-
81
-
82
-
83
-
84
-
85
-
86
-
87
-
88
-
89
-
90
-
91
-
92
-
93
-
94
-
95
-
96
-
97
-
98
-
99
-
100
-
101
-
102
-
103
-
104
-
105
-
106
-
107
-
108
-
109
-
110
-
111
-
112
-
113
-
114
-
115
-
116
-
117
-
118
-
119
-
120
-
121
-
122
-
123
-
124
-
125
-
126
-
127
-
128
-
129
-
130
-
131
-
132
-
133
-
134
-
135
-
136
-
137
-
138
-
139
-
140
-
141
-
142
-
143
-
144
-
145
-
146
-
147
-
148
-
149
-
150
-
151
-
152
-
153
-
154
-
155
-
156
-
157
-
158
-
159
-
160
-
161
-
162
-
163
-
164
-
165
-
166
-
167
-
168
-
169
-
170
-
171
-
172
-
173
-
174
-
175
-
176
-
177
-
178
-
179
-
180
-
181
-
182
-
183
-
184
-
185
-
186
-
187
-
188
-
189
-
190
-
191
-
192
-
193
-
194
-
195
-
196
-
197
-
198
-
199
-
200
-
201
-
202
-
203
-
204
-
205
-
206
-
207
-
 208
208 -
 209
209 -
 210
210 -
 211
211 -
 212
212 -
 213
213 -
 214
214 -
 215
215 -
 216
216 -
 217
217 -
 218
218 -
219
-
220
-
221
-
222
-
223
-
224
-
225
-
226
-
227
-
228
-
229
-
230
-
231
-
232
-
233
-
234
-
235
-
236
-
237
-
238
-
239
-
240
-
241
-
242
-
243
-
244
 |
 |