Netgear PS121v2 PS121v2 Reference Manual - Page 39
Viewing and Updating Settings with the Smart Wizard, Click the Smart Wizard icon - mac
 |
View all Netgear PS121v2 manuals
Add to My Manuals
Save this manual to your list of manuals |
Page 39 highlights
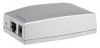
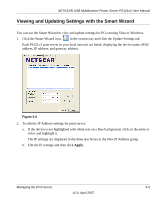
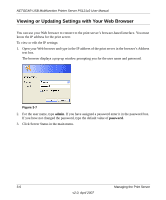
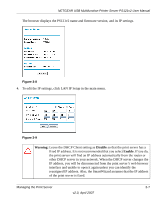
NETGEAR USB Multifunction Printer Server PS121v2 User Manual Viewing and Updating Settings with the Smart Wizard You can use the Smart Wizard to view and update settings for PCs running Vista or Windows. 1. Click the Smart Wizard icon, , in the system tray and click the Update Settings tab. Each PS121v2 print server in your local network are listed, displaying the device name, MAC address, IP address, and gateway address. Figure 3-6 2. To edit the IP Address settings for print server: a. If the device is not highlighted with white text on a blue background, click on the entry to select and highlight it. The IP settings are displayed in the three text boxes in the New IP Address group. b. Edit the IP settings and then click Apply. Managing the Print Server 3-5 v2.0, April 2007
-
 1
1 -
2
-
3
-
4
-
5
-
6
-
7
-
8
-
9
-
10
-
11
-
12
-
13
-
14
-
15
-
16
-
17
-
18
-
19
-
20
-
21
-
22
-
23
-
24
-
25
-
26
-
27
-
28
-
29
-
30
-
31
-
32
-
33
-
 34
34 -
 35
35 -
 36
36 -
 37
37 -
 38
38 -
 39
39 -
 40
40 -
 41
41 -
 42
42 -
 43
43 -
 44
44 -
45
-
46
-
47
-
48
-
49
-
50
-
51
-
52
 |
 |