Netgear RND4275 Hardware Manual
Netgear RND4275 - ReadyNAS NV+ NAS Server Manual
 |
UPC - 606449056099
View all Netgear RND4275 manuals
Add to My Manuals
Save this manual to your list of manuals |
Netgear RND4275 manual content summary:
- Netgear RND4275 | Hardware Manual - Page 1
ReadyNAS Duo and NV+ Hardware Manual 350 East Plumeria Drive San Jose, CA 95134 USA December 2011 202-10925-02 - Netgear RND4275 | Hardware Manual - Page 2
register your product, get the latest product updates, or get support online, visit us at http://support.netgear.com. Phone (US & Canada only): 1-888-NETGEAR Phone (Other Countries): See support information card. Trademarks NETGEAR, the NETGEAR logo, and Connect with Innovation are trademarks and/or - Netgear RND4275 | Hardware Manual - Page 3
Table of Contents Chapter 1 Getting Started Additional Documentation 6 Setup Location 6 System Requirements 6 Diskless Units 7 Chapter 2 ReadyNAS Duo Front and Side Panels 10 Drive Bays 11 Rear Panel 13 Status Information 14 System Shutdown 14 Boot Menu 15 Chapter 3 ReadyNAS NV+ Front and - Netgear RND4275 | Hardware Manual - Page 4
ReadyNAS Duo and NV+ Appendix A Defaults and Technical Specifications Factory Default Settings 32 Duo Technical Specifications 33 NV+ Technical Specifications 34 Safety Warnings 35 Electrical Safety Precautions 35 General Safety Precautions 36 Electrostatic Discharge (ESD) Precautions - Netgear RND4275 | Hardware Manual - Page 5
1. Getting Started 1 Congratulations on your purchase of a NETGEAR ReadyNAS® storage system. This ReadyNAS Duo and NV+ Hardware Manual describes the physical features of the Duo and NV+ storage systems. This chapter contains the following sections: • Additional Documentation • Setup Location • - Netgear RND4275 | Hardware Manual - Page 6
+ storage system, see the ReadyNAS RAIDiator 4.1 Software Manual, which is available at http://www.readynas.com/documentation. NETGEAR maintains a community website that supports ReadyNAS products. Visit http://readynas.com for reviews, tutorials, a comparison chart, software updates, documentation - Netgear RND4275 | Hardware Manual - Page 7
X-RAID®. If you want to use Flex-RAID, see the ReadyNAS RAIDiator 4.1 Software Manual. To prepare a diskless system for first use: 1. Obtain at least one hard disk drive that appears on the NETGEAR Hardware Compatibility List. See http://www.readynas.com/hard_disk_hcl. Note: If you use a formatted - Netgear RND4275 | Hardware Manual - Page 8
For more information about RAIDar, see the ReadyNAS RAIDiator 4.1 Software Manual. If you are installing multiple disks, your ReadyNAS system synchronizes as it synchronizes the disks. Follow the instructions in ReadyNAS RAIDiator 4.1 Software Manual, which is available at http://www.readynas.com - Netgear RND4275 | Hardware Manual - Page 9
2. ReadyNAS Duo 2 This chapter provides an overview of the physical features of the ReadyNAS Duo and includes the following sections: • Front and Side Panels • Drive Bays • Rear Panel • Status Information • System Shutdown • Boot Menu 9 - Netgear RND4275 | Hardware Manual - Page 10
ReadyNAS Duo and NV+ Front and Side Panels The following figure shows the front and side panels of the ReadyNAS Duo. 1 2 3 8 45 6 7 Figure 1. ReadyNAS Duo front and side panels 1. Power button and LED 2. Disk Activity LED 3. Exhaust vent 4. USB 2.0 port 5. Backup button 6. USB and Backup - Netgear RND4275 | Hardware Manual - Page 11
ReadyNAS Duo and NV+ Drive Bays The following figure shows the drive bays of the ReadyNAS Duo. Note that the tray design on your system might vary from the design pictured. 1 2 3 4 5 Figure 2. ReadyNAS Duo drive bay 1. Drive bay door 2. Disk tray handle 3. Recessed drive tray locking mechanism - Netgear RND4275 | Hardware Manual - Page 12
ReadyNAS Duo and NV+ The following figure shows a ReadyNAS Duo disk tray. Note that the tray design on your system might vary from the design pictured. 2 1 3 4 5 Figure 3. ReadyNAS Duo disk tray 1. Hard drive 2. Disk tray 3. Disk tray handle 4. Recessed disk tray locking mechanism 5. Disk tray - Netgear RND4275 | Hardware Manual - Page 13
ReadyNAS Duo and NV+ Rear Panel The following figure shows the rear panel of ReadyNAS Duo. 1 2 3 DC IN 6 54 Figure 4. ReadyNAS Duo rear panel 1. Exhaust fan 2. Kensington lock 3. Reset button 4. USB 2.0 ports 5. 1-gigabit Ethernet port with LED status indicators 6. Power adapter socket - Netgear RND4275 | Hardware Manual - Page 14
Information You can obtain information about the status of your system by reviewing the indicators listed in the following table. Indicator Power button and information, see the ReadyNAS RAIDiator 4.1 Software Manual, which is available at http://www.readynas.com/documentation. ReadyNAS Duo 14 - Netgear RND4275 | Hardware Manual - Page 15
RAID and Flex-RAID, see the ReadyNAS RAIDiator 4.1 Software Manual, which is available at http://www.readynas.com/documentation.) password, to defaults. • Tech support. Boots into a low-level diagnostic mode. Use the tech support boot mode only when instructed to do so by a NETGEAR technical support - Netgear RND4275 | Hardware Manual - Page 16
later), and then release the button. To perform a skip volume check, tech support mode, or memory test, TFTP boot, or USB boot: 1. Power off your release the button. Boot menu mode Skip volume check TFTP boot Tech support mode USB boot Action to select Press the Power button and continue to - Netgear RND4275 | Hardware Manual - Page 17
3. ReadyNAS NV+ 3 This chapter provides an overview of the physical features of the ReadyNAS NV+ and includes the following sections: • Front and Side Panels • Drive Bays • Rear Panel • Status Information • System Shutdown • Boot Menu 17 - Netgear RND4275 | Hardware Manual - Page 18
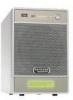
ReadyNAS Duo and NV+ Front and Side Panels The following figure shows the front and side panels of the ReadyNAS NV+. Note that the tray design on your system might vary from the design pictured. 2 34 56 1 7 8 Figure 5. ReadyNAS NV+ front and side panels 1. Exhaust vents 2. USB 2.0 port 3. Backup - Netgear RND4275 | Hardware Manual - Page 19
ReadyNAS Duo and NV+ Drive Bays The following figure shows the drive bays of the ReadyNAS NV+. Note that the tray design 2 3 4 1 5 on your system might vary from the design pictured. Figure 6. ReadyNAS NV+ drive bay 1. Drive bay door 2. Disk tray handle 3. Recessed drive tray locking mechanism 4. - Netgear RND4275 | Hardware Manual - Page 20
ReadyNAS Duo and NV+ The following figure shows a ReadyNAS NV+ disk tray. 2 1 3 4 5 Figure 7. ReadyNAS NV+ disk tray 1. Hard drive 2. Disk tray 3. Disk tray handle 4. Recessed disk tray locking mechanism 5. Disk tray release latch ReadyNAS NV+ 20 - Netgear RND4275 | Hardware Manual - Page 21
ReadyNAS Duo and NV+ Rear Panel The following figure shows the rear panel of the ReadyNAS NV+. 12 3 4 5 6 Figure 8. ReadyNAS NV+ rear panel 1. Reset button 2. USB 2.0 ports 3. 1-gigabit Ethernet port with LED status indicators 4. Exhaust fan 5. Power cable socket 6. Kensington lock ReadyNAS NV+ 21 - Netgear RND4275 | Hardware Manual - Page 22
Information You can obtain information about the status of your system by reviewing the indicators listed in the following table. Indicator Power button and LED information, see the ReadyNAS RAIDiator 4.1 Software Manual, which is available at http://www.readynas.com/documentation. ReadyNAS NV+ 22 - Netgear RND4275 | Hardware Manual - Page 23
RAID and Flex-RAID, see the ReadyNAS RAIDiator 4.1 Software Manual, which is available at http://www.readynas.com/documentation.) password, to defaults. • Tech support. Boots into a low-level diagnostic mode. Use the tech support boot mode only when instructed to do so by a NETGEAR technical support - Netgear RND4275 | Hardware Manual - Page 24
the Reset button. "OS reinstall" displays in the status display in 5 seconds. "Factory Reset" displays 25 seconds later. To perform a skip volume check, tech support mode, or memory test, TFTP boot, or USB boot: 1. Power off your system. 2. Press and hold the Power button. 3. When the name of the - Netgear RND4275 | Hardware Manual - Page 25
will not provide assistance. For a list of supported disks, see the NETGEAR Hardware Compatibility List at http://www.readynas.com/hard_disk_hcl. For information about configuring disks on your ReadyNAS storage system, see the ReadyNAS RAIDiator 4.1 Software Manual, which is available at http://www - Netgear RND4275 | Hardware Manual - Page 26
as described in Diskless Units on (diskless) page 7. Then, perform a factory default reboot as described in Boot Menu on page 15. Note: This process erases To obtain support from NETGEAR technical support, you must use previously formatted disks that appear on the NETGEAR Hardware Compatibility - Netgear RND4275 | Hardware Manual - Page 27
ReadyNAS Duo and NV+ Adding a Disk You can add a hard disk to an empty disk bay. You do not need to shut down your system before adding a disk. If you are adding a previously formatted disk to your Duo or NV+, see the precautions in Previously Formatted Disks on page 26. Note that the tray design on - Netgear RND4275 | Hardware Manual - Page 28
disks to a diskless system, see the ReadyNAS RAIDiator 4.1 Software Manual, which is available at http://www.readynas.com/documentation, for . In addition, ReadyNAS FrontView provides information about the failed disk. NETGEAR recommends replacing a failed disk with the same disk model. Use - Netgear RND4275 | Hardware Manual - Page 29
email alerts and status messages about the need to replace a disk. Your system supports hot-swap bays, so you do not need to power down your system when the wrong disk when another disk is syncing, call NETGEAR technical support. They might be able to help you recover your data if the - Netgear RND4275 | Hardware Manual - Page 30
ReadyNAS Duo and NV+ 2. Pull out the disk tray and replace the disk. 1 2 3 1. Hard drive 2. Empty disk tray 3. Assembled disk tray Make sure that the hard disk connectors face the interior of the disk bay. 3. Slide the disk tray back into the system, and press the handle to secure the disk. The - Netgear RND4275 | Hardware Manual - Page 31
A A. Defaults and Technical Specifications This appendix includes the following sections: • Factory Default Settings • Duo Technical Specifications • NV+ Technical Specifications • Safety Warnings 31 - Netgear RND4275 | Hardware Manual - Page 32
settings for ReadyNAS Duo and NV+. Feature Default Login User login URL when the ReadyNAS is https://192.168.168.168/admin not connected to a DHCP server Admin user name (case-sensitive) admin Admin login password (case-sensitive) netgear1 Management System configuration ReadyNAS FrontView - Netgear RND4275 | Hardware Manual - Page 33
fan • High temperature email alert with auto shutdown Environmental compliance: • 32° to 95°F • 20% to 80% humidity (noncondensing) • FCC, UL, CE, C-tick, IC, RoHS compliance Defaults and Technical Specifications 33 - Netgear RND4275 | Hardware Manual - Page 34
cooling fan • High temperature email alert with autoshutdown Environmental compliance: • 32° to 104°F • 20% to 80% humidity (noncondensing) • FCC, UL, CE, C-tick, IC, RoHS compliance Defaults and Technical Specifications 34 - Netgear RND4275 | Hardware Manual - Page 35
IS REPLACED BY AN INCORRECT TYPE. DISPOSE OF USED BATTERIES ACCORDING TO THEIR INSTRUCTIONS. 3. Connect the units and their associated LAN connections only to equipment within the include a grounding plug, and plug them into grounded electrical outlets. Defaults and Technical Specifications 35 - Netgear RND4275 | Hardware Manual - Page 36
See the technical specifications in this manual for details about your specific ReadyNAS to the manufacturer's instructions. DANGER: Installing in fuses: Only trained service technicians can replace the technical support for details and support. Electrostatic Defaults and Technical Specifications 36 - Netgear RND4275 | Hardware Manual - Page 37
a particular Region or Country. Therefore, all options described in this user's guide may not be available in your version of the product. FCC Requirements for FCC Information to User This product does not contain any user serviceable components and is to be used with approved antennas only. Any - Netgear RND4275 | Hardware Manual - Page 38
interference that may cause undesired operation. FCC Radio Frequency Interference Warnings & Instructions This equipment has been tested and found to comply with the limits help. Modifications made to the product, unless expressly approved by NETGEAR, Inc., could void the user's right to operate the - Netgear RND4275 | Hardware Manual - Page 39
ReadyNAS Duo and NV+ European Union The NETGEAR ReadyNAS Duo and NV+ comply with essential requirements of EU EMC Directive 2004/108/EC and Low Voltage Directive 2006/95/EC as supported by applying the following test methods and standards: • EN55022: 2006 / A1: 2007 • EN55024: 1998 / A1: 2001 / A2: - Netgear RND4275 | Hardware Manual - Page 40
of Conformity 38 disk adding 27 failure 28 previously formatted 26 replacing 29 supported 25 disk tray Duo 12 NV+ 20 diskless units 7, 26 drive 19 E electrical safety 35 electrostatic discharge (ESD) 36 email alerts 28 F factory default settings 32 failed disk 28 FCC 37 front panel Duo 10 NV+ 18 G - Netgear RND4275 | Hardware Manual - Page 41
ReadyNAS Duo and NV+ system requirements 6 system shutdown Duo 14 NV+ 22 T technical specifications Duo 33 NV+ 34 technical support 2 trademarks 2 troubleshooting with boot menu Duo 15 NV+ 23 V volume synchronization 8, 28, 30 W warning, safety 35 41
-
 1
1 -
 2
2 -
 3
3 -
 4
4 -
 5
5 -
 6
6 -
 7
7 -
8
-
9
-
10
-
11
-
12
-
13
-
14
-
15
-
16
-
17
-
18
-
19
-
20
-
21
-
22
-
23
-
24
-
25
-
26
-
27
-
28
-
29
-
30
-
31
-
32
-
33
-
34
-
35
-
36
-
37
-
38
-
39
-
40
-
41
 |
 |

350 East Plumeria Drive
San Jose, CA 95134
USA
December 2011
202-10925-02
ReadyNAS Duo and
NV+
Hardware Manual