Netgear WAX204-WiFi Installation Guide - Page 2
Support and Community, Regulatory and Legal, Use the WAX204 in access point mode
 |
View all Netgear WAX204-WiFi manuals
Add to My Manuals
Save this manual to your list of manuals |
Page 2 highlights
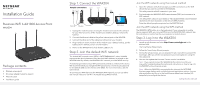
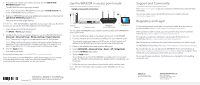
5. To register and activate your product warranty, tap the LOG IN with NETGEAR account button. The NETGEAR Account Login page displays. Note: If you do not own a NETGEAR account, tap the Create account link, create a NETGEAR account, and log in. 6. Enter your NETGEAR account email address and password, and then tap the LOG IN with NETGEAR account button. The Local device login page displays. IMPORTANT: After the WAX204 is registered and you log in with your NETGEAR account, you can use the local device password for future logins. 7. Log in using your local device password. The BASIC > Home page displays. 8. Configure the country and region where you are using the WAX204. Select Advanced > Advanced Setup > Wireless Settings > Region Selection. Note: The country or region is not selectable for the U.S. and Canada. Note: Make sure that the country is set to the location where the device is operating. You are responsible for complying with the local, regional, and national regulations for channels, power levels, and frequency ranges. 9. Click the Apply button. Your settings are saved. For more information, see Use the WAX204 in access point mode. If you do not want to use the WAX204 in access point mode, you can continue to use the WAX204 in router mode and configure the WAX204 for your environment. For more information, see the user manual. Use the WAX204 in access point mode Sample access point connections Internet Modem Network router WAX204 in access point mode WiFi device You can cable the WAX204 to your network router and then set the WAX204 to access point mode. 1. Connect the Ethernet cable to the yellow Internet port on the WAX204. 2. Connect the other end of the cable to a LAN port on your network router. Your network router must support a DHCP server, so that it assigns an IP address to the WAX204 and its clients, and provides Internet access. 3. Power on the WAX204 and check that the LEDs are lit. 4. Select ADVANCED > Advanced Setup > Router / AP / Bridge Mode. 5. Select the AP Mode radio button. 6. Tap the Apply button. Your settings are saved and the WAX204 is reconfigured in access point mode. The WAX204 routing functions are disabled and it is assigned a new IP address. 7. Follow the onscreen instructions to log in to the admin interface again. Note: For more information about configuring the WAX204, see the user manual. © NETGEAR, Inc., NETGEAR and the NETGEAR Logo are trademarks of NETGEAR, Inc. Any non‑NETGEAR September2020 trademarks are used for reference purposes only. Support and Community Visit netgear.com/support to get your questions answered and access the latest downloads. You can also check out our NETGEAR Community for helpful advice at community.netgear.com. Regulatory and Legal Si ce produit est vendu au Canada, vous pouvez accéder à ce document en français canadien à https://www.netgear.com/support/download/. (If this product is sold in Canada, you can access this document in Canadian French at https://www.netgear.com/support/download/.) For regulatory compliance information including the EU Declaration of Conformity, visit https://www.netgear.com/about/regulatory/. See the regulatory compliance document before connecting the power supply. For NETGEAR's Privacy Policy, visit https://www.netgear.com/about/privacy-policy. By using this device, you are agreeing to NETGEAR's Terms and Conditions at https://www.netgear.com/about/terms-and-conditions. If you do not agree, return the device to your place of purchase within your return period. Do not use this device outdoors. The PoE source is intended for intra building connection only. NETGEAR, Inc. 350 East Plumeria Drive San Jose, CA 95134, USA NETGEAR INTERNATIONAL LTD Floor 1, Building 3 University Technology Centre Curraheen Road, Cork, T12EF21, Ireland
-
 1
1 -
 2
2
 |
 |
