Netgear WN370-Wall Installation Guide - Page 1
Netgear WN370-Wall Manual
 |
View all Netgear WN370-Wall manuals
Add to My Manuals
Save this manual to your list of manuals |
Page 1 highlights
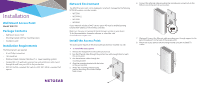
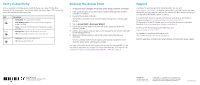
Installation Wall Mount Access Point Model WN370 Package Contents • Wall Mount Access Point • Mounting bracket with four mounting screws • Installation guide Installation Requirements The following items are required: • 6 mm Phillips screwdriver • T8 screwdriver • Windows-based computer (Windows 7 or newer operating system) • Standard EU or US wall outlet junction box with an Ethernet cable routed through the wall from your LAN to the junction box • IEEE 802.3af/at-compliant PoE switch or IEEE 802.3af/at-compliant PoE injector Network Environment The WN370 access point can be deployed in a network managed by the following NETGEAR wireless controller models: • WC7500 • WC7600v2 • WC7600 • WC9500 If your network includes a DHCP server, option 43 must be enabled pointing toward the IP address of the wireless controller. Make sure that you are running the latest firmware version on your device. To find documentation, firmware, software, or other files, visit downloadcenter.netgear.com. Install the Access Point The access point requires an electrical outlet junction box mounted in a wall. ¾¾ To install the access point: 1. Remove the faceplate from the outlet junction box. 2. Run the Ethernet cable through the junction box with enough slack to reach the access point. 3. Run the Ethernet cables through the mounting bracket. 4. Align the mounting bracket with the holes on the junction box. 5. Attach the mounting bracket to the junction box using the included Phillips head screws. 6. Connect the Ethernet cable providing PoE and network connectivity to the PoE port on the back of the access point. 7. (Optional) Connect the Ethernet cable providing pass-through support to the pass-through port on the back of the access point. 8. Mount the access point to the mounting bracket using the included T8 screws.
-
 1
1 -
 2
2
 |
 |
