Netgear WNR1000v3 Setup Guide
Netgear WNR1000v3 - Wireless- N Router Manual
 |
View all Netgear WNR1000v3 manuals
Add to My Manuals
Save this manual to your list of manuals |
Netgear WNR1000v3 manual content summary:
- Netgear WNR1000v3 | Setup Guide - Page 1
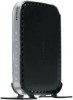
N150 Wireless Router WNR1000v3 Setup Manual NETGEAR, Inc. 350 E. Plumeria Drive San Jose, CA 95134 USA September 2010 208-10724-01 v1.0 - Netgear WNR1000v3 | Setup Guide - Page 2
Statement of Conditions In the interest of improving internal design, operational function, and/or reliability, NETGEAR reserves the right to make changes to the products described in this document without notice. NETGEAR does not assume any liability that may occur due to the use or application of - Netgear WNR1000v3 | Setup Guide - Page 3
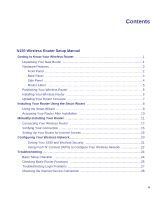
Router for Internet Access 16 Configuring Your Wireless Network 20 Setting Your SSID and Wireless Security 21 Using Push 'N' Connect (WPS) to Configure Your Wireless Network 22 Troubleshooting...24 Basic Setup Checklist ...24 Checking Basic Router Functions 25 Troubleshooting Login Problems - Netgear WNR1000v3 | Setup Guide - Page 4
Internet IP Address 28 Troubleshooting PPPoE 29 Troubleshooting Internet Browsing 30 Using the Ping Utility to Troubleshoot 30 Testing the Path from Your Computer to Your Router 30 Testing the Path from a Computer to the Internet 31 Technical Specifications ...32 Default Configuration Settings - Netgear WNR1000v3 | Setup Guide - Page 5
N150 Wireless Router • An AC power adapter (varies by region) • A yellow Ethernet cable • NETGEAR Installation Guide • The Resource CD, which includes: - The Smart Wizard Installation Assistant (Autorun.exe) - A PDF version of this manual - A link to the online User Manual A link to the online User - Netgear WNR1000v3 | Setup Guide - Page 6
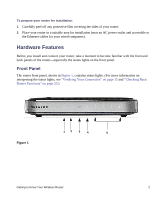
protective film covering the sides of your router. 2. Place your router in a suitable area for installation (near an AC power outlet and accessible to the Ethernet cables for your wired computers). Hardware Features Before you install and connect your router, take a moment to become familiar with - Netgear WNR1000v3 | Setup Guide - Page 7
25 for instructions on restoring your router firmware. Power is not being supplied to the router Indicates that wireless security is enabled. A WPS-capable device is connecting to or managing the router. No WPS connection exists. The Internet port is connected, but no IP address has been acquired - Netgear WNR1000v3 | Setup Guide - Page 8
. Press for approximately 5 seconds to reset the router to the factory default settings. 2. Four Local Area Network (LAN) 10/100 Mbps Ethernet ports for connecting the router to your local computers 3. Internet/Wide Area Network (WAN) Ethernet port for connecting the router to a cable or DSL modem - Netgear WNR1000v3 | Setup Guide - Page 9
label on the bottom of the wireless router shows the router's MAC address, serial number, security PIN, and factory default login information. The ports on the router are color-coded to distinguish your Internet port from the other four ports that connect to the wired computer(s) on your Local Area - Netgear WNR1000v3 | Setup Guide - Page 10
The Installation Assistant walks you through the steps required to connect your router, modem, and PC(s); configure your wireless settings; and enable wireless security for your network. When you have finished, you will be Internet ready! NETGEAR does not recommend or support adding a NETGEAR router - Netgear WNR1000v3 | Setup Guide - Page 11
wireless router for Internet access (see "Setting Up Your Router for Internet Access" on page 16). 3. Configure your wireless network and select wireless security settings to protect your wireless network (see "Configuring Your Wireless Network" on page 20). Updating Your Router Firmware NETGEAR - Netgear WNR1000v3 | Setup Guide - Page 12
an Internet Service Provider (ISP). • You have the configuration information provided by your ISP. Using the Smart Wizard The NETGEAR Smart Wizard takes you through the procedure to connect your router, modem, and PC(s). It then helps you to configure your wireless settings and enable wireless - Netgear WNR1000v3 | Setup Guide - Page 13
update later (for more information, see "Setting Up Your Router for Internet Access" on page 16, or the online User Manual). 3. Follow the remaining instructions and prompts. The Smart Wizard guides you through installing your router, connecting your router to the Internet, configuring your wireless - Netgear WNR1000v3 | Setup Guide - Page 14
, if you have reset the router to its default factory settings). If you want to change the settings after installing and configuring your router using the Smart Wizard, you must open a browser window and log in to the router. You will also be prompted to check for new router firmware. For more - Netgear WNR1000v3 | Setup Guide - Page 15
to set up your wireless router and access the Internet: - Host and domain name - Internet login name and password (frequently an email address and password) - Domain Name Server (DNS) addresses - Fixed or static IP address Your ISP should have provided you with all the information needed to connect - Netgear WNR1000v3 | Setup Guide - Page 16
Connecting Your Wireless Router Before you install your wireless router, make sure that the Internet Protocol (TCP/IP) Property settings on your computer are set to "automatically obtain an IP address" using DHCP and "Obtain DNS server address automatically." You can check these settings by looking - Netgear WNR1000v3 | Setup Guide - Page 17
your NETGEAR product. Securely insert one end of the Ethernet cable into your modem (C) and the other end into the Internet port of the wireless router (D). (The cable and the Internet port label are color coded.) D C Figure 7 6. Locate the cable (A) that is still attached to your computer (see - Netgear WNR1000v3 | Setup Guide - Page 18
7. Connect any additional wired PC to your router by inserting an Ethernet cable from one of these computers into one of the three remaining LAN ports. 8. Review that your network is now set up (as shown in Figure 9); you are ready to start your network. Figure 9 9. Start your network in the - Netgear WNR1000v3 | Setup Guide - Page 19
Basic Router Functions" on page 25. The WPS button/light will not be lit unless you have set wireless security. See "Using Push 'N' Connect (WPS) to Configure Your Wireless Network" on page 22. The wireless light should be lit after turning on the wireless router. Manually Installing Your Router - Netgear WNR1000v3 | Setup Guide - Page 20
and that the computer is turned on. Setting Up Your Router for Internet Access When configuring your wireless router manually, you must log in to your wireless router to set it up initially and to make any changes to your wireless router's settings later. The factory default state is reset when you - Netgear WNR1000v3 | Setup Guide - Page 21
admin for the router user name and password for the router password, both in lowercase letters. (For security reasons, the router has its own user name and password.) The router user name and password are not the same as any user name or password you might use to log in to your Internet connection - Netgear WNR1000v3 | Setup Guide - Page 22
you with configuring your wireless router to access the Internet. If you cannot connect to the wireless router, check the Internet Protocol (TCP/IP) properties in the Network Connections section of your Control Panel. It should be set to obtain both IP and DNS server addresses automatically. For - Netgear WNR1000v3 | Setup Guide - Page 23
the correct options and typed everything correctly. • Contact your ISP to verify that you have the correct configuration information. • Read "Troubleshooting" on page 24. If problems persist, register your NETGEAR product and contact NETGEAR Technical Support. Manually Installing Your Router 19 - Netgear WNR1000v3 | Setup Guide - Page 24
change your computer's wireless settings to match the router's new settings. To avoid this situation, you can use a computer that is connected to the router with an Ethernet cable. For a complete overview of all the security configurations that can be implemented on this router, see the online User - Netgear WNR1000v3 | Setup Guide - Page 25
security option it supports. To set up basic wireless connectivity: 1. Log in to the Router by going to http://www.routerlogin.net or http://www.routerlogin.com and entering the default user name admin and default password password, or using whatever LAN address and password you have set up. You can - Netgear WNR1000v3 | Setup Guide - Page 26
and ensure that TCP/IP Properties are set to Obtain an IP address automatically. To access the Internet from any computer connected to your wireless router, launch a browser such as Microsoft Internet Explorer or Mozilla Firefox. You should see the wireless router's Internet LED blink, indicating - Netgear WNR1000v3 | Setup Guide - Page 27
is in its default state), WPS automatically configures the SSID and wireless security settings for the router and then transmits these settings to the wireless device, such as a wireless PC. The first method is explained here. For more information on the second method, see the User Manual. If your - Netgear WNR1000v3 | Setup Guide - Page 28
For more information on setting up your wireless network and configuring your wireless security settings, see the User Manual. A link to the online User Manual is on your Resource CD. Configuring Your Wireless Network 24 - Netgear WNR1000v3 | Setup Guide - Page 29
. The label on the back of the wireless router identifies the number of each LAN port (see "LAN (Ports 1-4)" on page 3). • Make sure the network settings of the computer are correct. - LAN connected computers must be configured to obtain an IP address automatically using DHCP. For more information - Netgear WNR1000v3 | Setup Guide - Page 30
solid green within 2 minutes after turning the router on, reset the router according to the instructions in "Restoring the Default Password and Configuration Settings" on page 34. Checking Basic Router Functions After you turn on power to the router, check that the following sequence of events has - Netgear WNR1000v3 | Setup Guide - Page 31
the router's configuration to factory defaults. This procedure is explained in "Restoring the Default Password and Configuration Settings" on page 34. If the error persists, you might have a hardware problem and should contact technical support. • Internet Light Stays Amber. When the router is - Netgear WNR1000v3 | Setup Guide - Page 32
good connection from the computer to the router, then restart (reboot) your computer. • If your router's IP address has been changed and you don't know the current IP address, reset the router's configuration to the factory defaults. This procedure is explained in "Restoring the Default Password and - Netgear WNR1000v3 | Setup Guide - Page 33
Cable data into Ethernet networking information. NETGEAR does not support such a configuration. Checking the Internet Service Connection If your router is unable to access the Internet, check the Internet connection, and then check the wireless router. • Internet Connection. The cable or DSL modem - Netgear WNR1000v3 | Setup Guide - Page 34
connect after several minutes, you might be using an incorrect service name, user name, or password. There also might be a provisioning problem with your ISP. Unless you connect manually, the wireless router will not authenticate using PPPoE until data is transmitted to the network. Troubleshooting - Netgear WNR1000v3 | Setup Guide - Page 35
a DNS address, as explained in the documentation for your computer. • Your computer might not have the wireless router configured as its default gateway. Reboot the computer and verify that you can access the router's GUI through http://www.routerlogin.net. Using the Ping Utility to Troubleshoot - Netgear WNR1000v3 | Setup Guide - Page 36
's network interface card. • Wrong network configuration - Verify that the Ethernet card driver software and TCP/IP software are both installed and configured on your computer. - Verify that the IP addresses for your router and your computer are correct and that both addresses are on the same subnet - Netgear WNR1000v3 | Setup Guide - Page 37
the N150 Wireless Router Model WNR1000v3. Table 3. Home Router Default Configuration Settings Feature Default Setting Router Login Router Login URL http://www. routerlogin.net or http://www.routerlogin.com Login Name (case sensitive) admin Login Password (case sensitive) password Internet - Netgear WNR1000v3 | Setup Guide - Page 38
Home Router Default Configuration Settings (continued) Feature Default Setting Inbound (communications coming in from Disabled (bars all unsolicited requests except for the Internet) traffic on port 80, the http port) Outbound (communications going out to Enabled (all) the Internet) Wireless - Netgear WNR1000v3 | Setup Guide - Page 39
the factory default configuration settings that reset the router's user name to admin, the password to password, and the IP address to 192.168.1.1. This procedure will erase all the current configuration settings and restore the factory defaults. To restore the factory default configuration settings - Netgear WNR1000v3 | Setup Guide - Page 40
a more complete understanding of the technologies used in your NETGEAR product. Table 4. Related Documents Document Link Internet Networking and TCP/IP Addressing Preparing a Computer for Network Access Glossary http://documentation.netgear.com/reference/enu/tcpip/index.htm http://documentation - Netgear WNR1000v3 | Setup Guide - Page 41
.NETGEAR.com/support. Setup documentation is available on the CD, on the support website, and on the documentation website. When the wireless router is connected to the Internet, click the KnowledgeBase link to view support information or click the Documentation link to view the online User Manual
-
 1
1 -
 2
2 -
 3
3 -
 4
4 -
 5
5 -
 6
6 -
 7
7 -
8
-
9
-
10
-
11
-
12
-
13
-
14
-
15
-
16
-
17
-
18
-
19
-
20
-
21
-
22
-
23
-
24
-
25
-
26
-
27
-
28
-
29
-
30
-
31
-
32
-
33
-
34
-
35
-
36
-
37
-
38
-
39
-
40
-
41
 |
 |
September 2010
208-10724-01
v1.0
NETGEAR
, Inc.
350 E. Plumeria Drive
San Jose, CA 95134 USA
N150 Wireless Router
WNR1000v3 Setup
Manual