Netgear WNR2000v1 WNR2000 Setup Manual
Netgear WNR2000v1 - Wireless- N Router Manual
 |
View all Netgear WNR2000v1 manuals
Add to My Manuals
Save this manual to your list of manuals |
Netgear WNR2000v1 manual content summary:
- Netgear WNR2000v1 | WNR2000 Setup Manual - Page 1
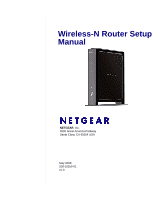
Wireless-N Router Setup Manual NETGEAR, Inc. 4500 Great America Parkway Santa Clara, CA 95054 USA May 2008 208-10259-01 v1.0 - Netgear WNR2000v1 | WNR2000 Setup Manual - Page 2
Setup is a trademark of the Wi-Fi Alliance. Other brand and product names are registered trademarks or trademarks of their respective holders. Statement of Conditions In the interest of improving internal design, operational function, and/or reliability, NETGEAR reserves the right to make changes - Netgear WNR2000v1 | WNR2000 Setup Manual - Page 3
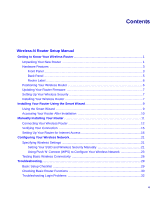
6 Updating Your Router Firmware 7 Setting Up Your Wireless Security 7 Installing Your Wireless Router 7 Installing Your Router Using the Smart Wizard 9 Using the Smart Wizard ...9 Accessing Your Router After Installation 10 Manually Installing Your Router 11 Connecting Your Wireless Router 12 - Netgear WNR2000v1 | WNR2000 Setup Manual - Page 4
Internet IP Address 33 Troubleshooting PPPoE 34 Troubleshooting Internet Browsing 35 Using the Ping Utility to Troubleshoot 35 Testing the Path from Your Computer to Your Router 35 Testing the Path from a Computer to the Internet 36 Technical Specifications ...37 Default Configuration Settings - Netgear WNR2000v1 | WNR2000 Setup Manual - Page 5
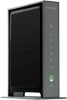
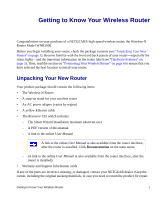
Getting to Know Your Wireless Router Congratulations on your purchase of a NETGEAR® high-speed wireless router, the Wireless-N Router Model WNR2000. Before you begin installing your router, check the package contents (see "Unpacking Your New Router" on page 1). Become familiar with the front and - Netgear WNR2000v1 | WNR2000 Setup Manual - Page 6
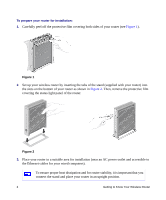
for installation (near an AC power outlet and accessible to the Ethernet cables for your wired computers). To ensure proper heat dissipation and for router stability, it is important that you connect the stand and place your router in an upright position. 2 Getting to Know Your Wireless Router - Netgear WNR2000v1 | WNR2000 Setup Manual - Page 7
Hardware Features Before you install and connect your router, take a moment to become familiar with the front and back panels of the router-especially the status lights on the front panel. Front Panel The router front panel, shown in Figure 3, contains status lights. (For more information on - Netgear WNR2000v1 | WNR2000 Setup Manual - Page 8
ready. A software update is in progress. There is a problem with the wireless router software. Power is not being supplied to the router No IP address acquired. The wireless router has acquired an Internet address. Data is being communicated with the Internet. No Ethernet cable is connected to the - Netgear WNR2000v1 | WNR2000 Setup Manual - Page 9
rear panel contains the following elements: 1. Restore factory settings button. Press for approximately 5 seconds to reset the router to the factory default settings. 2. Four Local Area Network (LAN) 10/100 Mbps Ethernet ports for connecting the router to your local computers. 3. Internet/Wide Area - Netgear WNR2000v1 | WNR2000 Setup Manual - Page 10
The label on the back of the wireless router shows the router's MAC address, serial number, security PIN, and factory default login information. The ports on the router are color-coded to distinguish your Internet port from the other four ports that connect to the wired computer(s) on your Local - Netgear WNR2000v1 | WNR2000 Setup Manual - Page 11
for and install updates. You must log in to the router to use this feature see "Setting Up Your Router for Internet Access" on page 16, or the online User Manual). Setting Up Your Wireless Security To make it easy for you to select the security that best fits your network, NETGEAR provides several - Netgear WNR2000v1 | WNR2000 Setup Manual - Page 12
option and install your router manually, for best results, install and set up your router in this order: 1. Install and connect your wireless router to your network (see "Connecting Your Wireless Router" on page 12). 2. Set up your wireless router for Internet access (see "Setting Up Your Router for - Netgear WNR2000v1 | WNR2000 Setup Manual - Page 13
prompts you about updates, click Yes to check for updates for your router, or No, to update later (for more information, see "Setting Up Your Router for Internet Access" on page 16, or the online User Manual). 4. Follow the remaining instructions and prompts. Installing Your Router Using the Smart - Netgear WNR2000v1 | WNR2000 Setup Manual - Page 14
Wireless Network" on page 21. Accessing Your Router After Installation The Smart Wizard only appears when you first install the router or when the router is in its factory default state (for example, if you have reset the router to its default factory settings). If you want to change the settings - Netgear WNR2000v1 | WNR2000 Setup Manual - Page 15
might need the following information to set up your wireless router and access the Internet: - Host and domain name - Internet login name and password (frequently an email address and password) - Domain Name Server (DNS) addresses - Fixed or static IP address Your ISP should have provided you with - Netgear WNR2000v1 | WNR2000 Setup Manual - Page 16
Connecting Your Wireless Router Before you install your wireless router, make sure that the Internet Protocol (TCP/IP) Property settings on your computer are set to "automatically obtain an IP address" using DHCP and "Obtain DNS server address automatically." You can check these settings by looking - Netgear WNR2000v1 | WNR2000 Setup Manual - Page 17
insert that cable into a port on the router, such as port 4 (E), as shown in Figure 9. Internet A 1 2 E 3 4 Figure 9 7. Connect any additional wired PCs to your router by inserting an Ethernet cable from a PC into one of the three remaining LAN ports. Manually Installing Your Router 13 - Netgear WNR2000v1 | WNR2000 Setup Manual - Page 18
accessing the Internet. To start your network: 1. Plug in and turn on the cable or DSL modem. Wait 2 minutes. 2. Plug the end of the power adapter's cord into the wall or a power strip, and into the power adapter outlet of your wireless router (F). Wait 1 minute. 14 Manually Installing Your Router - Netgear WNR2000v1 | WNR2000 Setup Manual - Page 19
go to the Internet Explorer Tools menu, Internet Options, Connections tab and select "Never dial a connection." Verifying Your Connection Verify that your router is connected correctly by checking the wireless router status lights (as illustrated in Figure 12). Manually Installing Your Router 15 - Netgear WNR2000v1 | WNR2000 Setup Manual - Page 20
configuring your wireless router manually, you must log in to your wireless router to set it up initially and to make any changes to your wireless router's settings later. The factory default state is reset when you use the Restore Factory Settings button. See "Restoring the Default Password and - Netgear WNR2000v1 | WNR2000 Setup Manual - Page 21
not the same as any user name or password you might use to log in to your Internet connection. The Firmware Upgrade Assistant screen will display. 3. Click Yes to check for new firmware (recommended). The router will automatically check the NETGEAR database for a new firmware image file. If no new - Netgear WNR2000v1 | WNR2000 Setup Manual - Page 22
• Select Yes to allow the Setup Wizard to detect your Internet connection. When prompted, click Next. The wizard will assist you with configuring your wireless router to access the Internet. If you cannot connect to the wireless router, check the Internet Protocol (TCP/IP) properties in the Network - Netgear WNR2000v1 | WNR2000 Setup Manual - Page 23
the correct options and typed everything correctly. • Contact your ISP to verify that you have the correct configuration information. • Read "Troubleshooting" on page 29. If problems persist, register your NETGEAR product and contact NETGEAR Technical Support. Manually Installing Your Router 19 - Netgear WNR2000v1 | WNR2000 Setup Manual - Page 24
20 Manually Installing Your Router - Netgear WNR2000v1 | WNR2000 Setup Manual - Page 25
the security configurations that can be implemented on this router, see the online User Manual. Setting Your SSID and Wireless Security Manually To specify the wireless settings, you must know the following: • SSID. The default SSID for the router is NETGEAR. Configuring Your Wireless Network 21 - Netgear WNR2000v1 | WNR2000 Setup Manual - Page 26
which wireless security option it supports. To set up basic wireless connectivity: 1. Log in to the wireless router as described in "To access the router:" on page 16. 2. On the main menu, select Wireless Settings to display the Wireless Settings screen. Note that the default SSID is NETGEAR. The - Netgear WNR2000v1 | WNR2000 Setup Manual - Page 27
will connect wirelessly to the router are clients). Look for the symbol on your client device.1 WPS automatically configures the SSID and wireless security settings for the router (if the router is in its default state) and broadcasts these settings to the wireless client. NETGEAR's Push 'N' Connect - Netgear WNR2000v1 | WNR2000 Setup Manual - Page 28
2. On the router main menu, select Add a WPS Client. The Add WPS Client wizard screen displays. Click Next. Figure 15 3. Select Go to your wireless client and, from the client's WPS utility, obtain the wireless client's security PIN, or follow the client's WPS utility instructions to generate a - Netgear WNR2000v1 | WNR2000 Setup Manual - Page 29
to your wireless network. - The router generated an SSID, implemented WPA/WPA2 wireless security (including a PSK security password), and broadcast these settings to the client; the client now shares the same security settings as the router. If the router was already configured manually, and either - Netgear WNR2000v1 | WNR2000 Setup Manual - Page 30
to obtain an IP address by DHCP from the router. Your wireless router is now configured to provide Internet access for your network. Your wireless router automatically connects to the Internet when one of your computers requires access. It is not necessary to run a dialer or login application such - Netgear WNR2000v1 | WNR2000 Setup Manual - Page 31
in, or disconnect. These functions are performed automatically by the wireless router as needed. To access the Internet from any computer connected to your wireless router, launch a browser such as Microsoft Internet Explorer or Netscape Navigator. You should see the wireless router's Internet LED - Netgear WNR2000v1 | WNR2000 Setup Manual - Page 32
28 Configuring Your Wireless Network - Netgear WNR2000v1 | WNR2000 Setup Manual - Page 33
on the back of the wireless router identifies the number of each LAN port (see "Restore factory settings button. Press for approximately 5 seconds to reset the router to the factory default settings." on page 5). • Make sure the network settings of the computer are correct. Troubleshooting 29 - Netgear WNR2000v1 | WNR2000 Setup Manual - Page 34
solid green within 2 minutes after turning the router on, reset the router according to the instructions in "Restoring the Default Password and Configuration Settings" on page 39. Checking Basic Router Functions After you turn on power to the router, check that the following sequence of events has - Netgear WNR2000v1 | WNR2000 Setup Manual - Page 35
the router's configuration to factory defaults. This will set the router's IP address to 192.168.1.1. This procedure is explained in "Restoring the Default Password and Configuration Settings" on page 39. If the error persists, you might have a hardware problem and should contact technical support - Netgear WNR2000v1 | WNR2000 Setup Manual - Page 36
computer. • If your router's IP address has been changed and you don't know the current IP address, reset the router's configuration to the factory defaults. This procedure will reset the router's IP address to 192.168.1.1 (see "Restoring the Default Password and Configuration Settings" on page 39 - Netgear WNR2000v1 | WNR2000 Setup Manual - Page 37
that an IP address is shown for the Internet Port. If 0.0.0.0 is shown, your wireless router has not obtained an IP address from your service provider. If your router is unable to obtain an IP address from the your service provider, the problem might be one of the following: Troubleshooting 33 - Netgear WNR2000v1 | WNR2000 Setup Manual - Page 38
or password. See "Troubleshooting PPPoE" on page 34. • Your service provider might check for your computer's host name. Assign the computer Host Name of your ISP account to the wireless router on the Basic Settings screen. • Your service provider might only allow one Ethernet MAC address to connect - Netgear WNR2000v1 | WNR2000 Setup Manual - Page 39
Troubleshooting Internet Browsing If your wireless router can obtain an IP address but your computer is unable to load any web pages from the Internet, check the following: • Your computer might not recognize any DNS server addresses. A DNS server is a host on the Internet that translates Internet - Netgear WNR2000v1 | WNR2000 Setup Manual - Page 40
. • Wrong network configuration - Verify that the Ethernet card driver software and TCP/IP software are both installed and configured on your computer. - Verify that the IP addresses for your router and your computer are correct and that both addresses are on the same subnet (for example, 192.168 - Netgear WNR2000v1 | WNR2000 Setup Manual - Page 41
Technical Specifications Default Configuration Settings This section provides factory default settings and technical specifications for the Wireless-N Router Model WNR2000. Table 2. Home Router Default Configuration Settings Feature Default Setting Router Login Router Login URL http://www. - Netgear WNR2000v1 | WNR2000 Setup Manual - Page 42
Table 2. Home Router Default Configuration Settings (continued) Feature Default Setting Wireless Wireless Communication SSID Name Security Broadcast SSID Enabled NETGEAR Disabled Enabled Transmission Speed Country/Region RF Channel Operating Mode Data Rate Autoa United States (North America - Netgear WNR2000v1 | WNR2000 Setup Manual - Page 43
the factory default configuration settings that reset the router's user name to admin, the password to password, and the IP address to 192.168.1.1. This procedure will erase all the current configuration settings and restore the factory defaults. To restore the factory default configuration settings - Netgear WNR2000v1 | WNR2000 Setup Manual - Page 44
40 Technical Specifications - Netgear WNR2000v1 | WNR2000 Setup Manual - Page 45
a more complete understanding of the technologies used in your NETGEAR product. Table 3. Related Documents Document Link Internet Networking and TCP/IP Addressing Preparing a Computer for Network Access Glossary http://documentation.netgear.com/reference/enu/tcpip/index.htm http://documentation - Netgear WNR2000v1 | WNR2000 Setup Manual - Page 46
42 Related Documents - Netgear WNR2000v1 | WNR2000 Setup Manual - Page 47
can use our telephone support service. Product updates and Web support are always available by going to: http://www.NETGEAR.com/support. Setup documentation is available on the CD, on the support website, and on the documentation website. When the wireless router is connected to the Internet, click - Netgear WNR2000v1 | WNR2000 Setup Manual - Page 48
44
-
 1
1 -
 2
2 -
 3
3 -
 4
4 -
 5
5 -
 6
6 -
 7
7 -
8
-
9
-
10
-
11
-
12
-
13
-
14
-
15
-
16
-
17
-
18
-
19
-
20
-
21
-
22
-
23
-
24
-
25
-
26
-
27
-
28
-
29
-
30
-
31
-
32
-
33
-
34
-
35
-
36
-
37
-
38
-
39
-
40
-
41
-
42
-
43
-
44
-
45
-
46
-
47
-
48
 |
 |
May 2008
208-10259-01
v1.0
NETGEAR
, Inc.
4500 Great America Parkway
Santa Clara, CA 95054 USA
Wireless-N Router Setup
Manual