Netgear XAV2501 XAV2501 User Manual - Page 22
Adding a Device to a Powerline Network, Device Settings, Security, Create a New Encryption Key
 |
UPC - 606449066432
View all Netgear XAV2501 manuals
Add to My Manuals
Save this manual to your list of manuals |
Page 22 highlights
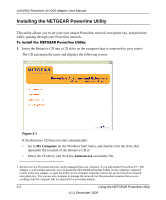
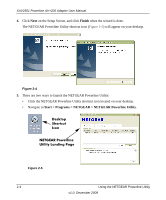
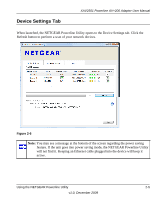
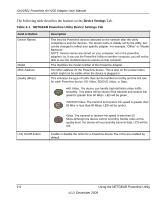
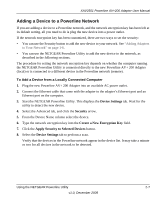
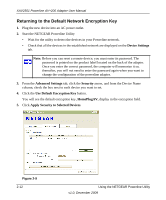
XAV2501 Powerline AV+200 Adapter User Manual Adding a Device to a Powerline Network If you are adding a device to a Powerline network, and the network encryption key has been left at its default setting, all you need to do is plug the new device into a power outlet. If the network encryption key has been customized, there are two ways to set the security: • You can use the Security button to add the new device to your network. See "Adding Adapters to Your Network" on page 1-6. • You can use the NETGEAR Powerline Utility to add the new device to the network, as described in the following sections. The procedure for setting the network encryption key depends on whether the computer running the NETGEAR Powerline Utility is connected directly to the new Powerline AV+ 200 Adapter (local) or is connected to a different device in the Powerline network (remote). To Add a Device from a Locally Connected Computer 1. Plug the new Powerline AV+ 200 Adapter into an available AC power outlet. 2. Connect the Ethernet cable that came with the adapter to the adapter's Ethernet port and an Ethernet port on the computer. 3. Start the NETGEAR Powerline Utility. This displays the Device Settings tab. Wait for the utility to detect the new device. 4. Select the Advanced tab, and click the Security arrow. 5. From the Device Name column select the device. 6. Type the network encryption key into the Create a New Encryption Key field. 7. Click the Apply Security to Selected Devices button. 8. Select the Device Settings tab to perform a scan. Verify that the devices in the Powerline network appear in the device list. It may take a minute or two for all devices in the network to be detected. Using the NETGEAR Powerline Utility 2-7 v1.0, December 2009
-
 1
1 -
2
-
3
-
4
-
5
-
6
-
7
-
8
-
9
-
10
-
11
-
12
-
13
-
14
-
15
-
16
-
 17
17 -
 18
18 -
 19
19 -
 20
20 -
 21
21 -
 22
22 -
 23
23 -
 24
24 -
 25
25 -
 26
26 -
 27
27 -
28
-
29
-
30
-
31
-
32
-
33
-
34
-
35
-
36
-
37
-
38
-
39
-
40
-
41
 |
 |