Nextar 43LT Quick Start Guide - Page 1
Nextar 43LT - Automotive GPS Receiver Manual
 |
UPC - 714129888561
View all Nextar 43LT manuals
Add to My Manuals
Save this manual to your list of manuals |
Page 1 highlights
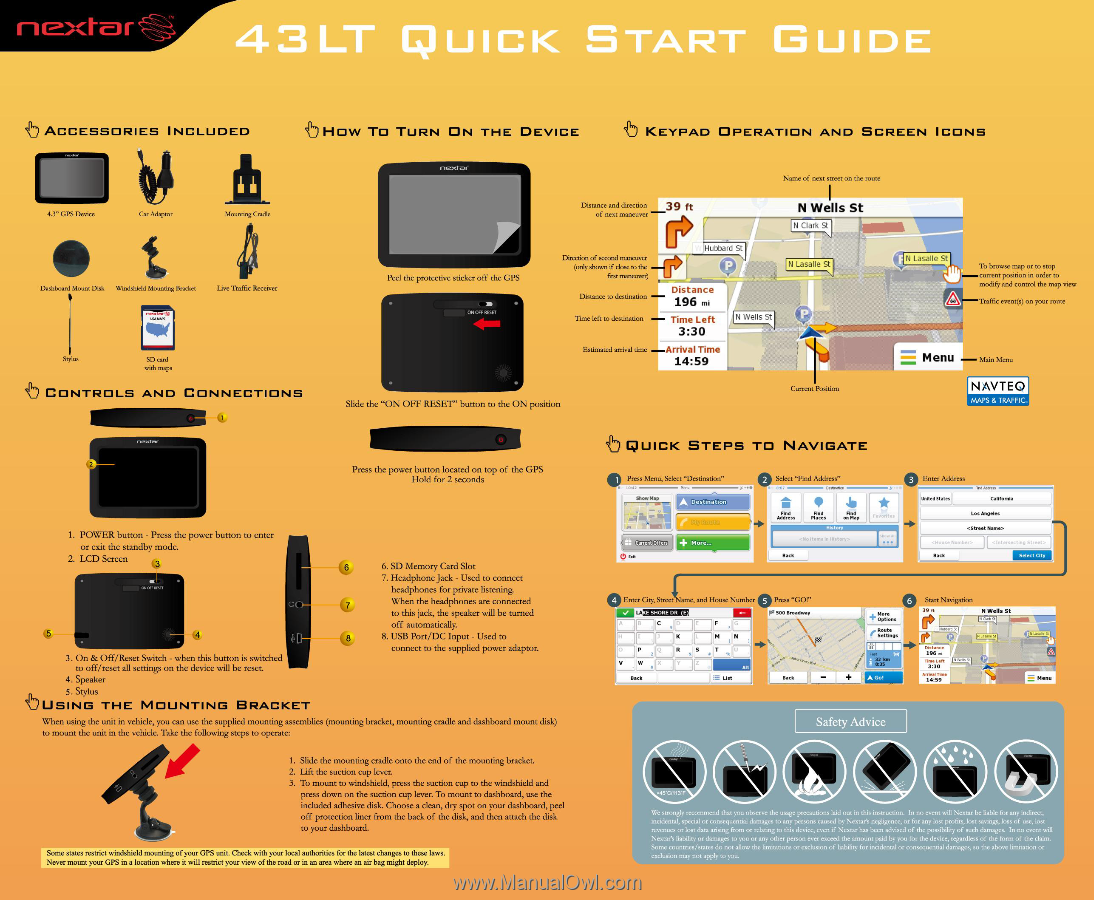
ACCESSORIES INCLUDED cb How TO TURN ON THE DEVICE KEYPAD OPERATION AND SCREEN ICONS 4.3" GPS Device Car Adaptor • Dashboard Mount Disk Windshield Mounting Bracket Mounting Cradle Live Traffic Receiver rt.teXt0i. uo MAPS Styli SD card with maps CONTROLS AND CONNECTIONS next-of Name of next street on the route Distance and direction of next maneuver 39 ft Peel the protective sticker off the GPS k-M ON OFF RESF Direction of second maneuver (only shown if dose to the first maneuver) Distance to destination Hubbard St! 117.:k Distance 196 mi Time left to destination Time Left 3:30 Estimated arrival time --Arrival Time 14:59 0 Slide the "ON OFF RESET" button to the ON position N Wells St ') CI,:ilt: St N Lasalle St St Current Position Fl Lasalle St To browse map or to stop current position in order to modify and control the map view Traffic event(s) on your route Menu . Main Menu NAVTEQ MAPS & TRAFFIC, 2 Press the power button located on top of the GPS Hold for 2 seconds 1. POWER button - Press the power button to enter or exit the standby mode. 2. LCD Screen 3 ON OFF RESET 5 • 4 • 3. On & Off/Reset Switch - when this button is switched to off/reset all settings on the device will be reset. 4. Speaker 5. Stylus USING THE MOUNTING BRACKET 6 6. SD Memory Card Slot 7. Headphone Jack - Used to connect headphones for private listening. 7 When the headphones are connected to this jack, the speaker will be turned off automatically. 8 8. USB Port/DC Input - Used to connect to the supplied power adaptor. When using the unit in vehicle, you can use the supplied mounting assemblies (mounting bracket, mounting cradle and dashboard mount disk) Af to mount the unit in the vehicle. Take the following steps to operate: 1. Slide the mounting cradle onto the end of the mounting bracket. 2. Lift the suction cup lever. 3. To mount to windshield, press the suction cup to the windshield and press down on the suction cup lever. To mount to dashboard, use the included adhesive disk. Choose a clean, dry spot on your dashboard, peel off protection liner from the back of the disk, and then attach the disk to your dashboard. Some states restrict windshield mounting of your GPS unit. Check with your local authorities for the latest changes to these laws. Never mount your GPS in a location where it will restrict your view of the road or in an area where an air bag might deploy. QUICK STEPS TO NAVIGATE Press Menu, Select "Destination" Show Map 0 Exit Offers. + More... el Select "Find Address" 0en, naban Find Address Find Find Places , on Map Back items In History> 0 Enter Address United States fin , California Favorites Los Angeles .=House Number:. Back Intersecting Street -.. Select City Enter City, Street ame, and House Number 0 Press "GO!" LA r. 0 500 Broadway A Lam` F I p-- K ! M 0 LP ifi iR S Z VWx Y Alt Back iEE List . *ot • Back IMP 101;trieons • Route • Settings SEM A Go! Start Navigation 39 ft N Wells St • Or- Di,tAnr , 196 Time Left 3:30 Arrival Tin, 14:59 E Menu Safety Advice 11 6 a 6 ea >45•C/113*F We strongly recommend that you observe the usage precautions laid out in this instruction. In no event will Nextar be liable for any indirect, incidental, special or consequential damages to any persons caused by Nextar's negligence, or for any lost profits, lost savings, loss of use, lost revenues or lost data arising from or relating to this device, even if Nextar has been advised of the possibility of such damages. In no event will Nextar's liability or damages to you or any other person ever exceed the amount paid by you for the device, regardless of the form of the claim. Some countries/states do not allow the limitations or exclusion of liability for incidental or consequential damages, so the above limitation or exclusion may not apply to you.
-
 1
1
 |
 |