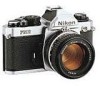
Nikon 1683 Instruction Manual
Nikon 1683 - FM 2N SLR Camera Manual
 |
View all Nikon 1683 manuals
Add to My Manuals
Save this manual to your list of manuals |
Nikon 1683 manual content summary:
- Nikon 1683 | Instruction Manual - Page 1
Nikon INSTRUCTION MANUAL CE - Nikon 1683 | Instruction Manual - Page 2
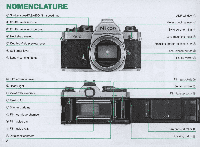
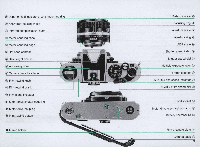
timer lever (J) Lens flange ® Film advance lever ® @J Viewfinder eyepiece (jj) Rewind fork @ Shutter curtains @ Film cartridge chamber ® Film guide pin @ Film guide rails @ Data back contacts 2 ADR window @ Meter coupling lever @ Sync cord terminal @ Lens mounting index @ Focusing screen release - Nikon 1683 | Instruction Manual - Page 3
@ Meter coupling shoe @ Meter coupling ridge ® Hot-shoe contact @ R.."nv-linlht contact @ Accessory shoe ® Camera back lock lever @ Film rewind knob @ Film rewind crank ® Film plane indicator @ Motor drive shutter coupling @ Motor drive coupling @ Film rewind button @ Memo holder Distance scale @ - Nikon 1683 | Instruction Manual - Page 4
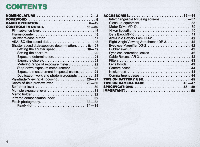
Flash photography 33-35 Ready-light 34-35 ACCESSORIES 36-44 Interchangeable focusing screens 36- 37 Close-up equipment 38 Motor Drive MD-12 39 Nikon Speedlights 40 Data Back MF-16 41 Anti -Cold Battery Pack OB·2 42 Right-Angle Viewing Attachment DR-3 42 Eyepiece Magnifier DG-2 42 Rubber - Nikon 1683 | Instruction Manual - Page 5
you for your purchase of the Nikon FM2 and welcome to Nikon's world of photography. The Nikon FM2 offers many special features including top results with your FM2, be sure to keep this instruction manual handy until you've fully mastered its operation - just a few minutes to ensure many years - Nikon 1683 | Instruction Manual - Page 6
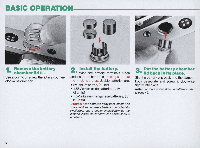
O N " 1 Remove the battery • chamber lid 58 • Use a coin to unscrew the lid in a counterclockwise direction. 2 Install the baUery. • Wipe , call a doctor immediately as the material inside the batteries can cause serious problems. 3 Put the battery chamber • lid back in Its place. Slip the - Nikon 1683 | Instruction Manual - Page 7
while looking through the viewfinder. If one or two of the red LED exposure indicator lamps inside lights up this would mean normal condition. Note: When the shutter speed dial ® is on B (bulb), none of the exposure indicator lamps will light up. Be sure to set the dial at another position. If none - Nikon 1683 | Instruction Manual - Page 8
-BASIC OPERATION-continued---------- 7. Mount the lens onto the camera. • Place the lens onto the camera, lining up the aperture/ focusing index @ on the lens with the lens mounting index ® on the camera body. Then twist the lens mounting ring ~ counterclockwise until it clicks into place. Confirm - Nikon 1683 | Instruction Manual - Page 9
spool inwards with your thumb, making sure the latch in the slot engages the first or second perforation along the side of the film leader. 11 Wind the film advance • lever to advance film onto the takeup spool. Wind the film advance lever and depress the shutter release button until the - Nikon 1683 | Instruction Manual - Page 10
back until it snaps shut, making sure that the perforations are perfectly meshed with the sprockets and that the film is set between the film guide rails @. 13 Take up film slack. • Fold out the film rewind crank @ and rotate it in the direction of the arrow on the film rewind - Nikon 1683 | Instruction Manual - Page 11
to cradle the camera, with your fingers wrapped around the lens and the elbow propped against your body for support, as you look through the viewfinder. Use your right hand 's index finger to depress the shutter release viewfinder with the right or left eye, with the other eye closed or open. 11 - Nikon 1683 | Instruction Manual - Page 12
12mm-diameter circle) of the field of view inside the viewfinder. Then turn the shutter speed dial ® and/or lens aperture ring @ until the LED lamp for the symbol for correct exposure 0 lights up. Important! Intermediate settings of lens aperture but not of shutter speed are usable. Nota: The meter - Nikon 1683 | Instruction Manual - Page 13
18 Focus on the subject • by rotating the lens focusing ring 46 • The FM2 is provided with the Type K2 focusing screen as standard. Look through the viewfinder while turning the focusing ring until the two halves of the split image rangefinder coincide perfectly to form a single unbroken image and - Nikon 1683 | Instruction Manual - Page 14
-BASIC OPERATION-continued----------- 19 Depress the shutter • release button. Look through the viewfinder, and depress the shutter release button. In depressing the shutter release button, apply light but steady pressure with the ball of your index finger to avoid camera shake that might result in - Nikon 1683 | Instruction Manual - Page 15
not using the camera, you should set the film advance lever to this position which locks the shutter release button and keeps the exposure indicator lamps inside the viewfinder switched off even if the shutter release button is accidentally pressed . Note: Even if the exposure indicator - Nikon 1683 | Instruction Manual - Page 16
CONTROLS IN DETAIL Film advance lever ® The film advance lever also functions as a lock for the shutter release button . The shutter release button is unlocked when the lever is pulled out to the standoff position. To advance the film , wind the lever to the right all the way until it stops. It - Nikon 1683 | Instruction Manual - Page 17
Shutter re.e••e button ® The shutter release button also serves to activate the FM2's built-in exposure meter. When the film advance lever is in the flush position, the shutter release button is locked and will not operate. To release the button from its locked position, pull out the film advance - Nikon 1683 | Instruction Manual - Page 18
the right or left until the desired shutter speed number click-stops and is aligned with the shutter speed index ® . The dial has indications for B (bulb) and for shutter speeds from 1 to 1/4000 sec. The 250 engraved in red indicates the fastest sync speed for an electronic flash unit. On B, the - Nikon 1683 | Instruction Manual - Page 19
Fast shutter speed SlOw snutter speed 19 - Nikon 1683 | Instruction Manual - Page 20
apertures are usable continuously. Lens aperture greatly affects depth of field (see page 28). With the exception of a few special lenses, Nikkor and Nikon Series E lenses enable full-aperture light measurement even when the aperture ring is moved . These lenses, which are said to have an automatic - Nikon 1683 | Instruction Manual - Page 21
and aperture. 1/4000 112000 1/1000 1/500 1/250 4 5.6 8 11 16 Exposure display The LED exposure indicator lamps can be seen on the right side of the viewfield frame within the Note: When the shutter speed dial is set at B (bulb), the LEO exposure display inside the viewfinder is turned off. 21 - Nikon 1683 | Instruction Manual - Page 22
-CONTROLS IN DETAIL-contlnued----------, Metering range of exposure meter When there is a proper combination of lens aperture and shutter speed, 0 lights up, indicating correct exposure. This sign will not light up when the aperture and shutter speed combination is not suitable for correct exposure - Nikon 1683 | Instruction Manual - Page 23
Stop-down exposure measurement This exposure measurement method is used when the diaphragm on the lens does not link with the meter coupling lever on the camera body, such as when a non-AI lens or an extension ring is mounted on the camera. The procedure is as follows: 1) Set the ASA/ ISO number. 2) - Nikon 1683 | Instruction Manual - Page 24
-CONTROLS IN DETAIL-continued------ - - - Exposure measurement in special cases The exposure meter of the Nikon FM2 adopts the centerweighted exposure measurement system in which approxi- mately 60 % of the total amount of light is measured by the 12 mm·diameter - Nikon 1683 | Instruction Manual - Page 25
When using Nikon Slide Copying Adapter PS-6, set the flood lamp 30cm away from its opal plate. ing Attachment PB-6 background Cable release Approx. + 1 stop Microflex PFX Generally, results come out better with more exposure in photomicrography. The compensation valueon theleft is onlya guide - Nikon 1683 | Instruction Manual - Page 26
picture comes out larger tha n the image in the viewfinder. Note that the picture comes out trimmed down in the case of mounted slides or service-size prints from negatives. With AF Nikkor lenses: Set the lens' A-M ring or A-M switch to "M." 26 - Nikon 1683 | Instruction Manual - Page 27
Split· image focusing Microprism grid focusing Matte outer field focusing Out of focus In focus 27 - Nikon 1683 | Instruction Manual - Page 28
-CONTROLS IN DETAIL-continued--------- Depth-of-fleld preview lever ® What depth of field is When you focus on your subject at a certain aperture, you will find that not only is the subject itself in focus but objects in a certain distance range both in front of and behind it appear sharp. Objects - Nikon 1683 | Instruction Manual - Page 29
Lens set at 1/1.4 Only major subject is in focus. Lens set at 1/16 Most objects near to far are in focus. 29 - Nikon 1683 | Instruction Manual - Page 30
when it is already in operation will result in the shutter's being released the moment the lever is back in its original position . Except for B (bulb), the self-timer can be used at any shutter speed . 30 - Nikon 1683 | Instruction Manual - Page 31
Multiple exposure lever 5 Taking a picture of different subjects or two or more of the same subject on the same frame means multiple exposure. To make a multiple exposure, observe the following : 1) Take the first shot. (Press the shutter release button.) 2) Pull the multiple exposure lever in the - Nikon 1683 | Instruction Manual - Page 32
- CONTROLS IN DETAIL-continued Memo holder 4 To remind yourself of the film type and number of exposures on the roll of film in use, clip off the end of the film package and insert it into the memo holder. Of course , you can use the memo holder to store anything , including your name card. - Nikon 1683 | Instruction Manual - Page 33
the guide number 11 ' 25 ' / 60 1/ 30 - 1 B SpeedUghl M. FPandMF Flashbu lbs [=:::J Synchronized [=:::J Cannot be used Note: When using a special electronic flash unit with provision for time lag, an electronic flash unit with long flash duration, the Medical-Nikkor 120mm fl4 IP', or the Nikon - Nikon 1683 | Instruction Manual - Page 34
-CONTROLS IN DETAIL-continued II 11 1111111 III 'I I l Ready-light ® When the 8B-28, 8B-27, 8B-26, 8B-25, 8B-24, 8B-22, 8B-20, 8B-19 or 8B-16B - Nikon 1683 | Instruction Manual - Page 35
covered by the Nikon Warrant y. Combination manual, MO S8-168 Direct Yes Auto, manual, MD Via SC-11 sync cord No Auto" , manual 88-11 1S8-14/S8-140 Via SC-13 sensor cord Yes Auto", manual Via SC-23 ill remote cord Yes Manual S8-1O Direct Yes Auto, manual Via SC-6 sync cord No Manual - Nikon 1683 | Instruction Manual - Page 36
ACCESSORIES Interchangeable focusing screens Three different types of focusing screens are usable with the Nikon FM2 . The Type K2 screen comes with the camera as a standard accessory. Two optional focusing screens , Type B2 (matte/Fresnel with focusing spot) and Type - Nikon 1683 | Instruction Manual - Page 37
Focusing Screen Selector Qulde Type I I Name/style Features Split-image rangefinder/microprism system Suitable lor general photography. Has microprism collar around the central split-image rangefinder spot. With PC-Nikkor or lenses having a maximum aperature slower than f/4 .5, the split-image - Nikon 1683 | Instruction Manual - Page 38
- A C C E S S O RIE S - c o n t i n u e d Close-up equipment The following are some of the accessories you can use for close-up photography. 1) Close-Up Lenses No. 0, No. 1, No. 2, No. 3T, No. 4T, No. 5T, NO. 6T. Since these lenses are attached to the front of the lens in use, metering can still - Nikon 1683 | Instruction Manual - Page 39
between 1/125 and 1/4000 sec.). The motor drive unit proves very convenient when shooting fastmoving subjects since the photographer does not have to wind film manually or take his eye off the viewfinder. The MO-12 can be mounted onto the FM2 by simply inserting and tightening its built-in screw - Nikon 1683 | Instruction Manual - Page 40
light or taking backlit portraits, as well as for synchro-sunlight shooting . Various models are available-from speedlights for beginners to those for professionals. The Nikon 88-28, 88-27, 88-26, 88-25, 88-24, 88-22, 88-20 , 88-19, or 88-168 Speed light can be directly mounted - Nikon 1683 | Instruction Manual - Page 41
LCD numerals and printed by LED 's, on the photo in unobtrusive red numerals. Serving as a handy clock , a quartz timer with alarm is incorporated. Note: The Nikon FM2 a/so accepts Data Back MF-12. In this case, use the cord provided with the da ta back to connect the socket contact of - Nikon 1683 | Instruction Manual - Page 42
-ACCESSORIES-contlnued------------ Anti-Cold Battery Pack DB-2 In cold weather, use the Anti-Cold Battery Pack OB-2, which accepts two M -type batteries, as an alternative power supply to the batteries inside the camera body. Simply connect the OB-2 to the camera body, then slip the assembly inside - Nikon 1683 | Instruction Manual - Page 43
, In this case, you should take the picture without a filter, Black&wni1. G.." So' Lenshoods Recommended to prevent extraneous light from striking the lens, Nikon 's lens hoods come in four styles : screw-in, slip-on, snap-on, and collapsible-rubber. Every lens should be fitted with the lens hood - Nikon 1683 | Instruction Manual - Page 44
-ACCESSORIES-contlnued----------- Camera cases Semi-soft cases , such as the CF-27, CF-28 and CF-29, are available. The CF-27 case accommodates the FM2 mounted with a lens smaller than 50 mm f/1 .4. The CF-28 is for the camera mounted with any lens from 50mm fl1 .2 to 105mm f/2 .5. When a motor - Nikon 1683 | Instruction Manual - Page 45
small children . In case a battery is accidentally swallowed, call a doctor immediately as the material inside the batteries can cause serious problems. • Battery power falls off in extremely cold temperatures and this may cause the camera 's photometeric circuit to malfunction . In this situation - Nikon 1683 | Instruction Manual - Page 46
Inside of the camera body accidentally gets wet , its internal precision parts may get rusty. Take the camera righ t away to the nea rest authorized Nikon dealer for a checkup which may require repair payment. • When not uSing the camera for a long time, take out the batteries and store the camera - Nikon 1683 | Instruction Manual - Page 47
cases in a vinyl bag may cause the leather to deteriorate, so exer· cise due care. If the camera malfunctions, take it immediately to an authorized Nikon dealer or service center. 47 - Nikon 1683 | Instruction Manual - Page 48
Mirror: 35mm single-lens reflex (SLR) focal plane shutter camera Any cartridge-type 35 mm film 24mmx36mm Nikon F bayonet mount Vertical-travel, metal focal plane sh utter 1 sec _"' 1/4000 sec ., B (bulb) ; 14 fixed sett ings in all Set/cancel type provided; approx. 10-sec. shutter release delay Eye - Nikon 1683 | Instruction Manual - Page 49
Film sensitivity range: Power source: Exposure meter switch: Battery power check: Camera back: Dimensions (W x H x D): (camera body only) Weight: (camera body only) ASAIISO 12"'6400 Choice of one 3V lithium battery, two 1.55V silver-oxide batteries, or two 1.5V alkaline-manganese batteries Light - Nikon 1683 | Instruction Manual - Page 50
with meter coupling ridges (see illustration). Almost all lenses now manufactured by Nikon are the AI type. However, please confirm whether or not your lens Reflex-Nlkkor 2oo0mm f/11 Zoom-Nikkor 200 - 600mm f/9.5 Zoom-Nikkor ED 1S0 - 600mm f/S Zoom-Nikkor ED 360 - 1200mm f/ 11 Focusing Unit AU-1 - Nikon 1683 | Instruction Manual - Page 51
No reproduction in any form of this manual, In whole or In part (except for brief quotation In critical articles or reviews). may be made without written authorization from NIKON CORPORATION. r Nikon , '~ NIKON CORPORATION FUJI BLDG., 2-3, MARUNOUCHI3-CHOME, CHIYODA-KU, TOKYO 100-8331, JAPAN
-
 1
1 -
 2
2 -
 3
3 -
 4
4 -
 5
5 -
 6
6 -
 7
7 -
8
-
9
-
10
-
11
-
12
-
13
-
14
-
15
-
16
-
17
-
18
-
19
-
20
-
21
-
22
-
23
-
24
-
25
-
26
-
27
-
28
-
29
-
30
-
31
-
32
-
33
-
34
-
35
-
36
-
37
-
38
-
39
-
40
-
41
-
42
-
43
-
44
-
45
-
46
-
47
-
48
-
49
-
50
-
51
 |
 |
Nikon
INSTRUCTION
MANUAL
CE