Nikon D-40 User Manual - Page 68
Reference: Connecting to a Computer, Printer, Storage, Mass Storage
 |
UPC - 915436789620
View all Nikon D-40 manuals
Add to My Manuals
Save this manual to your list of manuals |
Page 68 highlights
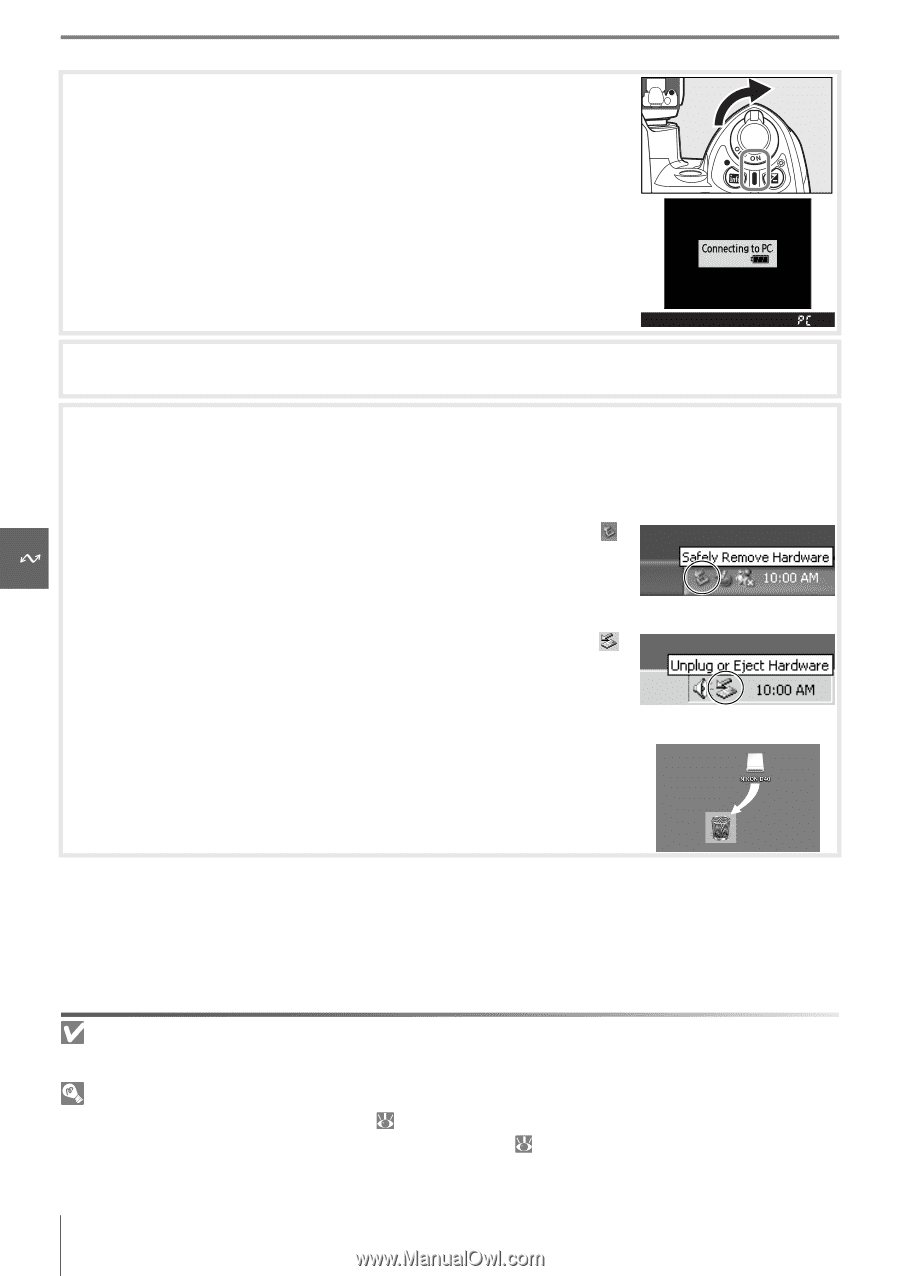
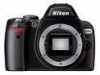
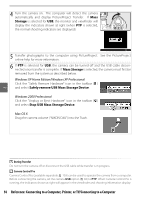
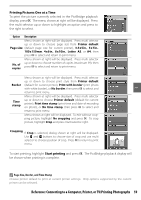
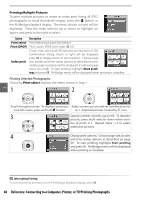
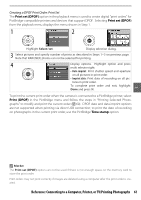
4 Turn the camera on. The computer will detect the camera automatically and display PictureProject Transfer. If Mass Storage is selected for USB, the monitor and viewfinder will display the indicators shown at right (when PTP is selected, the normal shooting indicators are displayed). 5 Transfer photographs to the computer using PictureProject. See the PictureProject online help for more information. 6 If PTP is selected for USB, the camera can be turned off and the USB cable disconnected once transfer is complete. If Mass Storage is selected, the camera must first be removed from the system as described below. Windows XP Home Edition/Windows XP Professional Click the "Safely Remove Hardware" icon in the taskbar ( ) and select Safely remove USB Mass Storage Device. Windows 2000 Professional Click the "Unplug or Eject Hardware" icon in the taskbar ( ) and select Stop USB Mass Storage Device. Mac OS X Drag the camera volume ("NIKON D40") into the Trash. During Transfer Do not turn the camera off or disconnect the USB cable while transfer is in progress. Camera Control Pro Camera Control Pro (available separately; 103) can be used to operate the camera from a computer. Before connecting the camera, set the camera USB option ( 84) to PTP. When Camera Control Pro is running, the indicators shown at right will appear in the viewfinder and shooting information display. 56 Reference: Connecting to a Computer, Printer, or TV/Connecting to a Computer
-
 1
1 -
2
-
3
-
4
-
5
-
6
-
7
-
8
-
9
-
10
-
11
-
12
-
13
-
14
-
15
-
16
-
17
-
18
-
19
-
20
-
21
-
22
-
23
-
24
-
25
-
26
-
27
-
28
-
29
-
30
-
31
-
32
-
33
-
34
-
35
-
36
-
37
-
38
-
39
-
40
-
41
-
42
-
43
-
44
-
45
-
46
-
47
-
48
-
49
-
50
-
51
-
52
-
53
-
54
-
55
-
56
-
57
-
58
-
59
-
60
-
61
-
62
-
 63
63 -
 64
64 -
 65
65 -
 66
66 -
 67
67 -
 68
68 -
 69
69 -
 70
70 -
 71
71 -
 72
72 -
 73
73 -
74
-
75
-
76
-
77
-
78
-
79
-
80
-
81
-
82
-
83
-
84
-
85
-
86
-
87
-
88
-
89
-
90
-
91
-
92
-
93
-
94
-
95
-
96
-
97
-
98
-
99
-
100
-
101
-
102
-
103
-
104
-
105
-
106
-
107
-
108
-
109
-
110
-
111
-
112
-
113
-
114
-
115
-
116
-
117
-
118
-
119
-
120
-
121
-
122
-
123
-
124
-
125
-
126
-
127
-
128
-
129
-
130
-
131
-
132
-
133
-
134
-
135
-
136
-
137
-
138
-
139
 |
 |