Nintendo GAMECUBE Instruction Booklet - Page 6
Connecting the AC Adapter and Controller
 |
UPC - 045496940027
View all Nintendo GAMECUBE manuals
Add to My Manuals
Save this manual to your list of manuals |
Page 6 highlights
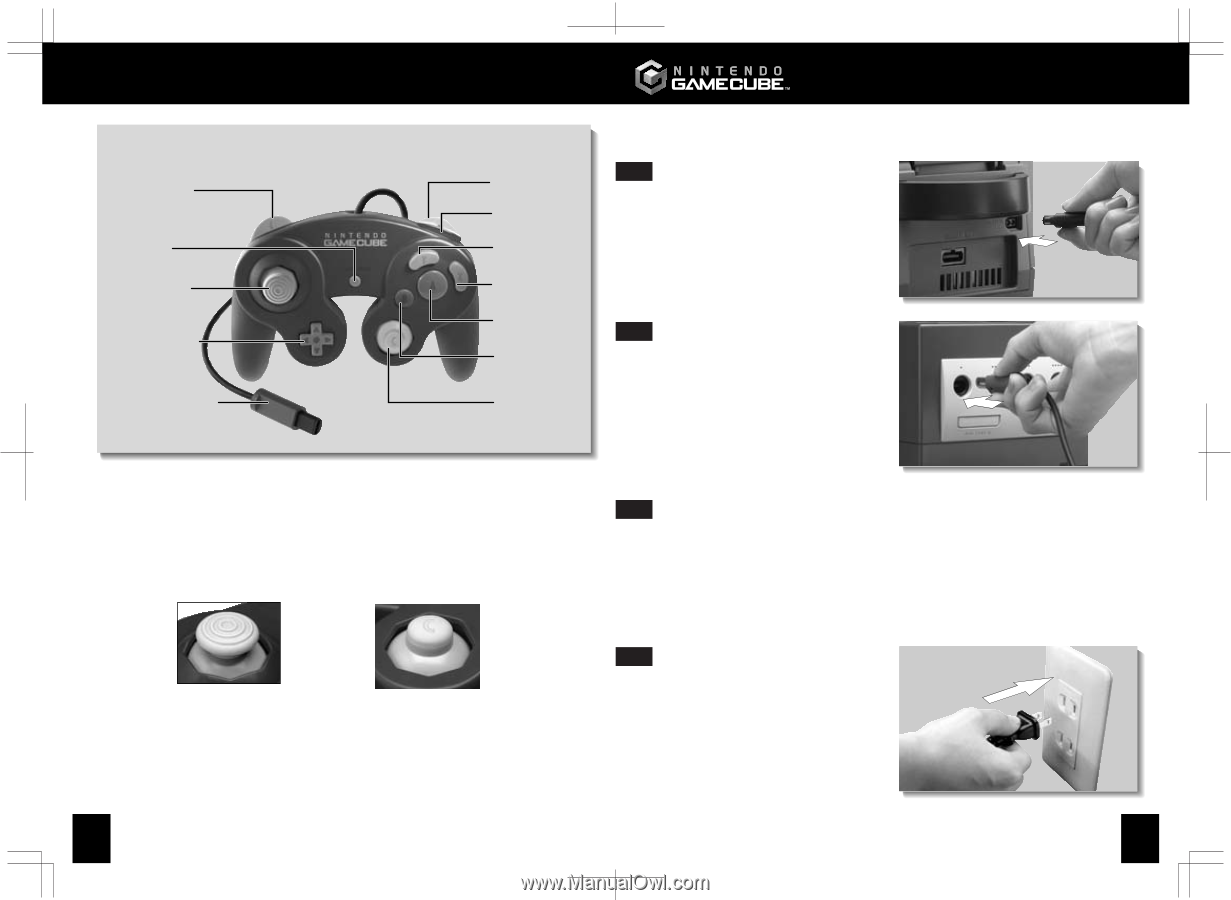
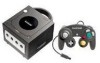
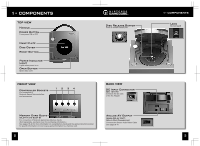
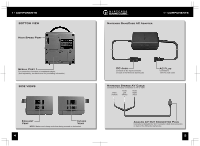
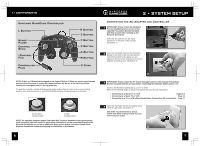
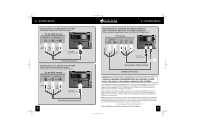
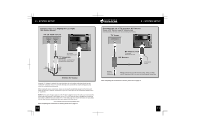
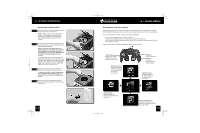
1• COMPONENTS Nintendo GameCube Controller L Button Start/ Pause Control Stick +Control Pad Controller Plug R Button Z Button Y Button X Button A Button B Button C Stick NOTE: If the L or R Buttons are pressed or the Control Stick or C Stick are moved out of neutral position when the power is turned ON, those positions will be set as the neutral position, causing incorrect game control during game play. To reset the controller, release all buttons and sticks to allow them to return to the correct neutral position, then hold down the X, Y and START/PAUSE Buttons simultaneously for 3 seconds. Control Stick neutral position C Stick neutral position NOTE: On specially designed games, the Game Boy® Advance handheld video game system (sold separately, see back cover for purchasing information) can be connected directly to the Nintendo GameCube for use as an additional game screen and/or controller. Please check Nintendo GameCube software packaging for availability of this feature. 6 2 • SYSTEM SETUP Connecting the AC Adapter and Controller IMPORTANT: Please review the Hardware 1 Precautions/Maintenance section of the separate Precautions Booklet included with this product before setting up the Nintendo GameCube. Insert the DC Jack into the DC Input Connector on the back of the console. (Illustration 1) 1 Insert the Controller Plug into the Controller 2 Socket on the front of the console. See the instruction booklet for the game you are playing to find out which socket(s) you need to plug the controller(s) into. (Illustration 2) 2 IMPORTANT: Please review the TV Screen Damage Caution in the separate Precautions 3 Booklet included with this product before connecting the Nintendo GameCube to a TV. Connect the Nintendo GameCube to your TV or VCR. Refer to the following pages to setup your system with your specific equipment: • Connecting to a Stereo TV or VCR Pages 8-9 • Connecting to a Mono TV or VCR Page 10 • Connecting to a TV or VCR without Audio/Video Connections (RF connection) Page 11 Insert the AC Plug from the AC Adapter into a 4 120V AC wall outlet. (Illustration 3) CAUTION: To prevent electric shock, match wide blade of plug to wide slot and insert fully into outlet. 3 7
-
 1
1 -
 2
2 -
 3
3 -
 4
4 -
 5
5 -
 6
6 -
 7
7 -
 8
8 -
 9
9 -
 10
10 -
 11
11 -
 12
12 -
13
-
14
-
15
-
16
 |
 |