Nintendo TWLSWA Operation Manual - Page 5
Nintendo DSi™ Components
 |
UPC - 045496718732
View all Nintendo TWLSWA manuals
Add to My Manuals
Save this manual to your list of manuals |
Page 5 highlights
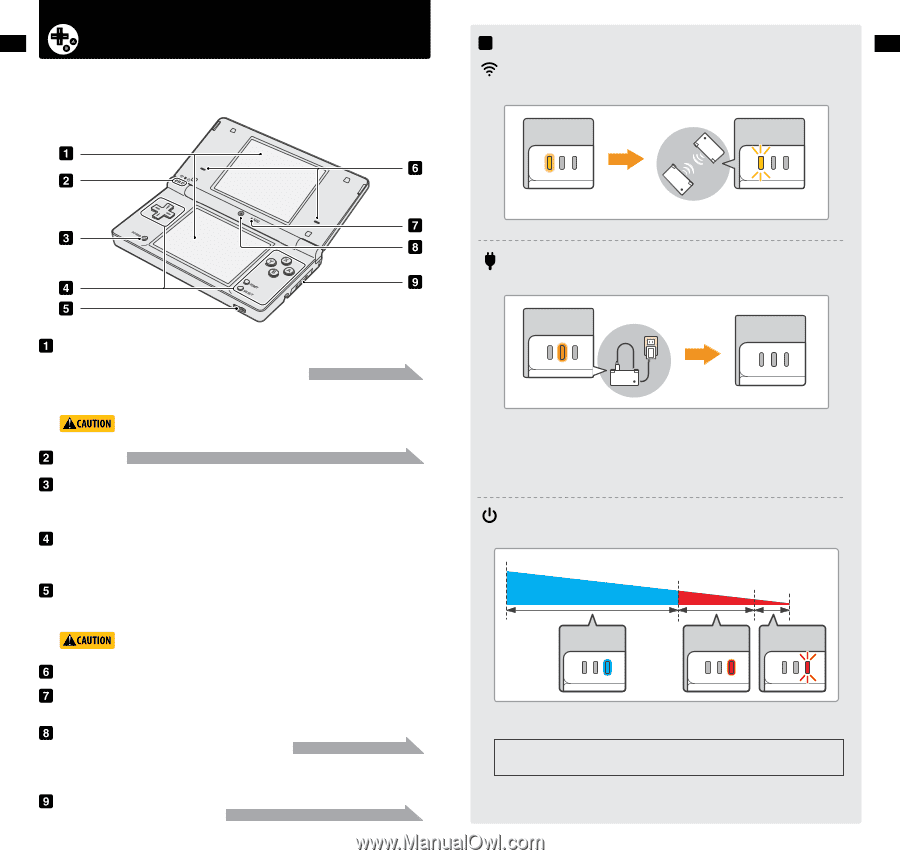
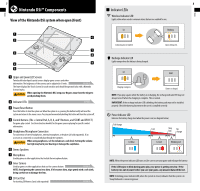
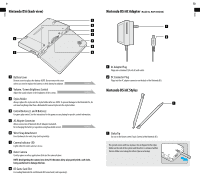
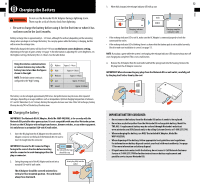
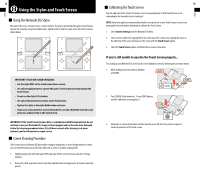
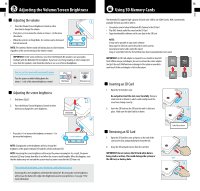
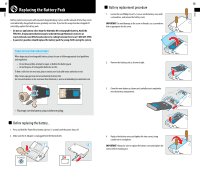
Basics Basics 7 Nintendo DSi™ Components View of the Nintendo DSi system when open (front) Upper and Lower LCD Screens Twin backlit color liquid crystal screens display game screens and other information. The brightness of the screens can be adjusted in 5 levels. SEE PAGE 15 The lower display (the Touch Screen) is touch sensitive and should be operated only with a Nintendo licensed stylus. When opening the Nintendo DSi, keep your fingers away from the hinge to avoid pinching them. Indicator LEDs SEE PAGE 8 Power/Reset Button Press this button to turn the system on. When the system is on, pressing this button briefly will reset the system and return to the menu screen. Pressing and momentarily holding this button will turn the system off. Control Buttons (The +Control Pad, A, B, X, and Y Buttons, and START and SELECT) For game play control. See the instruction booklet for the game you are playing for specific control information. Headphone/Microphone Connectors For connection of stereo headphones, external microphone, or headset (all sold separately). If an accessory is connected, no sound will play through the speakers. When using earphones, set the volume at a safe level. Setting the volume too high may harm your hearing or damage the earphones. Stereo Speakers Microphone Used by games or other applications that include the microphone feature. Inner Camera Used by games or other applications that use the camera feature. SEE PAGE 26 NOTE: Avoid getting the camera lens dirty. If it becomes dirty, wipe gently with a soft cloth, being careful not to damage the lens. SD Card Slot For inserting SD Memory Cards (sold separately). SEE PAGE 16 8 Indicator LEDs Wireless Indicator LED Lights yellow when wireless communications features are enabled for use. Lit Blinking Communication is enabled. Recharge Indicator LED Lights orange when the battery is being charged. Lit Data is being sent. Unlit Charging in progress. Battery is charged. NOTE: If you play a game while the battery is recharging, the recharge indicator LED may not always turn off when the charging is complete. This is normal. IMPORTANT: If the recharge indicator LED is blinking, the battery pack may not be installed properly. Check the battery placement to be sure it is installed correctly. Power Indicator LED Indicates the battery charge level when the power is on (see diagram below). Full charge Low Very low No charge Lit blue Lit red Blinking red NOTE: When the power indicator LED turns red, be sure to save your game and recharge the battery. If the LED begins to blink during game play, your power is getting very low. If the battery runs out of power before you save your game, any unsaved data will be lost. NOTE: A blinking power indicator LED, when the system is closed, indicates that the system is in Sleep Mode and is conserving power.
-
 1
1 -
 2
2 -
 3
3 -
 4
4 -
 5
5 -
 6
6 -
 7
7 -
 8
8 -
 9
9 -
 10
10 -
 11
11 -
12
-
13
-
14
-
15
-
16
-
17
-
18
-
19
-
20
-
21
-
22
-
23
-
24
-
25
-
26
-
27
-
28
-
29
-
30
-
31
-
32
-
33
-
34
-
35
-
36
-
37
-
38
-
39
-
40
-
41
-
42
-
43
-
44
-
45
-
46
-
47
-
48
-
49
-
50
-
51
-
52
-
53
-
54
-
55
 |
 |