Nokia Lumia Icon User Guide - Page 8
Charge your phone, The efficiency of USB charging power varies significantly, - battery replacement
|
View all Nokia Lumia Icon manuals
Add to My Manuals
Save this manual to your list of manuals |
Page 8 highlights
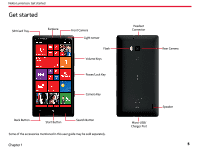
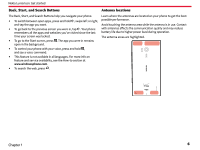
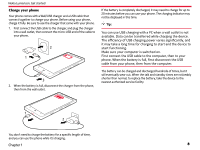
Nokia Lumia Icon: Get started Charge your phone Your phone comes with a Wall/USB charger and a USB cable that connect together to charge your phone. Before using your phone, charge it fully. Be sure to use the charger that came with your phone. 1. First connect the USB cable to the charger, and plug the charger into a wall outlet, then connect the micro-USB end of the cable to your phone. 2. When the battery is full, disconnect the charger from the phone, then from the wall outlet. If the battery is completely discharged, it may need to charge for up to 20 minutes before you can use your phone. The charging indicator may not be displayed in this time. Tip: You can use USB charging with a PC when a wall outlet is not available. Data can be transferred while charging the device. The efficiency of USB charging power varies significantly, and it may take a long time for charging to start and the device to start functioning. Make sure your computer is switched on. First connect the USB cable to the computer, then to your phone. When the battery is full, first disconnect the USB cable from your phone, then from the computer. The battery can be charged and discharged hundreds of times, but it will eventually wear out. When the talk and standby times are noticeably shorter than normal, to replace the battery, take the device to the nearest authorized service facility. You don't need to charge the battery for a specific length of time, and you can use the phone while it's charging. Chapter 1 8
-
 1
1 -
2
-
 3
3 -
 4
4 -
 5
5 -
 6
6 -
 7
7 -
 8
8 -
 9
9 -
 10
10 -
 11
11 -
 12
12 -
 13
13 -
14
-
15
-
16
-
17
-
18
-
19
-
20
-
21
-
22
-
23
-
24
-
25
-
26
-
27
-
28
-
29
-
30
-
31
-
32
-
33
-
34
-
35
-
36
-
37
-
38
-
39
-
40
-
41
-
42
-
43
-
44
-
45
-
46
-
47
-
48
-
49
-
50
-
51
-
52
-
53
-
54
-
55
-
56
-
57
-
58
-
59
-
60
-
61
-
62
-
63
-
64
-
65
-
66
-
67
-
68
-
69
-
70
-
71
-
72
-
73
-
74
-
75
-
76
-
77
-
78
-
79
-
80
-
81
-
82
-
83
-
84
-
85
-
86
-
87
-
88
-
89
-
90
-
91
-
92
-
93
-
94
-
95
-
96
-
97
-
98
-
99
-
100
-
101
-
102
 |
 |