NordicTrack Apex 4600 Treadmill English Manual - Page 20
How To Adjust The Cushioning System
 |
View all NordicTrack Apex 4600 Treadmill manuals
Add to My Manuals
Save this manual to your list of manuals |
Page 20 highlights
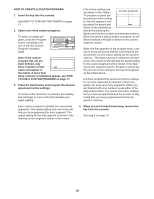
THE INFORMATION MODE HOW TO ADJUST THE CUSHIONING SYSTEM The console features an information mode that keeps track of the total number of hours that the treadmill has been used and the total number of miles that the walking belt has moved. The information mode also allows you to select miles or kilometers as the unit of measurement for speed and distance. In addition, the information mode allows you to turn on and turn off the demo mode. To select the information mode, hold down either of the Stop buttons while inserting the key into the console. When the information mode is selected, the following information will be shown: Remove the key from the console and unplug the power cord. The treadmill features a cushioning system that reduces the impact as you walk or run on the treadmill. To increase the firmness of the walking platform, step off the treadmill and slide the platform cushions (only one side is shown) toward the front of the treadmill. To decrease the firmness, step off the treadmill and slide the platform cushions toward the back of the treadmill. Note: Make sure that both cushions are set at the same firmness level. The faster you run on the treadmill, or the more you weigh, the firmer the walking platform should be. The Time display will show the total number of hours the treadmill has been used. Decrease Increase The Distance display will show the total number of miles or kilometers that the walking belt has moved. Platform Cushion An "E" for English miles or an "M" for metric kilometers will appear in the Calories display. Press the Speed increase button to change the unit of measurement if desired. The console features a display demo mode, designed to be used if the treadmill is displayed in a store. While the demo mode is turned on, the console will function normally when you plug in the power cord, switch the reset/off circuit breaker to the reset position, and insert the key into the console. However, when you remove the key, the displays will remain lit, although the buttons will not function. If the demo mode is turned on, a "d" will appear in display while the information mode is selected. To turn on or turn off the demo mode, press the Speed decrease button. THE OPTIONAL CHEST PULSE SENSOR An optional chest pulse sensor provides hands-free operation as it continuously monitors your heart rate. To purchase the optional chest pulse sensor, call the telephone number on the front cover of this manual. To exit the information mode, remove the key from the console. 20
-
 1
1 -
2
-
3
-
4
-
5
-
6
-
7
-
8
-
9
-
10
-
11
-
12
-
13
-
14
-
 15
15 -
 16
16 -
 17
17 -
 18
18 -
 19
19 -
 20
20 -
 21
21 -
 22
22 -
 23
23 -
 24
24 -
 25
25 -
26
-
27
-
28
-
29
-
30
 |
 |
