NordicTrack E9 Zl Uk Manual - Page 14
Shield Cover 59 onto the Left and Right Shields
 |
View all NordicTrack E9 Zl manuals
Add to My Manuals
Save this manual to your list of manuals |
Page 14 highlights
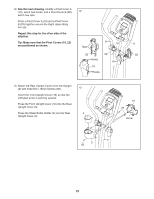
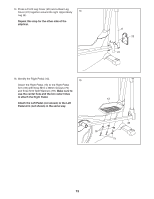
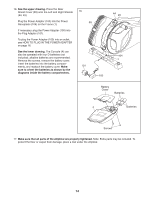
16. See the upper drawing. Press the Rear Shield Cover (59) onto the Left and Right Shields 16 (44, 45). Plug the Power Adapter (100) into the Power Receptacle (104) on the Frame (1). 59 If necessary, plug the Power Adapter (100) into the Plug Adapter (101). To plug the Power Adapter (100) into an outlet, see HOW TO PLUG IN THE POWER ADAPTER on page 16. See the lower drawing. The Console (4) can also be operated with four D batteries (not included); alkaline batteries are recommended. Remove the screws, remove the battery cover, insert the batteries into the battery compartments, and reattach the battery cover. Make 101 sure to orient the batteries as shown by the diagrams inside the battery compartments. 100 44 45 104 1 Battery Cover Batteries 4 Batteries Screws 17. Make sure that all parts of the elliptical are properly tightened. Note: Extra parts may be included. To protect the floor or carpet from damage, place a mat under the elliptical. 14
-
 1
1 -
2
-
3
-
4
-
5
-
6
-
7
-
8
-
 9
9 -
 10
10 -
 11
11 -
 12
12 -
 13
13 -
 14
14 -
 15
15 -
 16
16 -
 17
17 -
 18
18 -
 19
19 -
20
-
21
-
22
-
23
-
24
-
25
-
26
-
27
-
28
-
29
-
30
-
31
-
32
 |
 |
