NordicTrack T 6.1 Treadmill English Manual
NordicTrack T 6.1 Treadmill Manual
 |
View all NordicTrack T 6.1 Treadmill manuals
Add to My Manuals
Save this manual to your list of manuals |
NordicTrack T 6.1 Treadmill manual content summary:
- NordicTrack T 6.1 Treadmill | English Manual - Page 1
. CUSTOMER CARE For service at any time, go to www.nordictrackservice.com. Or call 1-800-TO-BE-FIT (1-800-862-3348) Mon.–-Fri. 6 a.m.–-6 p.m. MT Sat. 8 a.m.–-4 p.m. MT Please do not contact the store. CAUTION Read all precautions and instructions in this manual before using this equipment - NordicTrack T 6.1 Treadmill | English Manual - Page 2
TREADMILL 22 TROUBLESHOOTING 23 EXERCISE GUIDELINES 25 PART LIST 27 EXPLODED DRAWING 28 ORDERING REPLACEMENT PARTS number on the front cover of this manual and request a free replacement decal. Apply the decal in the location shown. Note: The decals may not be shown at actual size. NORDICTRACK - NordicTrack T 6.1 Treadmill | English Manual - Page 3
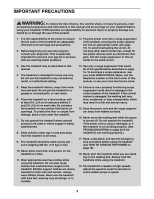
16. To purchase a surge suppressor, see your local NORDICTRACK dealer, call the telephone number on the front cover of this manual, or see your local electronics store. 5. Keep the treadmill indoors, away from moisture and dust. Do not put the treadmill in a garage or covered patio, or near water - NordicTrack T 6.1 Treadmill | English Manual - Page 4
before clean- ing the treadmill, and before performing the maintenance and adjustment procedures described in this manual. Never remove the motor hood unless instructed to do so by an authorized service representative. Servicing other than the procedures in this manual should be performed by - NordicTrack T 6.1 Treadmill | English Manual - Page 5
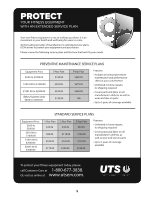
STANDARD SERVICE PLANS all 5 - NordicTrack T 6.1 Treadmill | English Manual - Page 6
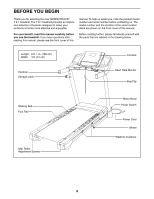
the new NORDICTRACK® T 6.1 treadmill. The T 6.1 treadmill provides an impressive selection of features designed to make your workouts at home more effective and enjoyable. manual. To help us assist you, note the product model number and serial number before contacting us. The model number and the - NordicTrack T 6.1 Treadmill | English Manual - Page 7
the drawings below to identify small parts used for assembly. The number in parentheses below each drawing is the key number of the part, from the PART LIST near the end of this manual. The number following the key number is the quantity used for assembly. Note: If a part is not in the hardware kit - NordicTrack T 6.1 Treadmill | English Manual - Page 8
on the treadmill, wipe it off with a soft cloth and a mild, non-abrasive cleaner. •• Left parts are marked “"L”" or “"Left”" and right parts are marked “"R”" or “"Right.”" •• To identify small parts, see page call Customer Care (see the front cover of this manual) and register your product. 8 - NordicTrack T 6.1 Treadmill | English Manual - Page 9
2. Make sure that the power cord is unplugged. Press a Base Cap (74) into each side of the Base (94). Identify the Right Upright (90). Have a second person hold the Right Upright near the Base (94). See the inset drawing. Tie the wire tie in the Right Upright (90) securely around the end of the - NordicTrack T 6.1 Treadmill | English Manual - Page 10
4. Hold the Right Upright (90) against the Base (94). Be careful not to pinch the wires. 4 Partially tighten three 3/8" x 4" Screws (7) with three 3/8" Star Washers (13) into the Right Upright and the Base; do not fully tighten the Screws yet. Attach the Left Upright (not shown) in the same - NordicTrack T 6.1 Treadmill | English Manual - Page 11
6. Identify the Right Handrail (84). 6 28 Attach the Right Handrail (84) to the Right Upright (90) with two 5/16" x 3" Screws (28) 11 and two 5/16" Star Washers (11). Make sure not to pinch the Upright Wire (81). Start both Screws, and then tighten them. 81 84 Attach the Left Handrail (not - NordicTrack T 6.1 Treadmill | English Manual - Page 12
. IMPORTANT: To avoid damaging the Pulse Crossbar (93), do not use power tools and do not overtighten the #10 x 1 1/2" Screws (9). Orient the Pulse Crossbar (93) as shown. Attach the Pulse Crossbar to the Right and Left Handrails (84, 85) with four #10 x 1 1/2" Screws (9) and four #10 Star Washers - NordicTrack T 6.1 Treadmill | English Manual - Page 13
10. Set the console assembly on the Right and Left Handrails (84, 85). Make sure that no wires 10 are pinched. Insert the excess Upright Wire (81) into the Right Upright (90). Attach the console assembly to the brackets on the Handrails (84, 85) with four 1/4" x 1/2" Screws (4). Do not tighten - NordicTrack T 6.1 Treadmill | English Manual - Page 14
12. Attach the Right and Left Trays (27, 36) with four #8 x 1/2" Screws (1). 12 27 36 1 1 1 13. Orient the Latch Housing (62) as shown. Attach the Latch Housing to the Left Upright (89) with 13 two 1/4" x 4 1/2" Screws (6); start both Screws, and then tighten them. 6 Knob 62 89 14 - NordicTrack T 6.1 Treadmill | English Manual - Page 15
(7). Then, slide the Left and Right Base Covers (82, 83) 14 downward. 82 7 83 7 15. Make sure that all parts are properly tightened before you use the treadmill. If there are sheets of plastic on the treadmill decals, remove the plastic. To protect the floor or carpet, place a mat under the - NordicTrack T 6.1 Treadmill | English Manual - Page 16
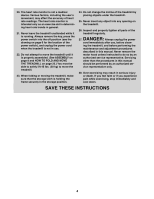
functioning surge suppressor could result in damage to the control system of the treadmill and serious injury to users. nominal 120-volt circuit if it will not fit an outlet, have a proper outlet installed by a qualified electrician. If you are unsure whether the treadmill is properly grounded, - NordicTrack T 6.1 Treadmill | English Manual - Page 17
instructions in this manual refer to miles. IMPORTANT: If there are sheets of plastic on the console, remove the plastic. To prevent damage to the walking platform, wear clean athletic shoes while using the treadmill. The first time you use the treadmill, observe the alignment of the walking belt - NordicTrack T 6.1 Treadmill | English Manual - Page 18
The console features a display demo mode, designed to be used if the treadmill is displayed in a store. Manual button on the console to select the manual mode. 3. Start the walking belt. To start the walking belt, press the Start button, the Speed increase button, or one of the Speed buttons numbered - NordicTrack T 6.1 Treadmill | English Manual - Page 19
desired. The matrix—-When you select the manual mode, the matrix will display a track that can show the speed of the walking belt and the approximate number of calories that you have burned. The of the treadmill to zero. The incline must be at zero or you may damage the treadmill when you - NordicTrack T 6.1 Treadmill | English Manual - Page 20
can manually override the setting by pressing the Speed or Incline buttons; however, when the next segment of the workout begins, the treadmill will increase button. The walking belt will begin to move at 1 mph. When the next segment of the workout begins, the treadmill will automatically adjust to - NordicTrack T 6.1 Treadmill | English Manual - Page 21
Stop button. When the information mode is selected, the following information will be shown: The upper display will show the total number of hours that the treadmill has been used. The lower left display will show the total number of miles or kilometers that the walking belt has moved. Next, press - NordicTrack T 6.1 Treadmill | English Manual - Page 22
the key and unplug the power cord. CAUTION: You must be able to safely lift 45 lbs. (20 kg) to raise, lower, or move the treadmill. 1. Hold the metal frame firmly in the location shown by the arrow below. CAUTION: Do not hold the frame by the plastic foot rails. Bend - NordicTrack T 6.1 Treadmill | English Manual - Page 23
TROUBLESHOOTING Most treadmill problems can be solved by following the simple steps below. Find the symptom that applies, and follow the steps listed. If further assistance is needed, see the front cover of this manual see THE INFORMATION MODE on page 21 to turn off the demo mode. SYMPTOM: The - NordicTrack T 6.1 Treadmill | English Manual - Page 24
. b Idler Roller Screws c. Your treadmill features a walking belt coated with high-performance lubricant. IMPORTANT: Never apply silicone spray or other substances to the walking belt or the walking platform unless instructed to do so by an authorized service representative. Such substances may - NordicTrack T 6.1 Treadmill | English Manual - Page 25
age 35 or persons with pre-existing health problems. The heart rate monitor is not a You can use your heart rate as a guide to find the proper intensity level. The until your heart rate is near the highest number in your training zone. WORKOUT GUIDELINES Warming Up part of your everyday life. 25 - NordicTrack T 6.1 Treadmill | English Manual - Page 26
SUGGESTED STRETCHES The correct form for several basic stretches is shown at the right. Move slowly as you stretch—-never bounce. 1. Toe Touch Stretch Stand with your knees bent slightly and slowly bend forward from 1 your hips. Allow your back and shoulders to relax as you reach down toward - NordicTrack T 6.1 Treadmill | English Manual - Page 27
Platform 45 1 Walking Belt 46 2 Belt Guide 47 1 Right Rear Spacer 72 1 Controller 73 1 Controller Plate 74 2 Base Manual Note: Specifications are subject to change without notice. For information about ordering replacement parts, see the back cover of this manual. *These parts - NordicTrack T 6.1 Treadmill | English Manual - Page 28
EXPLODED DRAWING A 1 26 8 1 39 26 8 41 39 1 37 35 43 44 37 23 61 15 59 30 34 40 15 40 57 2 2 2 42 46 35 23 52 51 21 59 50 14 53 10 30 34 49 19 37 60 45 35 23 56 37 59 30 34 47 35 37 1 39 26 8 20 23 53 10 24 73 10 10 21 1 19 39 26 8 37 59 30 34 48 46 54 55 28 - NordicTrack T 6.1 Treadmill | English Manual - Page 29
EXPLODED DRAWING B Model No. 831.24995.0 R0813B 31 31 31 65 66 67 71 29 33 69 70 16 32 33 33 33 67 2 68 31 2 71 2 72 68 76 68 77 75 10 68 78 68 2 31 2 29 - NordicTrack T 6.1 Treadmill | English Manual - Page 30
EXPLODED DRAWING C Model No. 831.24995.0 R0813B 28 11 85 79 87 62 63 7 82 33 38 17 9 5 93 10 58 41 1 6 89 1 1 9 5 1 28 11 84 79 4 81 87 22 13 74 91 3 12 94 91 17 38 33 90 22 81 77 10 3 12 83 74 13 7 30 - NordicTrack T 6.1 Treadmill | English Manual - Page 31
EXPLODED DRAWING D 64 36 1 2 Model No. 831.24995.0 R0813B 86 2 80 2 1 1 2 1 2 1 1 27 18 2 92 25 25 92 88 2 31 - NordicTrack T 6.1 Treadmill | English Manual - Page 32
manual) •• the key number and description of the replacement part(s) (see the PART LIST and the EXPLODED DRAWING near the end of this manual) LIMITED WARRANTY IMPORTANT: To protect your tness equipment with an extended service plan, see page 5. ICON Health & Fitness all instructions in this manual
-
 1
1 -
 2
2 -
 3
3 -
 4
4 -
 5
5 -
 6
6 -
 7
7 -
8
-
9
-
10
-
11
-
12
-
13
-
14
-
15
-
16
-
17
-
18
-
19
-
20
-
21
-
22
-
23
-
24
-
25
-
26
-
27
-
28
-
29
-
30
-
31
-
32
 |
 |
USER°S MANUAL
www.nordictrack.com
Model No. 831.24995.0
Serial No.
Write the serial number in the space
above for reference.
CAUTION
Read all precautions and instruc-
tions in this manual before using
this equipment. Save this manual
for future reference.
Serial
Number
Decal
To register your product and
activate your warranty today, go
to www.nordictrackservice.com/
registration.
For service at any time, go to
www.nordictrackservice.com.
Or call 1-800-TO-BE-FIT
(1-800-862-3348)
Mon.°Fri. 6 a.m.°6 p.m. MT
Sat. 8 a.m.°4 p.m. MT
Please do not contact the store.
ACTIVATE YOUR
WARRANTY
CUSTOMER CARE