Oki B6100n Configuration Guide: NIC Option - Page 28
Installing the Ethenet Network Interface on the Controller Assembly
 |
View all Oki B6100n manuals
Add to My Manuals
Save this manual to your list of manuals |
Page 28 highlights
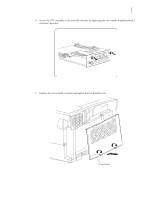
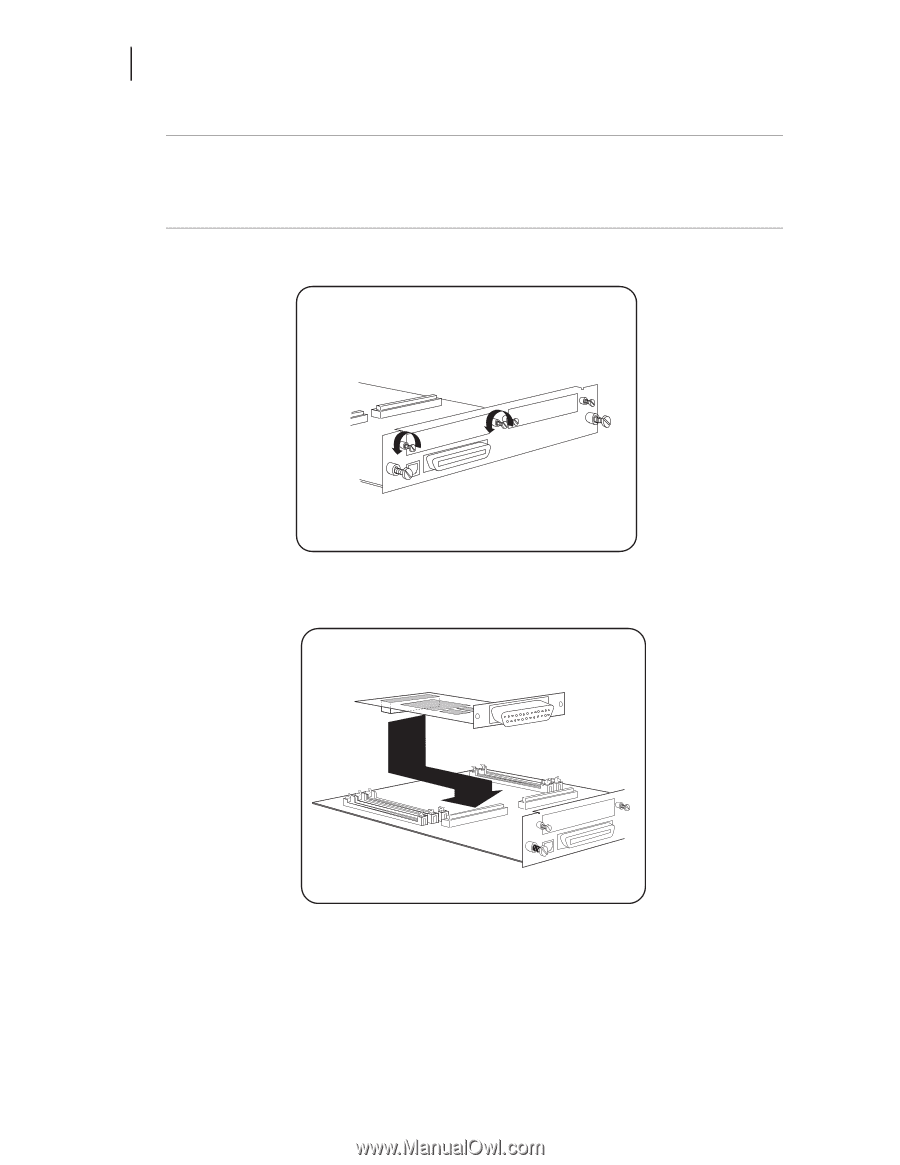
3-4 Ethernet Network Interface Card (NIC) Installation Installing the Ethenet Network Interface on the Controller Assembly NOTE: It is not necessary to remove the controller from your printer to complete the installation. For clarity, the following illustrations depict a controller removed from the printer. When facing the front of the controller as shown below, network port 1 is on the right and network port 2 is on the left. However, when installed in the printer, network port 1 is on the bottom and network port 2 is on top. In the following few steps, an Ethernet network interface is being installed in network port 2. 1. 2.
-
 1
1 -
2
-
3
-
4
-
5
-
6
-
7
-
8
-
9
-
10
-
11
-
12
-
13
-
14
-
15
-
16
-
17
-
18
-
19
-
20
-
21
-
22
-
 23
23 -
 24
24 -
 25
25 -
 26
26 -
 27
27 -
 28
28 -
 29
29 -
 30
30 -
 31
31 -
 32
32 -
 33
33 -
34
-
35
-
36
-
37
-
38
-
39
-
40
-
41
-
42
-
43
-
44
-
45
-
46
-
47
-
48
-
49
-
50
-
51
-
52
-
53
-
54
 |
 |
3-4
Ethernet Network Interface Card (NIC) Installation
Installing the Ethenet Network Interface on the Controller Assembly
NOTE:
It is not necessary to remove the controller from your printer to complete the installation. For
clarity, the following illustrations depict a controller removed from the printer. When facing the
front of the controller as shown below, network port 1 is on the right and network port 2 is on the
left. However, when installed in the printer, network port 1 is on the bottom and network port 2 is on
top. In the following few steps, an Ethernet network interface is being installed in network port 2.
1.
7XUQLQJ±WKXPEVFUHZV±FRXQWHU´FORFNZLVH³±UHPRYH±WKH±EODQN±PHWDO±SODWH±FRYHULQJ±RQH±RI±WKH±DYDLODEOH±
QHWZRUN±SRUWV±RQ±WKH±FRQWUROOHU±EUDFNHW²
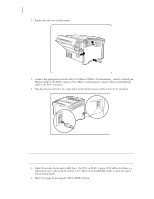
2.
:KLOH±DOLJQLQJ±WKH±IURQW±EUDFNHW±RI±WKH±1,&±DVVHPEO\±WR±WKH±WZR±UHVSHFWLYH±WKXPEVFUHZV±RQ±WKH±FRQ´
WUROOHU±DVVHPEO\±EUDFNHW³±ILUPO\±VHDW±WKH±¸¶´SLQ±PDOH±FRQQHFWRU±RQ±WKH±XQGHUVLGH±RI±WKH±1,&±WR±WKH±
¸¶´SLQ±IHPDOH±FRQQHFWRU±RQ±WKH±FRQWUROOHU±DVVHPEO\²±