Oki B6500 B6500 Network Guide - Page 61
Ppendix, Etting, Ddress
 |
View all Oki B6500 manuals
Add to My Manuals
Save this manual to your list of manuals |
Page 61 highlights
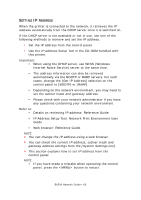
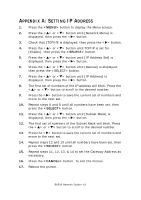
APPENDIX A: SETTING IP ADDRESS 1. Press the button to display the Menu screen. 2. Press the or button until [Network Menu] is displayed, then press the button. 3. Check that [TCP/IP] is displayed, then press the button. 4. Press the or button until TCP/IP is set for [Enable], then press the button. 5. Press the or button until [IP Address Set] is displayed, then press the button. 6. Press the or button until [Manual] is displayed, then press the button. 7. Press the or button until [IP Address] is displayed, then press the button. 8. The first set of numbers of the IP address will blink. Press the or button to scroll to the desired number. 9. Press the button to save the current set of numbers and move to the next set. 10. Repeat steps 8 and 9 until all numbers have been set, then press the button. 11. Press the or button until [Subnet Mask] is displayed, then press the button. 12. The first set of numbers of the Subnet Mask will blink. Press the or button to scroll to the desired number. 13. Press the button to save the current set of numbers and move to the next set. 14. Repeat steps 12 and 13 until all numbers have been set, then press the button. 15. Repeat steps 11, 12, 13, & 14 to set the Gateway Address as necessary. 16. Press the button. To exit the menus. 17. Reboot the printer. B6500 Network Guide> 61
-
 1
1 -
2
-
3
-
4
-
5
-
6
-
7
-
8
-
9
-
10
-
11
-
12
-
13
-
14
-
15
-
16
-
17
-
18
-
19
-
20
-
21
-
22
-
23
-
24
-
25
-
26
-
27
-
28
-
29
-
30
-
31
-
32
-
33
-
34
-
35
-
36
-
37
-
38
-
39
-
40
-
41
-
42
-
43
-
44
-
45
-
46
-
47
-
48
-
49
-
50
-
51
-
52
-
53
-
54
-
55
-
 56
56 -
 57
57 -
 58
58 -
 59
59 -
 60
60 -
 61
61 -
 62
62
 |
 |