Oki B720dn B710, B720, B730 Setup Guide (English, Fran栩s, Espa?ol, - Page 10
Windows Installation
 |
View all Oki B720dn manuals
Add to My Manuals
Save this manual to your list of manuals |
Page 10 highlights
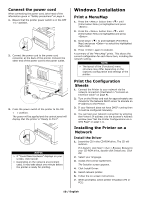
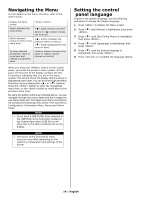
Connect the power cord When connecting the power cord, take heed of the information given in "Safety precautions" on page 4. 1. Ensure that the printer power switch is in the OFF position. 2. Connect the power cord to the power cord connector at the back of the printer. Connect the other end of the power cord to the power outlet. 3. Press the power switch of the printer to the ON < > position. The power will be applied and the control panel will display that the printer is "Ready to Print". NOTES > If "Found New Hardware" displays on your screen, click Cancel. > Depending on the network environment used, it may take about one minute before the printer is ready for printing. Windows Installation Print a MenuMap 1. Press the button then < > until [Information Menu] is highlighted and press . 2. Press the button then < > until [Information Menu] is highlighted and press . 3. Scroll down < > to and highlight [Print Menu Map] and press to select the highlighted menu item. 4. Press again to execute. A summary of the "MenuMap" prints. This shows the current configuration for each Menu item, including the network setting. NOTE > The layout of the [Functions] menu structure may differ depending on the (options) configuration and settings of the printer. Print the Configuration Sheets 1. Connect the Printer to your network via the network connection (illustrated in "Connect an Interface Cable" on page 9). 2. Turn on the Printer and wait for approximately one minute for the Network DHCP server to allocate an IP address to the Printer. 3. If your Network does not have DHCP running then it must be configured manually. 4. You can test your network connection by entering the Printer's IP address into the browser's Address window (see "Set the Printer Configurations via a Web Page" on page 11). Installing the Printer on a Network Install the Driver 1. Insert the CD in the CD-ROM drive. The CD will autorun. If it doesn't, click Start > Run > Browse. Browse to your CD-ROM drive, double-click Install.exe. Click OK. 2. Select your language. 3. Accept the License Agreement. The Installer screen appears. 4. Click Install Driver. 5. Select network printer. 6. Follow the on-screen instructions. 7. When prompted, select printer emulation (PS or PCL). 10 / English
-
 1
1 -
2
-
3
-
4
-
 5
5 -
 6
6 -
 7
7 -
 8
8 -
 9
9 -
 10
10 -
 11
11 -
 12
12 -
 13
13 -
 14
14 -
 15
15 -
16
-
17
-
18
-
19
-
20
-
21
-
22
-
23
-
24
-
25
-
26
-
27
-
28
-
29
-
30
-
31
-
32
-
33
-
34
-
35
-
36
-
37
-
38
-
39
-
40
-
41
-
42
-
43
-
44
-
45
-
46
-
47
-
48
 |
 |
