Oki C7300 Software Install Setup Guide - Page 16
Install Printer Software for OS 8.6 to 9.1
 |
View all Oki C7300 manuals
Add to My Manuals
Save this manual to your list of manuals |
Page 16 highlights
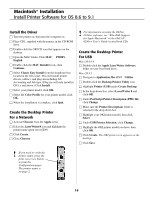
Macintosh® Installation Install Printer Software for OS 8.6 to 9.1 Install the Driver □ Turn the printer on, then turn the computer on. □ Place CD1, supplied with the printer, in the CD-ROM drive. □ Double-click the OKI CD icon that appears on the desktop. ® ® □ Open the MAC folder. Click MAC PSDRV English. □ Double-click the MAC Installer icon, click Continue. □ Select Classic Easy Install from the dropdown box located in the left corner. This will install printer drivers, utilities, and plug-ins including Job Accounting and Job type. (Plug-ins will only install in OS 9.x and above.) Click Install. □ Select your printer model, click OK. □ Select the Color Profile for your printer model, click OK. □ When the installation is complete, click Quit. Create the Desktop Printer For a Network □ Activate Chooser from the Apple menu. □ Select the LaserWriter8 icon and highlight the printer name (print server ID#). □ Click Create. □ Close Chooser. ! For information on using the OkiNet Utilities software, see "EtherTalk Support for Apple Macintosh" in the OkiLAN 6200e+ User's Guide located both CDs. Create the Desktop Printer For USB Mac OS 9.0.4 □ Double-click the Apple LaserWriter Software folder on your local hard drive. ® Mac OS 9.1 □ Navigate to Application Mac OS 9 Utilties. □ Double-click the Desktop Printer Utility icon. □ Highlight Printer (USB) under Create Desktop. □ In the drop-down box, select LaserWriter 8 and click OK. □ Under PostScript Printer Description (PPD) file, click Change. □ Make sure the Printer Descriptions folder is selected in the drop-down box. □ Highlight your OKI printer model, then click Select. □ Under USB Printer Selection, click Change. □ Highlight the OKI printer model you have, then click OK. □ Click Create. The OKI printer icon appears on the desktop. □ Click Save. ! If you need to verify the printer name, press the print server test button to print the Configuration pages. The printer name is on page 2. 16
-
 1
1 -
2
-
3
-
4
-
5
-
6
-
7
-
8
-
9
-
10
-
 11
11 -
 12
12 -
 13
13 -
 14
14 -
 15
15 -
 16
16 -
 17
17 -
 18
18 -
 19
19 -
 20
20
 |
 |
