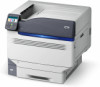
Oki C910 C910 User Guide (English)
Oki C910 Manual
 |
View all Oki C910 manuals
Add to My Manuals
Save this manual to your list of manuals |
Oki C910 manual content summary:
- Oki C910 | C910 User Guide (English) - Page 1
C910 User's Guide 59102301 my.okidata.com - Oki C910 | C910 User Guide (English) - Page 2
Copyright Information Copyright © 2010 by Oki Data. All Rights Reserved C910 User's Guide P/N 59102301 Revision 1.1 September, drivers and manuals are available from the web site: http://www.okiprintingsolutions.com Trademark Information Oki and Oki Printing Solutions are registered trademarks of Oki - Oki C910 | C910 User Guide (English) - Page 3
Tray/High Capacity Feeder (HCF) Configurations. . . . .8 Printer Overview 10 Opening and Closing the Top Cover 10 Identifying Major Components Information 29 Using the Menus 29 Getting Started 31 Printer Location 31 Turning Off the Printer 32 No hard disk drive installed 32 Hard disk - Oki C910 | C910 User Guide (English) - Page 4
) . . 48 Optional Accessories 51 Accessory Order Information 52 Installing Accessories 53 Troubleshooting 54 General 54 Paper Jams - Printer 54 Open cover, paper jam, tttttt side cover 54 Open cover, paper 97 Configuration example - Number lpf Monochrome Pages Printed 98 4 - C910 Contents - Oki C910 | C910 User Guide (English) - Page 5
Print Information 99 Print Information example - Printing the Demonstration Page 100 Print Secure Job 101 Menus 102 Tray Configuration 102 System Adjust 107 Menus example 1 - Tray 1 transparencies 111 Menus example 2 - MP Tray paper size 112 5 - C910 Contents - Oki C910 | C910 User Guide (English) - Page 6
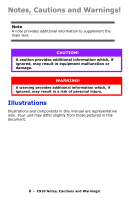
equipment malfunction or damage. WARNING! A warning provides additional information which, if ignored, may result in a risk of personal injury. Illustrations Illustrations and components in this manual are representative only. Your unit may differ slightly from those pictured in this document - Oki C910 | C910 User Guide (English) - Page 7
Capacity Feeder (HCF) Mounted on locking casters, the HCF includes three paper trays, each holding 530 shets. Capacity 1590 sheets. • Additional Memory • Finisher For stapling printer output. • Punch Unit 7 - C910 Introduction - Oki C910 | C910 User Guide (English) - Page 8
Adds punching holes (e.g., for 3-ring notebook) to extend the functionality of the finisher. Possible Tray/High Capacity Feeder (HCF) Configurations • Tray 1 only • Tray 1 + 2nd Tray • Tray 1 + 2nd Tray + 3rd Tray • Tray 1 + HCF 8 - C910 Introduction - Oki C910 | C910 User Guide (English) - Page 9
• Tray1 + 2nd Tray + HCF 9 - C910 Introduction - Oki C910 | C910 User Guide (English) - Page 10
and Closing the Top Cover CAUTION! To gain access to the inside of the printer, ensure that the top cover is fully opened. To open the top cover, squeeze the top cover handle and then push harder to close the cover completely. Make sure that the cover is securely closed. 10 - C910 Printer Overview - Oki C910 | C910 User Guide (English) - Page 11
major components of your printer are identified in the graphics below. 1. Paper holding arm 2. Top cover (face-down stacker) 3. MP Tray (multi-purpose tray) 4. Tray 1 side cover 5. Paper size label 6. Paper gauge 7. Tray 1 (paper tray) 8. Control panel 9. Top cover handle 11 - C910 Printer Overview - Oki C910 | C910 User Guide (English) - Page 12
10 12 11 10. Face-down stacker 11. Power (on/off) switch 12. Face-up stacker 12 - C910 Printer Overview - Oki C910 | C910 User Guide (English) - Page 13
14 15 18 13 16 17 13. Interface unit 14. Network interface connector 15. Parallel interface connector 16. USB interface connector 17. Power connector 18. Ventilation openings 13 - C910 Printer Overview - Oki C910 | C910 User Guide (English) - Page 14
cartridge and toner cartridge (Cyan) 20. Image drum cartridge and toner cartridge (Magenta) 21. Image drum cartridge and toner cartridge (Yellow) 22. Image drum cartridge and toner cartridge (Black) 23. Toner cartridge 24. Image drum cartridge 25. Fuser unit 26. LED heads 14 - C910 Printer Overview - Oki C910 | C910 User Guide (English) - Page 15
29 28 27 27. Belt unit 28. Drum basket handle 29. Drum basket 15 - C910 Printer Overview - Oki C910 | C910 User Guide (English) - Page 16
24 lb (75 - 90 g/m²) paper designed for use in copiers and laser printers. Suitable types are: • OKI® Bright White, 32 lb US Bond • HammerMill® Laser Print Radiant, White melt in the fuser and cause damage. Labels should also be of the type recommended for use in copiers and laser printers, in which - Oki C910 | C910 User Guide (English) - Page 17
Stacker Tray 1 or MP Tray Face-up Stacker MP Tray Face-up Stacker 0.004-0.008 inch 0.102-0.203 mm MP Tray Face-up Stacker 17 - C910 Paper Recommendations - Oki C910 | C910 User Guide (English) - Page 18
printer automatically switch to that other tray when the current tray runs out of paper. This function can be enabled by driver ensures that the paper path through the printer is almost straight. The multi-purpose tray printer. Do not use the duplex (two-sided printing) function for transparencies. - Oki C910 | C910 User Guide (English) - Page 19
Exit) The face-down stacker on the top of the printer can hold up to 500 sheets of 20 lb (75 for use. (With the face-up stacker either open or closed, the driver setting of Face Down will successfully direct prints to the Face-Down stacker . 1. Pull out the tray. 19 - C910 Paper Recommendations - Oki C910 | C910 User Guide (English) - Page 20
2. Press the paper rear stopper tab (1) and adjust the tab to the required paper size. 1 3. Fan the paper to be loaded then tap the edges of the stack on a flat surface to make it flush. 20 - C910 Paper Recommendations - Oki C910 | C910 User Guide (English) - Page 21
between the paper and the guides and rear stopper. • Do not overfill the paper tray. Capacity depends on the paper type. • Do not load damaged paper. • Do not load paper of different sizes or types at the same time. 3 2 5. Gently push the tray back into the printer. 21 - C910 Paper Recommendations - Oki C910 | C910 User Guide (English) - Page 22
Using the MP Tray 1. Squeeze the handle (1) and open the multi-purpose tray. 1 2. Fold out the paper support section and swivel out the extension supports (2). 3 2 3. Adjust the paper guides (3) to the size of the paper being used. 22 - C910 Paper Recommendations - Oki C910 | C910 User Guide (English) - Page 23
top edge into the printer. • For two-sided (duplex) printing on printer. (The duplex unit must be installed for this function.) • Envelopes should be loaded face-up with long edge into the printer . Do not select duplex printing on envelopes. • Do not leave space between the paper and the guides - Oki C910 | C910 User Guide (English) - Page 24
Using the Stackers Face-down stacker When the face-up stacker (1) on the left side of the printer is closed (its normal position), paper is ejected to the face-down stacker on the top of the printer. 1 Face-up Stacker The face-up exit path is used for heavy paper (cardstock etc.), envelopes - Oki C910 | C910 User Guide (English) - Page 25
2. Flip out the paper support (2). 2 3. Swivel out the paper support extension (3). 3 25 - C910 Paper Recommendations - Oki C910 | C910 User Guide (English) - Page 26
for more than 2 seconds for a soft shutdown. You can then press this button again for a restart or use the Power switch to turn off the printer completely. 2. Ready light On: indicates ready to print 26 - Oki C910 | C910 User Guide (English) - Page 27
button Enters menu mode and selects the menu item highlighted in the display panel 9. Online button Switches between online (printer ready to receive data) and offline (printer not ready to receive data) 10. Cancel button Cancels current print job 11. Help button Provides additional textual or image - Oki C910 | C910 User Guide (English) - Page 28
problem and cannot continue printing until the user has intervened and removed the cause of the trouble. The top two lines of the display panel show the printer status. The bottom of the display panel normally shows a bar chart of the toner printer. Administrator menu: accessed by pressing the Enter button for - Oki C910 | C910 User Guide (English) - Page 29
printer power supply (including Restart). Available to support staff to allow printer used to move through the printer menus. You can adjust printer drivers. However, several of the driver settings can be left at "Printer Setting," which will then default to the settings entered in these printer - Oki C910 | C910 User Guide (English) - Page 30
1. Ensure that the display panel indicates that the printer is ready to print. 2. Enter User menu mode by pressing either the Enter button or the Up-arrow or Down-arrow the ready to print status. Refer to "Appendix B - Menu system" on page 94 for examples of using the menus. 30 - C910 Control Panel - Oki C910 | C910 User Guide (English) - Page 31
Getting Started This section provides information to help you get started with using your printer. Printer Location Check that you have sufficient space for access: • around your printer: 20cm 8in 60cm 24in 60cm 24in 100cm 40in 31 - C910 Getting Started - Oki C910 | C910 User Guide (English) - Page 32
• above your printer: 70cm 28in Turning Off the Printer No hard disk drive installed 1. If a hard disk drive is NOT installed, use the On/Off switch. 32 - C910 Getting Started - Oki C910 | C910 User Guide (English) - Page 33
control panel for more than 2 seconds to start the shutdown process. 1 2. When the display panel shows that you can either turn off or restart the printer, use the On/Off switch to turn off the printer. 33 - C910 Getting Started - Oki C910 | C910 User Guide (English) - Page 34
the printer. Changing the Display Language The default language used by your printer for display messages and for report printing is English. If required, this can be changed using the Panel Language Download Utility located on the installation CD under Optional Utilities. 34 - C910 Getting Started - Oki C910 | C910 User Guide (English) - Page 35
follow. Interfaces and Connection Your printer is equipped with a selection of data interfaces: • Parallel - printers of the same type, they appear as 2), ***** (3), etc. These numbers depend on the order of connecting or turning on each printer. • Ethernet - For network cable connection. 35 - C910 - Oki C910 | C910 User Guide (English) - Page 36
Connecting the USB Interface Do not connect the USB cable at this time. You will be instructed when to connect the USB cable when you run the Drivers CD. If you are connecting your printer directly to a stand alone computer proceed to the section entitled "Printer Drivers". 36 - C910 Getting Started - Oki C910 | C910 User Guide (English) - Page 37
Connecting the Network Interface CAUTION! Do not connect a USB cable into the network interface connector as this may lead to malfunction. 1. Turn off the printer and the computer. 2. Install the Ferrite core to the Ethernet cable as shown. 37 - C910 Getting Started - Oki C910 | C910 User Guide (English) - Page 38
printer, please refer to the relevant section in the Software Installation Guide and Configuration Guide for further details on how to configure the network connection before installing the printer drivers. Note Administrator's authority is required when installing a network connection. 38 - C910 - Oki C910 | C910 User Guide (English) - Page 39
the Printer CD into your computer and follow the on-screen instructions. You are prompted to follow a set of basic steps to configure the display panel language, install drivers and other software and finally print a test page to check that your printer is operating correctly. 39 - C910 Getting - Oki C910 | C910 User Guide (English) - Page 40
guide, the life expectancy of these items is: • Black Toner - 15,700 Letter-size pages ISO/IEC 19798. • Cyan, Magenta, Yellow Toner- 17,500 Letter-size pages ISO/IEC 19798 The printer is shipped with sufficient toner size pages • Fuser - Approximately 100,000 Letter-size pages • Waste toner - 30,000 - Oki C910 | C910 User Guide (English) - Page 41
Consumable Item Order Information Item Toner, Black Toner, Cyan Toner, Magenta Toner, Yellow Image drum, Black Image drum, Cyan Image drum Maintenance Item Order Information Item Fuser unit Life 100,000 Letter-size pages Belt unit 100,000 Letter-size pages Waste toner bottle 30,000 Letter-size - Oki C910 | C910 User Guide (English) - Page 42
. Please follow these instructions carefully. CAUTION! Only use genuine Oki Original consumables to ensure the best quality and performance from your hardware. Cleaning the LED heads You should clean the LED heads: • any time you replace a toner cartridge (a LED lens cleaner is enclosed with - Oki C910 | C910 User Guide (English) - Page 43
2. With an LED lens cleaner or soft cloth, gently wipe each of the four heads (1). Move the cleaner as shown, using a clean section of the cleaner with each pass. Be careful not to damage the guards (2). 1 2 3. Close the top cover. 43 - C910 Consumables and Maintenance - Oki C910 | C910 User Guide (English) - Page 44
Clean the paper feed rollers if paper jams frequently occur. 1. Remove items like a wrist watch or bracelet and follow the correct steps to turn the printer off depending on whether a hard disk drive is installed (see page 32). 2. Open the Tray 1 side cover and pull out the paper - Oki C910 | C910 User Guide (English) - Page 45
3. Remove Tray 1 completely from the printer. 4. Gaining access through the gap left by Tray 1, wipe the 3 paper feed rollers (2) with a soft cloth lightly moistened with water. 2 45 - C910 Consumables and Maintenance - Oki C910 | C910 User Guide (English) - Page 46
5. Replace Tray 1. 6. Return the paper guide plate to its original position and close Tray 1 side cover. 7. Turn on the printer. 46 - C910 Consumables and Maintenance - Oki C910 | C910 User Guide (English) - Page 47
the correct steps to turn the printer off depending on whether a hard disk drive is installed (see page 32). 2. Wipe the printer surface with a soft cloth moistened sparingly with water or neutral detergent. 3. Use a soft dry cloth to dry the printer surface. 47 - C910 Consumables and Maintenance - Oki C910 | C910 User Guide (English) - Page 48
4. Turn on the printer. Emptying the Punch Chip Box (Punch unit optional accessory) When the display panel indicates that the punch chip box is full, empty the box as follows: 1. Operate the Finisher lever and move the Finisher away from the printer. 48 - C910 Consumables and Maintenance - Oki C910 | C910 User Guide (English) - Page 49
2. Pull out the punch chip box, being careful to keep it level so as not to spill any chips. 3. Discard the chips in an appropriate place. 4. Replace the punch chip box carefully into the Finisher. 49 - C910 Consumables and Maintenance - Oki C910 | C910 User Guide (English) - Page 50
5. Check that the punch chip box has been replaced correctly then move the Finisher back into position, being careful not to trap your fingers. 50 - C910 Consumables and Maintenance - Oki C910 | C910 User Guide (English) - Page 51
Optional Accessories This section describes optional accessory equipment for your printer. The following accessories are available: • duplex unit ( 2nd Tray + 3rd Tray • Tray 1 + HCF • Tray1 + 2nd Tray + HCF. • Finisher (for stapling printer output) • Punch unit (to extend Finisher functionality) 51 - Oki C910 | C910 User Guide (English) - Page 52
70051701 Hard disk drive 70050502 Second, third paper tray 42831301 High capacity feeder (HCF) 42831501 Finisher: 4-tray 5-tray 70050701 70050801 Finisher Punch Unit: 2-3 hole 42872902 Printer cabinet 70050901 52 - C910 Optional Accessories - Oki C910 | C910 User Guide (English) - Page 53
Each accessory (apart from the Finisher) includes instructions for installation. Please follow these instructions carefully. After installation, print out a Menu Map to make the appropriate setting in your printer driver(s): • duplex unit • paper tray(s) • Finisher 53 - C910 Optional Accessories - Oki C910 | C910 User Guide (English) - Page 54
Troubleshooting General If the printer display panel does not display anything or is still in stand-by mode 10 minutes after switching the printer on, follow the printer shutdown sequence to switch it off (see page 32). Check all cable connections before restarting the printer. If the problem - Oki C910 | C910 User Guide (English) - Page 55
1. Squeeze the catch (1) on Tray 1 side cover and open the cover. 1 2. Holding it by the tab (2), turn the paper guide outward. 2 3. Carefully remove the jammed paper. 55 - C910 Troubleshooting - Oki C910 | C910 User Guide (English) - Page 56
4. Put the paper guide back into position and close Tray 1 side cover. Open cover, paper jam, side cover 1. If the MP Tray is open, close it so that the side cover (1) is visible. 1 2. Pull the release lever (2) and pull open the side cover. 2 56 - C910 Troubleshooting - Oki C910 | C910 User Guide (English) - Page 57
3. Carefully remove the jammed paper. 4. Close the side cover. 57 - C910 Troubleshooting - Oki C910 | C910 User Guide (English) - Page 58
Open cover, paper jam, top cover 1. Squeeze the top cover handle (1) and open the top cover. 1 WARNING! Be careful not to touch the fuser unit which is hot after printing. 2. Squeeze the basket handle (2) and raise the drum basket. 2 58 - C910 Troubleshooting - Oki C910 | C910 User Guide (English) - Page 59
! Be careful not to touch the fuser unit which may be hot after printing. If the fuser unit is hot, wait until it cools before attempting to remove any jammed paper. Holding the fuser unit (4) by the handle, lift it out of the printer and place it on a flat surface. 4 3 59 - C910 Troubleshooting - Oki C910 | C910 User Guide (English) - Page 60
5. Pull up the jam release levers (5) and remove the jammed paper. 5 6. Carefully replace the fuser unit into the printer and turn the lock lever (6) in the direction shown to lock the fuser unit. 6 60 - C910 Troubleshooting - Oki C910 | C910 User Guide (English) - Page 61
7. If paper is jammed near the paper exit, open the face-up stacker (7). 7 8. Open the side cover (paper exit) (8) and remove the jammed paper. 8 61 - C910 Troubleshooting - Oki C910 | C910 User Guide (English) - Page 62
9. Close the side cover (paper exit) and then the face-up stacker. 10. Return the image drum basket (9) into position and check it is locked. 9 11. Close the top cover and ensure it is latched. 62 - C910 Troubleshooting - Oki C910 | C910 User Guide (English) - Page 63
Jams - Duplex Unit (if installed) Check duplex unit, paper jam 1. If a Finisher unit is attached to your printer, operate the lever (1) of the Inverter unit to separate the Inverter from the printer. 1 2. Operate the duplex cover release button (2) and open the cover. 2 63 - C910 Troubleshooting - Oki C910 | C910 User Guide (English) - Page 64
3. Carefully remove any jammed paper. 4. Operate the levers (3) and pull out the duplex unit. 3 3 64 - C910 Troubleshooting - Oki C910 | C910 User Guide (English) - Page 65
5. Holding the front top cover by the grip (4), push it gently inwards and raise it. 4 6. Remove any jammed paper. 7. In similar manner, check for and clear any paper jammed under the rear top cover. 65 - C910 Troubleshooting - Oki C910 | C910 User Guide (English) - Page 66
8. Replace the two top covers. 9. Raise the front cover of the duplex unit. 10. Push the duplex unit back into position. 66 - C910 Troubleshooting - Oki C910 | C910 User Guide (English) - Page 67
11. If you detached a Finisher unit to gain access to the duplex unit, replace the Finisher unit. 67 - C910 Troubleshooting - Oki C910 | C910 User Guide (English) - Page 68
Finisher (optional accessory) Check Finisher, paper jam/paper remains Press the Help button on the printer control panel to check the number displayed. You will need this to be able to clear 643, 645 (Paper Jam Around Finisher) 1. Remove any paper at the Finisher paper exit. 68 - C910 Troubleshooting - Oki C910 | C910 User Guide (English) - Page 69
2. Operate the Finisher lever (1) and move the Finisher away from the Inverter. 1 3. Open the Finisher top cover. 4. Carefully remove any jammed paper. 69 - C910 Troubleshooting - Oki C910 | C910 User Guide (English) - Page 70
5. Close the Finisher top cover. 6. Move the Finisher back into position and connect it to the Inverter. 70 - C910 Troubleshooting - Oki C910 | C910 User Guide (English) - Page 71
Numeric Codes 594, 597, 598/ 644, 646 (Paper Jam in Finisher) 1. Operate the Finisher lever (1) and move the Finisher away from the Inverter. 1 2. Open the Finisher front cover (2). 2 71 - C910 Troubleshooting - Oki C910 | C910 User Guide (English) - Page 72
3. Continue to turn the lower knob (3) clockwise until any jammed paper is completely ejected. 3 4. Remove the ejected paper. 5. Close the Finisher front cover. 72 - C910 Troubleshooting - Oki C910 | C910 User Guide (English) - Page 73
6. Open the Finisher right side cover. 7. Carefully remove any jammed paper. 8. Close the Finisher right side cover. 73 - C910 Troubleshooting - Oki C910 | C910 User Guide (English) - Page 74
9. Move the Finisher back into position and connect it to the Inverter. Numeric Code 590 (Paper Jam in Finisher/Punch Unit) 1. Operate the Finisher lever (1) and move the Finisher away from the Inverter. 1 74 - C910 Troubleshooting - Oki C910 | C910 User Guide (English) - Page 75
2. Move the tab (2) on the right side of the Finisher to align it with the mark (3). 3 2 3. Open the Finisher top cover. 4. Carefully remove any jammed paper. 75 - C910 Troubleshooting - Oki C910 | C910 User Guide (English) - Page 76
5. Close the Finisher top cover. 6. Move the Finisher back into position and connect it to the Inverter. 76 - C910 Troubleshooting - Oki C910 | C910 User Guide (English) - Page 77
Check Inverter, paper jam 1. Operate the Finisher lever (1) and move the Finisher away from the Inverter. 1 2. Squeeze the recessed handle (2) and open the left side cover of the Inverter. 2 77 - C910 Troubleshooting - Oki C910 | C910 User Guide (English) - Page 78
3. Carefully remove any jammed paper. 4. Close the Inverter left side cover. 5. Move the Finisher back into position and connect it to the Inverter. 78 - C910 Troubleshooting - Oki C910 | C910 User Guide (English) - Page 79
6. Operate the Inverter lever (3) and separate the Inverter from the printer. 3 7. Open the right side door (4) of the Inverter. 4 79 - C910 Troubleshooting - Oki C910 | C910 User Guide (English) - Page 80
8. Remove any jammed paper. 9. Close the right side door. 80 - C910 Troubleshooting - Oki C910 | C910 User Guide (English) - Page 81
media is not aligned properly in the paper tray. Suggested remedy Place the printer on a steady, level surface. Use appropriate media. Use media that has the paper stop and paper guides of the tray, or the manual feed guide on the MP Tray to align the media properly. 81 - C910 Troubleshooting - Oki C910 | C910 User Guide (English) - Page 82
. Select the correct printer menu settings for toner cartridge. Replace the image drum cartridge. Wipe the film with a LED lens cleaner or with a soft cloth. Wipe the LED head with a LED lens cleaner or with a soft cloth. Replace the toner cartridge. Use recommended paper. 82 - C910 Troubleshooting - Oki C910 | C910 User Guide (English) - Page 83
printing. Vertical lines appear. The toner cartridge is not properly seated. The toner is low. The paper is moist. The paper is not suitable for the printer. Thickness and type of paper are conditions. Replace the image drum cartridge. Replace the toner cartridge. 83 - C910 Troubleshooting - Oki C910 | C910 User Guide (English) - Page 84
again. Replace the fuser unit. Replace the image drum cartridge if the problem is not resolved. Use paper stored in proper temperature and humidity conditions. Use thinner paper. Replace the toner cartridge. Wipe the menu setup or set one value lighter for [Media Weight]. 84 - C910 Troubleshooting - Oki C910 | C910 User Guide (English) - Page 85
Staple J ams - Finisher (optional accessory) Check Finisher, Staple Jam When the display indicates a staple jam has occurred, clear the jam as follows: 1. Open the Finisher front cover. 2. Turn the knob in the direction indicated until the colored indicator appears. 85 - C910 Troubleshooting - Oki C910 | C910 User Guide (English) - Page 86
3. Remove any paper that awaits stapling in the paper ejection area. 4. Pull out the staple unit. 5. Turn the knob in the direction indicated to move the stapler to the front. 86 - C910 Troubleshooting - Oki C910 | C910 User Guide (English) - Page 87
6. Grip both sides of the staple cartridge, pull it up and remove it. 7. Raise the staple cartridge gate. 8. Remove all staples that are emerging from the staple case. 87 - C910 Troubleshooting - Oki C910 | C910 User Guide (English) - Page 88
9. Return the staple cartridge gate to its original position. 10. Replace the staple cartridge. 11. Ensure that the staple cartridge is securely installed back into the staple unit then push the staple unit fully home. 88 - C910 Troubleshooting - Oki C910 | C910 User Guide (English) - Page 89
12. Close the Finisher front cover, being careful not to trap your fingers. 89 - C910 Troubleshooting - Oki C910 | C910 User Guide (English) - Page 90
input at 20 lb (75 g/m²) Paper weight Paper output Interfaces Duty cycle Toner life Black Cyan, Magenta, Yellow Image drum life Belt life Fuser life Waste toner bottle life Power rating Specification 23.6 x 25 x 18.5 in 599 pages 110 - 127 VAC, 60 Hz 230 VAC, 50 Hz +/- 2Hz 90 - C910 Specifications - Oki C910 | C910 User Guide (English) - Page 91
°F/20 - 80%RH Off: 32 - 110°F/10 - 90%RH Operating: 54dBA maximum Standby: 42dBA maximum Power save: 28dBA maximum after 30 mins background level 91 - C910 Specifications - Oki C910 | C910 User Guide (English) - Page 92
Toner Low Fuser Unit Near Life Change Fuser Unit Inverter is Removed Invalid Data remaining toner of color cccccc is running low. The fuser unit is nearing the end of its working life. The fuser unit help details by pressing the HELP button. The printer has tried to take paper from an empty tray - Oki C910 | C910 User Guide (English) - Page 93
tttttt Please see HELP for details Check Image Drum cccccc Please see HELP for details Explanation The printer has tried to take paper from a tray that has been removed. Ensure that tray tttttt is can access help details by pressing the HELP button. 93 - C910 Appendix A - Display Panel Messages - Oki C910 | C910 User Guide (English) - Page 94
above are intended for more specialized usage and are not described further here. For full details of using all menus to configure and use the printer, refer to the Network and Configuration Guide. 94 - C910 Appendix B - Menu system - Oki C910 | C910 User Guide (English) - Page 95
MP tray. Finisher Count Item Staple Punch Finisher Description Displays total pages stapled. Displays total pages punched. Displays total pages ejected into the Finisher. 95 - C910 Appendix B - Menu system - Oki C910 | C910 User Guide (English) - Page 96
the fuser unit as a percentage. Displays the remaining life span of xxxx toner as a percentage, where xxxx can be Cyan, Magenta, Yellow, Black. (n.nK) indicates the capacity of the toner cartridge being used. Network Item Printer Name Short Printer Name IP Address Subnet Mask Gateway Address MAC - Oki C910 | C910 User Guide (English) - Page 97
xxxxxxxxxxxxxxx xxxxxxx CU Version xx.xx PU Version xx.xx.xx Description Displays serial no. of the printer. Displays Asset Number. Asset Number is 8 alphanumeric characters that can be assigned by a user. (Print Unit) firmware. Same as PU version of Menu Map. 97 - C910 Appendix B - Menu system - Oki C910 | C910 User Guide (English) - Page 98
remembering that a duplex page counts as two pages): 1. Make sure that the display panel indicates that the printer is ready to print. 2. Enter ther menu mode by pressing either the Up-arrow or Down-arrow button menu mode and return to the ready to print status. 98 - C910 Appendix B - Menu system - Oki C910 | C910 User Guide (English) - Page 99
Profile List Execute Execute Execute Execute Execute Execute Execute Execute Item Description Prints printer configuration details. Execute Prints summary information about the wired network. Prints a demo . Prints the error log. Prints a color profile list. 99 - C910 Appendix B - Menu system - Oki C910 | C910 User Guide (English) - Page 100
Down-arrow buttons repeatedly until Demo 1 is highlighted. 7. Press the Enter button to select this Item and the demo page is printed. 8. After printing, the printer returns to ready to print status. 100 - C910 Appendix B - Menu system - Oki C910 | C910 User Guide (English) - Page 101
prompted to recheck by Yes/No display, and selecting Yes deletes all jobs. After the job is printed, or the deletion of the job is instructed by the menu, the job is deleted in the manner specified in the printer driver. 101 - C910 Appendix B - Menu system - Oki C910 | C910 User Guide (English) - Page 102
for the direction perpendicular to the direction of paper movement. Sets Custom paper length for Traym. Sets for the same direction as paper movement. 102 - C910 Appendix B - Menu system - Oki C910 | C910 User Guide (English) - Page 103
to User Type5 are reserved for custom paper sizes set in the printer driver. Sets media weight for Traym. The printer detects A3 Nobi, A3 Wide and Tabloid Extra sizes as the same . Use this setting to tell the printer which of the three sizes is loaded in Traym. Sets the - Oki C910 | C910 User Guide (English) - Page 104
paper size for MP Tray. Sets Custom paper width for the MP Tray. Sets for the direction perpendicular to the direction of paper movement. 104 - C910 Appendix B - Menu system - Oki C910 | C910 User Guide (English) - Page 105
Weight Auto Light Medium Light Medium Medium Heavy Heavy Ultra Heavy 1 Ultra Heavy 2 Ultra Heavy 3 Ultra Heavy 4 Sets the media weight for MP Tray. 105 - C910 Appendix B - Menu system - Oki C910 | C910 User Guide (English) - Page 106
Tray selection/switching uses this tray as the normal tray. If a paper size or type in a tray is not matched to that of the print data, use paper from this tray instead of the specified tray. Makes the MP tray unavailable in auto tray selection/switching. 106 - Oki C910 | C910 User Guide (English) - Page 107
a new print job is received. Sets whether the printer is automatically recovered when Memory Overflow or Tray Request occurs. If paper is not fed within this time in manual feed, the job is cancelled. Sets the time period between stopping receipt of job data and forced print. For PS, printing is not - Oki C910 | C910 User Guide (English) - Page 108
Description Sets the printing operation when insufficient toner is detected. Continue: the printer can continue printing while remaining online. Stop: the printer stops printing and goes offline. ON: to the direction of paper movement (i.e. vertically). 108 - C910 Appendix B - Menu system - Oki C910 | C910 User Guide (English) - Page 109
horizontal dotted line, a significantly faded image or other such problem that occurs in results printed on plain paper. Decrement setting when white horizontal dotted line, a significantly faded image or other such a problem that occurs in results printed on plain paper. Decrement setting when a - Oki C910 | C910 User Guide (English) - Page 110
for a significantly white horizontal dotted line, a significantly faded image or other such a problem that occurs in results printed on transparencies. Decrement setting when a white horizontal dotted line changed when a dark background occurs in printed result. 110 - C910 Appendix B - Menu system - Oki C910 | C910 User Guide (English) - Page 111
horizontal white lines. This shortens image drum life. Prints out the data received from the host PC in hexadecimal code. Menus example 1 in Tray1): 1. Ensure that the display panel indicates that the printer is ready to print. 2. Enter menu mode by pressing either - C910 Appendix B - Menu system - Oki C910 | C910 User Guide (English) - Page 112
paper size To set paper size in the MP Tray: 1. Ensure that the display panel indicates that the printer is ready to print. 2. Enter menu mode by pressing either the Up-arrow or Down-arrow button and button to exit menu mode and return to the ready to print status. 112 - C910 Appendix B - Menu system
-
 1
1 -
 2
2 -
 3
3 -
 4
4 -
 5
5 -
 6
6 -
 7
7 -
8
-
9
-
10
-
11
-
12
-
13
-
14
-
15
-
16
-
17
-
18
-
19
-
20
-
21
-
22
-
23
-
24
-
25
-
26
-
27
-
28
-
29
-
30
-
31
-
32
-
33
-
34
-
35
-
36
-
37
-
38
-
39
-
40
-
41
-
42
-
43
-
44
-
45
-
46
-
47
-
48
-
49
-
50
-
51
-
52
-
53
-
54
-
55
-
56
-
57
-
58
-
59
-
60
-
61
-
62
-
63
-
64
-
65
-
66
-
67
-
68
-
69
-
70
-
71
-
72
-
73
-
74
-
75
-
76
-
77
-
78
-
79
-
80
-
81
-
82
-
83
-
84
-
85
-
86
-
87
-
88
-
89
-
90
-
91
-
92
-
93
-
94
-
95
-
96
-
97
-
98
-
99
-
100
-
101
-
102
-
103
-
104
-
105
-
106
-
107
-
108
-
109
-
110
-
111
-
112
 |
 |

User’s Guide
C910
m
o
c
.
a
t
a
d
i
k
o
.
y
m
59102301