Oki C9600n Finisher Unit Installation Guide
Oki C9600n Manual
 |
View all Oki C9600n manuals
Add to My Manuals
Save this manual to your list of manuals |
Oki C9600n manual content summary:
- Oki C9600n | Finisher Unit Installation Guide - Page 1
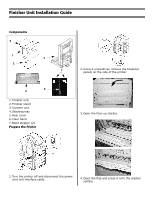
Finisher Unit Installation Guide Components 4 1 2 3 7 6 5 1. Finisher unit 2. Finisher stand 3. Inverter unit 4. Stacking tray 5. Rear cover 6. Clear band 7. Band stopper (2) Prepare the Printer 2. Using a screwdriver, remove the breakout panels on the side of the printer. 3. Open the face-up - Oki C9600n | Finisher Unit Installation Guide - Page 2
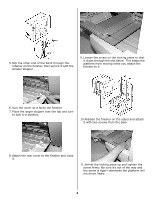
inverter. 6. Install the metal brackets as shown. Assemble the Finisher 3. Attach the finisher stand to the inverter with 2 screws. 1. Attach the guide rail of the inverter to the printer with 2 screws. 4. Slip one end of the clear band over the tab on the right side of the rear cover at a right - Oki C9600n | Finisher Unit Installation Guide - Page 3
5. Slip the other end of the band through the retainer on the finisher, then secure it with the smaller stopper. 9. Loosen the screw on the locking piece so that it drops through the slot below. This keeps the platform from moving while you attach the finisher to it. 6. Turn the cover so it faces - Oki C9600n | Finisher Unit Installation Guide - Page 4
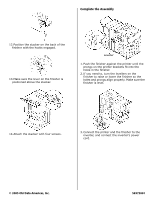
lower the finisher so the holes and prongs align properly. Make sure the finisher is level. 14.Attach the stacker with four screws. 3. Connect the printer and the finisher to the inverter, and connect the inverter's power cord. © 2005 Oki Data Americas, Inc. 58372801
-
 1
1 -
 2
2 -
 3
3 -
 4
4
 |
 |

Finisher Unit Installation Guide
Components
1. Finisher unit
2. Finisher stand
3. Inverter unit
4. Stacking tray
5. Rear cover
6. Clear band
7. Band stopper (2)
Prepare the Printer
1.Turn the printer off and disconnect the power
cord and interface cable.
2.Using a screwdriver, remove the breakout
panels on the side of the printer.
3.Open the face-up stacker.
4. Open the flap and press it onto the stacker
surface
4
2
3
1
5
7
6