Oki C9600n Finisher Unit Installation Guide - Page 4
Complete the Assembly
 |
View all Oki C9600n manuals
Add to My Manuals
Save this manual to your list of manuals |
Page 4 highlights
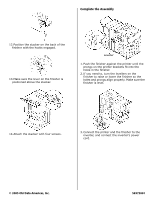
Complete the Assembly 12.Position the stacker on the back of the finisher with the hooks engaged. 13.Make sure the lever on the finisher is positioned above the stacker. Leveller 1. Push the finisher against the printer until the prongs on the printer brackets fit into the holes in the finisher. 2. If you need to, turn the levellers on the finisher to raise or lower the finisher so the holes and prongs align properly. Make sure the finisher is level. 14.Attach the stacker with four screws. 3. Connect the printer and the finisher to the inverter, and connect the inverter's power cord. © 2005 Oki Data Americas, Inc. 58372801
-
 1
1 -
 2
2 -
 3
3 -
 4
4
 |
 |

© 2005 Oki Data Americas, Inc.
58372801
12.Position the stacker on the back of the
finisher with the hooks engaged.
13.Make sure the lever on the finisher is
positioned above the stacker.
14.Attach the stacker with four screws.
Complete the Assembly
1. Push the finisher against the printer until the
prongs on the printer brackets fit into the
holes in the finisher.
2. If you need to, turn the levellers on the
finisher to raise or lower the finisher so the
holes and prongs align properly. Make sure the
finisher is level.
3. Connect the printer and the finisher to the
inverter, and connect the inverter°s power
cord.
Leveller