Olympus 225275 D-150/C-1 Zoom Basic Manual (2.5MB) - Page 12
Checking the Camera Status Indication Next to the, Viewfinder or on the Monitor
 |
UPC - 050332134652
View all Olympus 225275 manuals
Add to My Manuals
Save this manual to your list of manuals |
Page 12 highlights
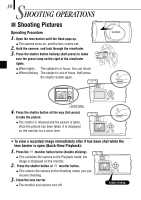
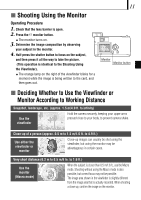
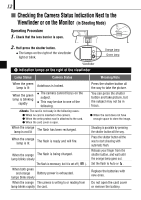
12 í Checking the Camera Status Indication Next to the Viewfinder or on the Monitor (in Shooting Mode) Operating Procedure 1. Check that the lens barrier is open. 2. Half-press the shutter button. ¼ The lamps on the right of the viewfinder light or blink. Orange lamp Green lamp Viewfinder 1 Indication lamps on the right of the viewfinder Lamp Status Camera Status Meaning/Note When the green lamp is lit Autofocus is locked. When the green lamp is blinking rapidly ¼ The camera cannot focus on the subject. ¼ This may be due to one of the following. The card is not ready in the following cases: ¼ When no card is inserted in the camera. ¼ When the write protect seal is attached to the card. ¼ When the card cover is open. When the orange lamp is not lit The flash has been recharged. When the orange lamp is lit The flash is ready and will fire. When the orange The flash is being charged. lamp blinks slowly The flash is necessary, but it is set off ( ). When both green and orange Battery power is exhausted. lamps blink slowly When the orange The camera is writing to or reading from lamp blinks rapidly the card. Press the shutter button all the way to take the picture. You can press the shutter button and take picture, but the subject may not be in focus. ¼ When the card does not have enough space to store the image. Shooting is possible by pressing the shutter button all the way. Press the shutter button all the way to start shooting with automatic flash. Release your finger from the shutter button, and wait until the orange lamp goes out. Set the flash to Auto or . Replace the batteries with new ones. Do not open the card cover or remove the battery.
-
 1
1 -
2
-
3
-
4
-
5
-
6
-
 7
7 -
 8
8 -
 9
9 -
 10
10 -
 11
11 -
 12
12 -
 13
13 -
 14
14 -
 15
15 -
 16
16 -
 17
17 -
18
-
19
-
20
-
21
-
22
-
23
-
24
-
25
-
26
-
27
-
28
-
29
-
30
-
31
-
32
-
33
-
34
-
35
-
36
-
37
-
38
-
39
-
40
-
41
-
42
-
43
-
44
-
45
-
46
-
47
-
48
-
49
-
50
-
51
-
52
-
53
-
54
-
55
-
56
-
57
-
58
-
59
-
60
-
61
-
62
-
63
-
64
-
65
-
66
-
67
-
68
-
69
-
70
-
71
-
72
-
73
-
74
-
75
-
76
-
77
-
78
-
79
-
80
-
81
-
82
-
83
-
84
-
85
-
86
-
87
-
88
-
89
-
90
-
91
-
92
-
93
-
94
-
95
-
96
-
97
-
98
-
99
-
100
-
101
-
102
-
103
-
104
-
105
-
106
-
107
-
108
-
109
-
110
-
111
-
112
-
113
-
114
-
115
-
116
-
117
-
118
-
119
-
120
-
121
-
122
-
123
-
124
-
125
-
126
-
127
-
128
-
129
-
130
-
131
-
132
-
133
-
134
-
135
-
136
-
137
-
138
-
139
-
140
-
141
-
142
-
143
-
144
-
145
-
146
 |
 |
