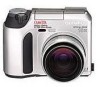
Olympus C 700 C-700 UZ Basic Manual (5 MB) - Page 16
Viewing still pictures - Quick View
 |
UPC - 050332133938
View all Olympus C 700 manuals
Add to My Manuals
Save this manual to your list of manuals |
Page 16 highlights
QUICK-START GUIDE (Cont.) ⅷ Using the flash (Auto-flash) 1 Press the (flash) switch to raise the flash. 2 Press the Shutter button halfway. The flash fires automatically in low-light conditions. The flash is charging when blinks. Wait until stops blinking, then press the Shutter button. 3 Press the Shutter button all the way. The flash fires. ● If you do not want to use the flash or if the camera is turned off, close the flash manually. Note: ● Recorded pictures will be saved in the card regardless of whether the camera is turned off or the batteries are replaced or removed. ● NEVER open the card cover, eject the card, remove the batteries, or pull the plug when the card access lamp is blinking. Doing so could destroy stored pictures and prevent storage of pictures you have just taken. Viewing still pictures - Quick View It is possible to shift quickly from the shooting mode to the playback mode by pressing the (monitor) button. During playback, you can also return to the shooting mode. 1 Press the (monitor) 2 The monitor turns on and the last recorded button twice quickly. picture appears. Display the desired pictures using the Arrow pad. Jumps to the picture10 frames behind. Displays the previous picture. Displays the next picture. Jumps to the picture 10 frames ahead. 3 To return to the shooting mode, press the Shutter button halfway. The monitor turns off and the viewfinder turns on.The subject the camera is aimed at appears. Ⅵ With the Mode dial set to , recorded pictures can be displayed. In this mode, it is not possible to return to the shooting mode by pressing the Shutter button halfway. 16
-
 1
1 -
2
-
3
-
4
-
5
-
6
-
7
-
8
-
9
-
10
-
 11
11 -
 12
12 -
 13
13 -
 14
14 -
 15
15 -
 16
16 -
 17
17 -
 18
18 -
 19
19 -
 20
20 -
 21
21 -
22
-
23
-
24
-
25
-
26
-
27
-
28
-
29
-
30
-
31
-
32
-
33
-
34
-
35
-
36
-
37
-
38
-
39
-
40
-
41
-
42
-
43
-
44
-
45
-
46
-
47
-
48
-
49
-
50
-
51
-
52
-
53
-
54
-
55
-
56
-
57
-
58
-
59
-
60
-
61
-
62
-
63
-
64
-
65
-
66
-
67
-
68
-
69
-
70
-
71
-
72
-
73
-
74
-
75
-
76
-
77
-
78
-
79
-
80
-
81
-
82
-
83
-
84
-
85
-
86
-
87
-
88
-
89
-
90
-
91
-
92
-
93
-
94
-
95
-
96
-
97
-
98
-
99
-
100
-
101
-
102
-
103
-
104
-
105
-
106
-
107
-
108
-
109
-
110
-
111
-
112
-
113
-
114
-
115
-
116
-
117
-
118
-
119
-
120
-
121
-
122
-
123
-
124
-
125
-
126
-
127
-
128
-
129
-
130
-
131
-
132
-
133
-
134
-
135
-
136
-
137
-
138
-
139
-
140
-
141
-
142
-
143
-
144
-
145
-
146
-
147
-
148
-
149
-
150
-
151
-
152
-
153
-
154
-
155
-
156
-
157
-
158
-
159
-
160
-
161
-
162
-
163
-
164
-
165
-
166
-
167
-
168
-
169
-
170
-
171
-
172
 |
 |
