Quick Reference Guide
C-7070 Wide Zoom
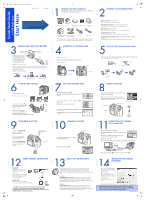
INDEX
1. Camera Diagram and Controls
2. Shooting Modes
3. Using the Zoom
4. How to Use the Autofocus
5. Flash Modes
6. Image Quality Modes
7. Recording a Movie
8. Viewing Pictures/Movies on a TV
9. How to Erase All Pictures
10. E-mailing a Picture
11. Printing a Picture
CAMERA DIAGRAM AND CONTROLS
Flash
Strap eyelet
AF illuminator
Lens
DC-IN jack
Monitor
Control panel
Tripod socket
OK/Menu button (
Z
)
Speaker
Microphone
Self-timer/Remote control lamp
Remote control receiver
Viewfinder window
AF sensor
USB connector
A/V OUT jack (MONO)
Flash mode button (
#
)
Exposure compensation button (
F
)
Viewfinder
Diopter adjustment dial
Hot shoe
Protect button (
0
)
Metering button (
4
)
AF/Macro/MF button (
AF
/
&
/
MF
)
Zoom lever (W/T·
GU
)
Shutter button
Battery compartment cover
Battery compartment lock
Arrow pad (
acbd
)
Card access lamp
Monitor button (
f
INFO)
QUICK VIEW
button
Custom button
Print reservation button (
<
)
Control dial
Power switch
Self-timer/Remote control
button (
Z
)
Rotation button (
y
)
Erase button (
S
)
AEL button (
[
)
Card button (CF/xD)
Note: You can change the mode dial when the camera is on or off.
SHOOTING MODES
Turn the mode dial to the mode you want.
Playback mode:
Set the mode dial to this position
to view pictures or movies.
Shooting Mode Descriptions
P
•
Program
- The camera sets the optimal settings automatically.
A
•
Aperture priority
- Lets you set the aperture, giving you control over the
depth of field. The camera sets the other settings.
S
•
Shutter priority
- Lets you set the shutter speed, giving you the control to
capture moving subjects. The camera sets the other settings.
M
•
Manual
- Lets you set both the aperture and shutter speed giving you more
creative control over your pictures.
r
•
My modes
- Lets you use your own customized settings when taking
pictures.
n
•
Movie
- Lets you record movies.
f
•
Scene modes
- Lets you select the optimal settings for specific situations.
You can select from: Portrait, Sports, Landscape+Portrait, Landscape, Night
Scene, Underwater Wide, and Underwater Macro.
USING THE ZOOM
This camera features a zoom lens, letting you get closer to the action or
capture wide-angle shots.
• Push toward W to zoom out and get more into the picture.
• Pull toward T to zoom in and get closer to the action.
Zoom in
Zoom out
Zoom out:
Push the zoom lever toward W.
Zoom in:
Pull the zoom lever toward T.
HOW TO USE THE AUTOFOCUS
a.
While positioning the AF target over the subject, press
and hold the shutter button halfway.
b.
The green lamp, which indicates the focus and
exposure are locked, remains lit as long as the shutter
button is kept depressed halfway.
c.
Press the shutter button completely to take the
picture.
Shutter button
F2.8
F2.8
1/1000
1/1000
0.0
0.0
3072
2304
3072 2304
HQ
HQ
P
30
30
30
AF target mark
Green lamp
Shutter button
FLASH MODES
This camera features multiple flash modes. You can select the
appropriate flash mode to the suit the situation. The icons that are
displayed on the monitor and control panel are shown below.
(None)
• AUTO-FLASH - The camera decides if the flash is needed.
!
• RED-EYE REDUCTION - Reduces the incidence of red-eye by
emitting pre-flashes to shrink pupil size before taking the picture.
#
• FILL-IN FLASH - The flash always fires. Suitable for shooting backlit
subjects.
#
SLOW
•
SLOW SYNCHRONIZATION - Allows you to use the flash with a slow
shutter speed.
$
• FLASH OFF - The flash is turned off. Suitable for when flash
photography is not permitted.
a.
Set the mode dial to any mode other than
n
or
q
.
b.
Press the
#
button.
c.
Turn the control dial until the desired flash mode is
selected. Press the
#
button again.
FLASH MODE
SLOW
AUTO
SET
OK
IMAGE QUALITY MODES
Your camera is equipped with multiple image quality modes, which
determine the quality and image size of the pictures you take. Below is
a general description of the commonly used modes. For a detailed
description of all quality modes, refer to the Advanced Manual
included on the CD-ROM.
a.
With the mode dial set to any mode other than
q
,
press
Z
.
b.
Use the arrow pad to select [
K
] on the monitor.
c.
Select the record mode. Use the arrow pad and
Z
to
make further settings.
Image becomes clearer
Compression
Application
Uncompressed
Low
compression
High
compression
Select according to print size
TIFF
SHQ
HQ
SQ1
SQ1
HIGH
NORMAL
SQ2
SQ2
For small-sized prints and websites
HIGH
NORMAL
Image size becomes larger
WB
MODE MENU
DRIVE
RAW
GO
OK
TIFF
SHQ
HQ
SET
SELECT
RECORDING A MOVIE
a.
Set the mode dial to
n
.
b.
Press the shutter button to start recording
(video and audio).
c.
Press the shutter button again to stop.
Note: You can use features such as the digital and optical zooms while recording;
however, you need to set the record sound function off to use the optical zoom.
See the Advanced Manual to learn more about these settings.
0.0
0.0
HQ
HQ
00
00
:
30
30
00:30
Remaining recording time
VIEWING PICTURES/MOVIES ON A TV
a.
Make sure that the camera and TV are off. Connect the camera to the TV
using the AV cable (included).
b.
Turn on the TV and set to “video input”.
c.
Set the mode dial to
q
and turn on the camera. Use the arrow pad to display
the picture you want.
Note: If the pictures are not displayed, consult your TV manual to set up the video
source.
Connect to the TV’s video input
(yellow) and audio input (white)
terminals.
AV cable
A/V OUT jack (MONO)
HOW TO ERASE ALL PICTURES
WARNING - PERFORMING THESE STEPS WILL DELETE ALL
PICTURES STORED IN YOUR CAMERA!
a.
Set the mode dial to
q
, then press
Z
.
b.
Use the arrow pad to select [MODE MENU] on the
monitor.
c.
Select the [CARD] tab, and press
d
.
Select [ALL ERASE], and press
d
.
d.
Select [YES] and press
Z
.
MODE MENU
ALL ERASE
CARD
SET
PLAY
EDIT
FORMAT
ALL ERASE
NO
CAUTION ERASING ALL
YES
GO
OK
SELECT
Two Corporate Center Drive, PO Box 9058, Melville, NY 11747-9058
Technical Support (USA):
24/7 online automated help: http://olympusamerica.com/support
Phone customer support: 1-888-553-4448 (toll free)
Our phone customer support is available from 8am - 10pm, (Monday to
Friday) ET
Olympus software updates can be obtained at: http://olympus.com/digital
© 2004
E-MAILING A PICTURE
Using the OLYMPUS Master software (included), you can share your pictures with
others by using the built-in e-mail feature.
After installing OLYMPUS Master, open the program and click “
Browse
Images”. From the “Browse Images” window, select the picture(s) you want to
send and click the “
E-mail” tool button.
At this time, you can resize your pictures to make them more manageable for e-
mail. This helps you stay within the e-mail capacity limitations set by your e-mail
provider.
When finished, click the “
Launch Mailer” button at the bottom of the
window. Your default e-mail program will open, and the selected picture(s) will
automatically be attached to a new message.
PRINTING A PICTURE
Using the OLYMPUS Master software (included), you can make prints of your
pictures using your own photo printer.
After installing OLYMPUS Master, open the program and click the “Print Images”
icon on the main menu. You can create many different types of prints such as an
index print, photos, albums, or calendars. Simply select the image(s) and add
them to one of the many layouts within OLYMPUS Master. For detailed
instructions, please refer to the “Help” menu in the software.
You can also order prints online using the “Print Online” feature in OLYMPUS
Master.
Alternatively, you can print your pictures by connecting your PictBridge*-
compatible camera directly to a PictBridge*-compatible printer, such as the
Olympus P-10 Digital Photo Printer. This permits fast, easy printing without using
a computer.
* For detailed instructions on using PictBridge, please refer to your camera’s
Advanced Manual included in digital format on the CD-ROM.
CONTACT INFORMATION
Shooting modes:
Set the mode dial to one of these
positions to take pictures or movies.
d4227qsg_e_7.fm
Page 2
Wednesday, October 27, 2004
10:04 AM

 1
1 2
2

