Olympus D-40 D-40 Zoom Quick Start Guide (596KB) - Page 1
Olympus D-40 - Camedia 4MP Digital Camera Manual
 |
UPC - 050332134935
View all Olympus D-40 manuals
Add to My Manuals
Save this manual to your list of manuals |
Page 1 highlights
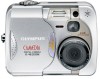
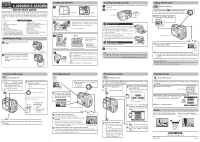
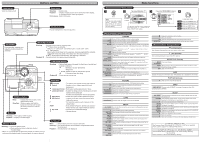
C-40ZOOM/D-40ZOOM DIGITAL CAMERA Quick-start guide We've included this convenient Quick-Start Guide to show you basic functions and techniques that will help you quickly master your new camera. For more detailed descriptions of procedures, as well as for additional information on more sophisticated features not covered here, please refer to the primary "Reference Manual" on the CDROM. Package contents Ⅺ Camera Ⅺ Remote control Ⅺ Strap Ⅺ Remote control instructions Ⅺ CR-V3 lithium battery pack Ⅺ Warranty card/Registration card (not Ⅺ A/V cable provided in some areas) Ⅺ USB cable Ⅺ Safety Precautions (booklet) Ⅺ Basic manual Ⅺ SmartMedia Quick-start guide (this page) Ⅺ Static-free case Ⅺ Software installation guide (included in Ⅺ Index labels (2 pieces) the CD-ROM package in some areas) Ⅺ Write-protect adhesive seals (4 pieces) Ⅺ CD-ROMs with Windows 98 USB driver Ⅺ SmartMedia instructions software, Reference manual, and more. Attaching the strap 1 Thread the strap through the strap eyelet. 2 Thread the rest of the strap through the loop that has already gone through the eyelet. Make sure the strap is securely fastened. Strap eyelet Loading the batteries 1 Lens barrier OK Monitor Make sure the camera is turned off (i.e. the lens barrier is closed and the monitor if turned off). 4 2 While pressing the lock button on the battery compartment cover, slide the cover in the direction of the arrow (É) printed on it. 3 Battery compartment lock 5 Insert the batteries in the direction shown in the illustration. When using a lithium battery pack ● CR-V3 lithium battery packs cannot be charged. When using AA (R6) batteries 6 7 Close the battery compartment cover, then press it down and slide it in the opposite direction of the arrow (É) printed on it. ● When pressing the battery compartment cover shut, be sure to press the center of the cover, as it may be difficult to close properly by pressing the edge. ● Make sure the cover is completely closed. Inserting/ejecting the card 1 Make sure the camera is turned off (i.e. the lens barrier is closed and the monitor if turned off). 2 Open the card cover. Card cover Guideline 3 Inserting the card Insert the card all the way with the contact area facing towards the lens side so that the label's edge is aligned with the guideline (É) printed on the camera. ● Insert the card while keeping it straight. Be sure not to insert it an angle. ● Note the orientation of the card. If it is inserted incorrectly, it may become jammed. ● If the card is not inserted fully, the card cover will not close. Closing the card cover forcibly will damage the card cover. 3 Ejecting the card Grasp the card and pull in straight out. 4 Close the cover tightly. Note: ● NEVER open the card cover, eject the card, remove the batteries, or disconnect the optional AC adapter while the camera is in use or the camera is communicating with a computer. Doing so could destroy all data on the card. Taking still pictures Full-auto shooting 1 Set the mode dial to and open the lens barrier. ● The camera turns on and the lens automatically extends. 2 Point the camera towards a subject while viewing through the viewfinder. Card access lamp 3 To focus on the subject, press the shutter button halfway, slowly and gently. ● When the subject is in focus, the green lamp lights up. Green lamp 4 To start shooting, press the shutter button gently all the way (fully). ● The green lamp and card access lamp blink and the camera begins storing pictures on the card. Never eject the card or remove the battery while the card access lamp is blinking. To turn off the camera ● Partially close the lens barrier (about halfway to the lens). Wait until the lens is retracted, then close the lens barrier all the way. Viewing still pictures Using Quick View 1 Press (monitor button) twice quickly (double-click) while in the shooting mode. ● The monitor turns on and the recorded picture appears. 2 Display the desired pictures using the arrow pad. ● Pictures indicated by are movie frames. Jumps to the picture 10 frames behind. Displays the next picture. Jumps to the picture 10 frames ahead. Displays the previous picture. Zoom lever Turning the zoom lever towards T: Enlarges the picture. W: Displays multiple pictures at the same time. 3 To return to the shooting mode, press the shutter button halfway. Recording movies Viewfinder Green lamp 2 Point the camera towards the subject and compose the picture while viewing through the monitor. 1 Set the mode dial to lens barrier. ● The monitor turns on. and open the Card access lamp 3 Press the shutter button halfway. ● The green lamp on the viewfinder lights up. AF target mark 4 Press the shutter button all the way to start recording. ● The orange lamp lights up during movie recording. ● During movie recording, correct focus is maintained. ● When the sound recording mode is set to ON, sound can be recorded with movies. Seconds remaining 5 Press the shutter button all the way again to stop recording. ● The card access lamp blinks and the camera starts writing the movie to the card. ● If you use all the displayed seconds remaining, shooting finishes automatically and the camera starts writing the movie to the card. Playing back movies Using Quick View 1 Display the movie frame (picture with ) you want to play back. T See steps 1 and 2 in "Viewing still pictures". 2 Press to display menu. 3 Press Ñ on the arrow pad to select MOVIE PLAY. ● The card access lamp blinks while movie data is accessed. MOVIE PLAY INFO MODE MENU 5 Press to start Playback. ● When playback finishes, the screen returns to the beginning of the movie. ● If is pressed again when the movie playback is finished, the MOVIE PLAYBACK screen appears. To exit the movie playback mode, press Ññ to select EXIT, then press . 4 Press Ññ to select MOVIE PLAYBACK on the MOVIE PLAY screen. To exit this screen, press É. MOVIE PLAY MOVIE PLAYBACK INDEX EDIT CANCEL SELECT GO 6 To return to the shooting mode, press the shutter button halfway. Erasing pictures Single-Frame Erase 1 Display the picture you want to erase. T See steps 1 and 2 in "Viewing still pictures". 2 Press the (erase) button. Erase button 3 When the ERASE screen appears, press Ñ to select YES. ● To cancel erasure, press ñ on the arrow pad to ERASE select NO, and press or the button. YES 4 Press to erase the picture. N O SELECT GO Zoom Shoot a wider view picture (wide-angle) Press the zoom lever toward W to zoom out. Zoom in on a subject (telephoto) Press the zoom lever toward T to zoom in. Printed in Japan 1AG6P1P1131 - - http://www.olympus.com/ VT317101
-
 1
1 -
 2
2
 |
 |