Olympus E-1 E-1 Pocket Guide (English) - Page 4
Card Setup, All Erase
 |
UPC - 050332143913
View all Olympus E-1 manuals
Add to My Manuals
Save this manual to your list of manuals |
Page 4 highlights
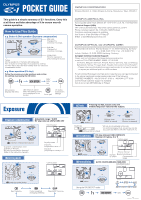
Information display INFO button Single-frame playback information + or Detailed information SQ Picture only x10 Press INFO button once INFO Highlight SQ 453 Information 1 x10 SQ [1024x768 , 1/8] '03.01.01 00:00 FILE:123-3456 Information 2 Histogram P ESP ISO 100 sRGB / CS3 45mm 1/200 F5.6 WB: AUTO CONTRAST: -2 SHARPNESS: -2 SQ 0.0 0.0 - 2STEP Shooting information Erasing pictures Single-frame erase: Display the picture to be erased YES OK (erase) button Erasing selected frames: Index display Select the picture to be erased OK Repeat this procedure All-frame erase: CARD SETUP YES * ALL ERASE OK YES OK * Protected pictures cannot be erased. If FORMAT is selected, however, all pictures on a card are erased. OK Protecting pictures Display the picture to be protected Protects pictures from being accidentally erased. Canceling the protection Display the protected picture (protect) button TV playback Video cable (provided) To VIDEO OUT button To video input terminal Connect the video cable as illustrated Switch the TV setting to video input mode Turn the camera on Date/time setting 2 Y-M-D M-D-Y D-M-Y Use the arrow pad for each setting OK 4
-
 1
1 -
 2
2 -
 3
3 -
 4
4 -
 5
5
 |
 |
