Olympus FE-46 FE-46 Instruction Manual (English)
Olympus FE-46 - Digital Camera - Compact Manual
 |
UPC - 050332171145
View all Olympus FE-46 manuals
Add to My Manuals
Save this manual to your list of manuals |
Olympus FE-46 manual content summary:
- Olympus FE-46 | FE-46 Instruction Manual (English) - Page 1
DIGITAL CAMERA FE-46/X-42/X-41 Instruction Manual ● Thank you for purchasing an Olympus digital camera. Before you start to use your new camera, please read these instructions carefully to enjoy optimum performance and a longer service life. Keep this manual in a safe place for future reference. ● - Olympus FE-46 | FE-46 Instruction Manual (English) - Page 2
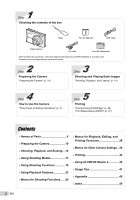
box Strap Two AA batteries USB cable Digital camera AV cable microSD Attachment Other accessories not shown: Instruction Manual (this manual), OLYMPUS Master 2, warranty card. Contents may vary depending on purchase location. 2 Step Preparing the Camera "Preparing the Camera" (p. 10) 3 Step - Olympus FE-46 | FE-46 Instruction Manual (English) - Page 3
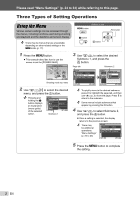
SAVE]. CAMERA MENU EXIT guide) of the selected option. SETUP 1 MEMORY FORMAT 2 BACKUP 3 ENGLISH PIXEL MAPPING EXIT MENU NO SET OK Submenu 1 3 Use kl to select the desired Submenu 1, and press the B button. Page tab Submenu 2 SETUP 1 VIDEO OUT NTSC 2 POWER SAVE OFF 3 BATTERY TYPE - Olympus FE-46 | FE-46 Instruction Manual (English) - Page 4
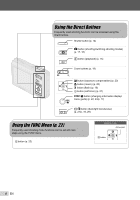
(exposure compensation) (p. 20) & button (macro) (p. 20) # button (flash) (p. 19) Y button (self-timer) (p. 21) g/E button (changing information display/ menu guide) (p. 22, 23/p. 17) /D button (backlight boost/erase) (p. 21/p. 16, 29) Using the FUNC Menu (p. 22) Frequently used shooting menu - Olympus FE-46 | FE-46 Instruction Manual (English) - Page 5
RESET p. 27 6 E SETUP MEMORY FORMAT/ FORMAT p. 30 BACKUP p. 30 W (Language) ....... p. 30 PIXEL MAPPING........ p. 30 K/q p. 31 SAVE SETTINGS ....... p. 31 MENU COLOR p. 31 BEEP p. 31 s (Monitor p. 31 X (Date/time p. 31 VIDEO OUT p. 32 POWER SAVE p. 33 BATTERY TYPE R (Add sound to still - Olympus FE-46 | FE-46 Instruction Manual (English) - Page 6
Names of Parts Camera unit 3 1 4 5 6 2 7 8 1 Strap eyelet p. 10 5 Self-timer lamp p. 21 2 Battery/card 6 Lens p. 45, 58 compartment cover p. 10 7 Tripod socket 3 Microphone p. 25, 29 8 Multi-connector p. 32, 34, 39 4 Flash p. 19 6 EN - Olympus FE-46 | FE-46 Instruction Manual (English) - Page 7
information switching shooting modes) ... p. 17, 18 display/menu guide)..... p. 22, 23/p. 17 10 q button (playback p. 15 3 Monitor p. 14, 41 11 B button (OK/FUNC p. 3, 22 4 m button p. 3 12 Arrow pad p. 3, 12 5 /D button (backlight boost/erase) F button (exposure compensation) p. 21 - Olympus FE-46 | FE-46 Instruction Manual (English) - Page 8
standby/camera shake warning/flash charge p. 19, 41 7 AF target mark p. 14 8 Recording with sound p. 25 9 Number of storable still pictures/ remaining recording time ... p. 14/p. 18 1 23 4 5 7 18 16 QVGA 15 15 +2.0 14 8 IN 00:34 11 10 9 Movie 10 Current memory p. 46 11 Self-timer p. 21 12 - Olympus FE-46 | FE-46 Instruction Manual (English) - Page 9
0004 10 IN 4 11 14 13 12 Still image 1 34 5 8 9 15 QVGA 2009.10.26 12:30 15 100-0004 10 IN 00:14 /00:34 11 13 12 Movie 1 Silent mode p. 33 10 /total recording time 3 Adding sound p. 29 p. 15/p. 16 4 Protect p. 28 12 Current memory p. 46 5 Battery check p. 10 13 Compression/frame - Olympus FE-46 | FE-46 Instruction Manual (English) - Page 10
charged, and select [NiMH] for [BATTERY TYPE]. [BATTERY TYPE] (p.33) Turn off the camera before opening the battery/card compartment cover. When using the camera, be sure to close the battery/card compartment cover. When to replace the batteries Replace the batteries when the error message shown - Olympus FE-46 | FE-46 Instruction Manual (English) - Page 11
not touch the contact area directly. 4 1 2 Insert the card entirely into the attachment. 2 Insert the microSD Attachment into the camera. Notch This camera allows the user to take pictures using the internal memory even when no xD-Picture Card (sold separately) is inserted. "Using an xD-Picture - Olympus FE-46 | FE-46 Instruction Manual (English) - Page 12
12:30 100-0004 IN 00:14 /00:34 / Setting the date and time The date and time set here are saved to image file names, date prints, and other data. 1 Press the n button to turn on the camera button be used. CAMERA MENU EXIT MENU SET OK SEL. IMAGE IN WT SET1 OK 2 3 Operation guide 4 BACK MENU - Olympus FE-46 | FE-46 Instruction Manual (English) - Page 13
on the monitor is adjustable. 1 Press the m button, and press klmn to select [E] (SETUP). SETUP EXIT MENU SET OK 2 Press the B button. SETUP 1 MEMORY FORMAT 2 BACKUP 3 ENGLISH PIXEL MAPPING EXIT MENU NO SET OK 3 Use kl to select [W] and press the B button. 4 Use klmn to select your - Olympus FE-46 | FE-46 Instruction Manual (English) - Page 14
wide range of shooting menu functions such as exposure compensation, white balance, etc. as needed. 1 Press the n button to turn on the camera. P mode indicator 2 Hold the camera and compose the shot. AUTO Monitor Horizontal grip P 12M NORM IN 4 Number of storable still pictures (p. 47) Monitor - Olympus FE-46 | FE-46 Instruction Manual (English) - Page 15
image The display size of the images can be changed. "Index view and close-up view" (p. 23) To play back movies Select a movie, and press the B button. 2009.10.26 12:30 100-0004 MOVIE PLAY OK IN 4 Movie The sound recorded in movie mode cannot be played back with this camera. To listen - Olympus FE-46 | FE-46 Instruction Manual (English) - Page 16
Fast-forward: Press and hold down n. Rewind: Press and hold down m. Pause: Press the B button. Elapsed time/ Total recording time 2009.10.26 12:30 100-0004 IN 00:12 /00:34 During playback First (last) frame/frame advance: During pause, press k to display the first frame, and press l to display the - Olympus FE-46 | FE-46 Instruction Manual (English) - Page 17
SPORT]/[MACRO]. This is a fully automatic mode that allows the user to take pictures using the best mode for the shooting scene button a few times to set G. The icon changes depending on the scene that the camera automatically selects. iAUTO 12M NORM AF ON IN 4 ● Press the shutter button halfway - Olympus FE-46 | FE-46 Instruction Manual (English) - Page 18
start tracking, see "To focus on a moving subject continuously (AF Tracking)" (p. 26). Using the digital image stabilization mode (h mode) This mode enables the user to reduce blur that is caused by camera stop recording. Sound will also be recorded. During sound recording, only the digital zoom can - Olympus FE-46 | FE-46 Instruction Manual (English) - Page 19
be selected to best match the shooting conditions. 1 Press the # button. P AUTO P P SET OK 12M NORM IN 4 12M NORM Zoom bar IN 4 Optical zoom: 5x, digital zoom: 4x Use of h mode (p. 18) is recommended when shooting with the telephoto zoom. The zoom bar appearance identifies the status of the - Olympus FE-46 | FE-46 Instruction Manual (English) - Page 20
or darker to obtain a desired shot. 1 Press the F button. EXPOSURE COMP. Shooting closeups (Macro shooting) This function enables the camera to focus and shoot subjects at close distances. 1 Press the & button. P OFF SET OK 0.0 +0.3 OFF % & OFF +0.7 +1.0 Exposure compensation value - Olympus FE-46 | FE-46 Instruction Manual (English) - Page 21
select the desired setting option, and press the B button to set. Option OFF ON Description The self-timer is deactivated. The self-timer lamp turns on for approx. 10 seconds, then blinks for approx. 2 seconds, and then the picture is taken. Self-timer shooting is automatically canceled after one - Olympus FE-46 | FE-46 Instruction Manual (English) - Page 22
button is pressed. "Shooting mode display" (p. 8) Normal P Using the FUNC menu The FUNC menu provides the following menu functions that can be quickly accessed and set. • [WB] (p. 25) • [ISO] (p. 25) • [A IMAGE QUALITY] (p. 24) 1 Press the B button. P WB AUTO ISO AUTO 12M NORM WB AUTO AUTO - Olympus FE-46 | FE-46 Instruction Manual (English) - Page 23
Features Index view and close-up view Index view enables quick selection of a desired image. Close-up view (up to 2009.10.26 12:30 W IN 4 2009.10.26 12:30 W W IN 4 T Detailed 2009.10.26 12:30 1/1000 F3.5 +2.0 ISO 400 NORM 12M 100-0004 IN 4 2009.10.26 12:30 IN 4 T 2009.10.26 12:30 IN - Olympus FE-46 | FE-46 Instruction Manual (English) - Page 24
P G h s n Still pictures Submenu 1 IMAGE SIZE Submenu 2 12M (3968×2976) 5M (2560×1920) for printing pictures at postcard size. Suitable for viewing pictures on normal quality. Movies Submenu 1 IMAGE SIZE FRAME RATE Submenu 2 VGA (640 quality based on the image size and frame rate. Higher frame - Olympus FE-46 | FE-46 Instruction Manual (English) - Page 25
etc.) Submenu 2 OFF ON Application No sound is recorded. The camera automatically starts recording sound for approx. 4 seconds after a picture is n Submenu 2 OFF ON Application No sound is recorded. Sound is recorded. When set to [ON], only the digital zoom can be used during movie recording. - Olympus FE-46 | FE-46 Instruction Manual (English) - Page 26
CAMERA MENU X PANORAMA E: P h s Panorama shooting lets you create a panoramic picture, using the OLYMPUS Master 2 software the second shot. ● The part of the previous picture where OLYMPUS Master 2 help guide for details on how to make panorama images. Selecting the focusing area [AF MODE] B CAMERA - Olympus FE-46 | FE-46 Instruction Manual (English) - Page 27
the digital image RESET E: P G h s n Submenu 1 YES NO Application Restores the following menu functions to the default settings. • Flash (p. 19) • Exposure compensation (p. 20) • Macro (p. 20) • Self-timer (p. 21) • [A IMAGE QUALITY] (p. 24) • [s ] (p. 17) • Menu functions in [B CAMERA - Olympus FE-46 | FE-46 Instruction Manual (English) - Page 28
start a slideshow After pressing the B button, the slideshow starts. To stop the slideshow, press the B button or the m button. The sound as a separate image. Changing the image size [Q] I EDIT X Q Submenu 2 C erased except by formatting of the internal memory/card. 1 Use mn to select an - Olympus FE-46 | FE-46 Instruction Manual (English) - Page 29
sound source. Microphone Submenu 1 SEL. IMAGE ALL ERASE Application Images are individually selected and erased. All images in the internal memory or card will be erased. When erasing pictures in the internal memory, do not insert the card into the camera . ● Recording starts. Saving print - Olympus FE-46 | FE-46 Instruction Manual (English) - Page 30
the internal memory or card. Non-Olympus cards and cards that have been formatted by a computer must be formatted with this camera before use. internal memory to the card. Cancels the backup. It takes some time to back up data. Check that the battery has sufficient power before starting the backup - Olympus FE-46 | FE-46 Instruction Manual (English) - Page 31
the camera and starts the camera in the playback mode. The power is not turned on. To turn on the camera, press the n button. Submenu 2 NORMAL/ COLOR 1/ COLOR 2/ COLOR 3 Application Selects the menu screen color or background image according to your preference. Setting the operation sound [BEEP - Olympus FE-46 | FE-46 Instruction Manual (English) - Page 32
AV cable (supplied) 2 Use the camera to select the same video signal system as the one of connected TV ([NTSC]/ [PAL]). 3 Turn on the TV, and change "INPUT" to "VIDEO (an input jack connected to the camera)." For details on changing the input source of the TV, refer to the TV's instruction manual - Olympus FE-46 | FE-46 Instruction Manual (English) - Page 33
. Turning off the camera sounds [F SILENT MODE] F SILENT MODE Submenu 1 OFF ON Application Button operation sound/warning sound are not muted. The electronic sounds (button operation sound, warning sound) are muted. [BEEP] (p. 31) Selecting the battery type [BATTERY TYPE] E SETUP X BATTERY TYPE - Olympus FE-46 | FE-46 Instruction Manual (English) - Page 34
to the printer's instruction manual. For details on the available paper types, loading paper, and installing ink cassettes, refer to the printer's instruction manual. 2 Turn on the printer, and then connect the printer and camera. Multi-connector n button USB cable (supplied) Printing images - Olympus FE-46 | FE-46 Instruction Manual (English) - Page 35
34), and press the B button. USB PC EASY PRINT CUSTOM PRINT EXIT SET stored in the internal memory or card. MULTI PRINT This SIZE] (Submenu 3), and press n. If the [PRINTPAPER] screen is not displayed, the [SIZE], [BORDERLESS], and [PICS/SHEET] are set to the printer's standard. PRINTPAPER SIZE - Olympus FE-46 | FE-46 Instruction Manual (English) - Page 36
[P] 1 Use the zoom buttons to select the size of the cropping frame, use klmn to move the select [PRINT], and press the B button. ● Printing starts. ● When [OPTION SET] is selected in [ALL 12 When the message [REMOVE USB CABLE] is displayed, disconnect the USB cable from the camera and printer. 36 EN - Olympus FE-46 | FE-46 Instruction Manual (English) - Page 37
. This enables easy printing at a printer or print shop supporting DPOF by using only the print reservations on the card without a computer or a camera. *1 DPOF is a standard for storing automatic printout information from digital cameras. Print reservations can be set only for the images stored on - Olympus FE-46 | FE-46 Instruction Manual (English) - Page 38
Reserving one print each of all images on the card [U] Resetting the print reservation data for selected images 1 Follow Steps 1 and 2 in [ - Olympus FE-46 | FE-46 Instruction Manual (English) - Page 39
window appears after starting the software. When you start OLYMPUS Master 2 for the first time after installation, "Default Settings" and "Registration" screen appear. Follow the instructions on the screen. Locate the position of the USB port by referring to your computer's instructions manual - Olympus FE-46 | FE-46 Instruction Manual (English) - Page 40
-step instructions for common tasks. When the Quick Start Guide is not displayed, click in the tool bar to show the Guide. For details on the operation, refer to the help guide of the software. Transferring and saving images without using OLYMPUS Master 2 This camera is compatible with the USB Mass - Olympus FE-46 | FE-46 Instruction Manual (English) - Page 41
[BATTERY TYPE]. [BATTERY TYPE] (p. 33) ● Battery performance may have been reduced temporarily due to low temperature. Take the batteries out of the camera, and warm them by putting them in your pocket for a while. Card/Internal memory "An error message is displayed". "Error message" (p. 42) Shutter - Olympus FE-46 | FE-46 Instruction Manual (English) - Page 42
retouch software, etc. to edit the image on a computer. CARD-COVER OPEN g BATTERY EMPTY Operation problem Close the battery/card compartment cover. Battery problem • Insert new batteries. • If using rechargeable batteries, charge the batteries. NO CONNECTION Connection problem Connect the camera - Olympus FE-46 | FE-46 Instruction Manual (English) - Page 43
objects appear in the center of the screen Object with no vertical lines*1 *1 It is also effective to compose the shot by holding the camera vertically to focus, and then returning to the horizontal position to take the picture. When objects are at different distances Fast-moving object The subject - Olympus FE-46 | FE-46 Instruction Manual (English) - Page 44
Avoid using digital zoom (p. memory and card" ● Remove the card when playing pictures in the internal memory ● "Loading the batteries and the xD-Picture Card™ (sold separately) into the camera" (p. 10) ● "Using the microSD card/microSDHC card (sold separately)" (p. 11) Editing "Erasing the sound - Olympus FE-46 | FE-46 Instruction Manual (English) - Page 45
the instructions in this manual (p. 51) when disposing used batteries. • The following types of batteries cannot be used: Lithium battery pack (CR-V3)/AA (R6) manganese (zinc-carbon) batteries/AA (R6) oxyride batteries/AA (R6) lithium batteries • Power consumption by the camera varies depending - Olympus FE-46 | FE-46 Instruction Manual (English) - Page 46
of the card Never open the battery/card compartment cover or unplug the USB cable while the camera is reading or writing data, which is indicated by blinking of the card access lamp. This can not only damage the image data but also render the internal memory or card unusable. Card access lamp - Olympus FE-46 | FE-46 Instruction Manual (English) - Page 47
480 D 1920×1080 COMPRES- SION L M L M L M L M L M L M L M Number of storable still pictures Internal memory Using a 1GB xD-Picture Card With sound Without sound With sound Without sound 2 2 151 152 5 5 296 300 6 6 353 359 12 13 673 695 10 10 565 576 21 21 1,102 1,141 17 - Olympus FE-46 | FE-46 Instruction Manual (English) - Page 48
authorized distributors/service centers. Cards compatible with this camera microSD card/microSDHC card For a list of tested microSD cards, please visit our website (http://www.olympus.com/). Sending images You can send images to a computer or a PictBrige printer by using the USB cable provided with - Olympus FE-46 | FE-46 Instruction Manual (English) - Page 49
microSD card. Other types of cards cannot be inserted into microSD Attachment. • Do not insert anything other than an xD-Picture Card or the microSD Attachment into the camera. If you insert a card by mistake, such as a microSD card, do not use force. Contact authorized distributors/service centers - Olympus FE-46 | FE-46 Instruction Manual (English) - Page 50
as described in the operating instructions. • Do not use batteries if their body is not covered by the insulating sheet or if the sheet is torn, as this may cause fluid leaks, fire or injury. CAUTION • Do not remove batteries immediately after using the camera. Batteries may become hot during - Olympus FE-46 | FE-46 Instruction Manual (English) - Page 51
. • Always observe the operating environment restrictions described in the camera's manual. Battery Handling Precautions • Olympus NiMH batteries (included in some areas) are intended for use only with Olympus digital cameras. Never use these batteries with any other device. • Always charge NiMH - Olympus FE-46 | FE-46 Instruction Manual (English) - Page 52
reserved. No part of these written materials or this software may be reproduced or used in any form or by any means, electronic or mechanical, including photocopying and recording or the use of any type of information storage and retrieval system, without the prior written permission of Olympus. No - Olympus FE-46 | FE-46 Instruction Manual (English) - Page 53
technician for help. Only the OLYMPUS-supplied USB cable should be used to connect the camera to USB enabled personal computers (PC). For customers in North and South America For customers in USA Declaration of Conformity Model Number : FE-46/X-42/X-41 Trade Name : OLYMPUS Responsible Party - Olympus FE-46 | FE-46 Instruction Manual (English) - Page 54
use of non"OLYMPUS" brand accessories, consumables, or supplies, or use of the Products in combination with non-compatible devices; (d) software programs; (e) supplies and consumables (including but not limited to lamps, ink, paper, film, prints, negatives, cables and batteries); and/or (f) Products - Olympus FE-46 | FE-46 Instruction Manual (English) - Page 55
on the Product (unless it is a model on which Olympus does not place and record serial numbers). 3 A detailed description of the problem. 4 Sample prints, negatives, digital prints (or files on disk) if available and related to the problem. When service is completed, the Product will be returned - Olympus FE-46 | FE-46 Instruction Manual (English) - Page 56
protection. "CE" mark cameras are intended for sales in instructions, etc.) b. Any defect that occurs due to repair, modification, cleaning, etc. performed by anyone other than Olympus or an Olympus authorized service accessory equipment, such as the case, strap, lens cap and batteries. 4 Olympus - Olympus FE-46 | FE-46 Instruction Manual (English) - Page 57
original invoice or the sales receipt (indicating the dealer's name, the date of purchase and product type) is attached to this Guarantee Certificate. Olympus reserves the right to refuse free-of-charge service if neither Guarantee Certificate is completed nor the above document is attached or if the - Olympus FE-46 | FE-46 Instruction Manual (English) - Page 58
in accordance with Design rule for Camera File system (DCF)) Applicable standards : Exif 2.2, Digital Print Order Format (DPOF), PRINT Image Matching III, PictBridge Sound with still pictures : Wave format Movie : AVI Motion JPEG Memory : Internal memory xD-Picture Card (16 MB to 2 GB) (TypeH - Olympus FE-46 | FE-46 Instruction Manual (English) - Page 59
18, 26 Arrow pad 12 AV cable 32 B Backlight boost 21 BACKUP 30 Battery 10, 45 BATTERY TYPE 33 Beep 31 Brightness Backlight boost 21 Exposure compensation 20 Monitor brightness s 31 C Card microSD Card 11, 48 microSDHC card 11, 48 xD-Picture Card 10, 46 Compression 24 Connecting - Olympus FE-46 | FE-46 Instruction Manual (English) - Page 60
Z Zoom 19 R RESET D 27 Rotating images y 29 S s mode 17 Self-timer 21 Shooting 14 Shooting movies n 18 SILENT MODE F 33 SLIDESHOW G 28 Sound recording R 25, 29 SPOT 26 Strap 10 SUPER MACRO 20 SWITCH SHOOTING MODES C ....... 27 T Turning on the camera 12 K/q 31 U USB cable 34, 39 - Olympus FE-46 | FE-46 Instruction Manual (English) - Page 61
VN389701
-
 1
1 -
 2
2 -
 3
3 -
 4
4 -
 5
5 -
 6
6 -
 7
7 -
8
-
9
-
10
-
11
-
12
-
13
-
14
-
15
-
16
-
17
-
18
-
19
-
20
-
21
-
22
-
23
-
24
-
25
-
26
-
27
-
28
-
29
-
30
-
31
-
32
-
33
-
34
-
35
-
36
-
37
-
38
-
39
-
40
-
41
-
42
-
43
-
44
-
45
-
46
-
47
-
48
-
49
-
50
-
51
-
52
-
53
-
54
-
55
-
56
-
57
-
58
-
59
-
60
-
61
 |
 |

DIGITAL CAMERA
FE-46/X-42/X-41
●
Thank you for purchasing an Olympus digital camera. Before you start to
use your new camera, please read these instructions carefully to enjoy
optimum performance and a longer service life. Keep this manual in a
safe place for future reference.
●
We recommend that you take test shots to get accustomed to your
camera before taking important photographs.
●
In the interest of continually improving our products, Olympus reserves
the right to update or modify information contained in this manual.
●
The screen and camera illustrations shown in this manual were produced
during the development stages and may differ from the actual product.
Instruction Manual