Olympus FE 5020 FE-5020 Instruction Manual (English) - Page 21
function and, to select
 |
UPC - 050332170612
View all Olympus FE 5020 manuals
Add to My Manuals
Save this manual to your list of manuals |
Page 21 highlights
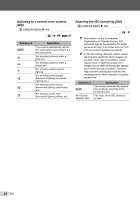
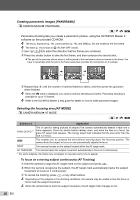
Using the self-timer After the shutter button is pressed all the way down, the picture is taken after a short delay. 1 Press the Y button. P Y OFF SET OK ON SELFTIMER 12M NORM OFF 2 Use kl to select the desired setting option, and press the B button to set. Option OFF ON Description The self-timer is deactivated. The self-timer lamp turns on for approx. 10 seconds, then blinks for approx. 2 seconds, and then the picture is taken. Changing the shooting information display The display of the screen information can be changed to best match the situation, for example, the need for a clear view of the screen or for making a precise composition by using the grid display. 1 Press the g button. ● The displayed shooting information changes in the order shown below each time the button is pressed. "Shooting mode display" (p. 8) Normal P ISO 400 12M NORM +2.0 Grid P IN 4 No information ISO 400 12M NORM +2.0 IN 4 Self-timer shooting is automatically canceled after one shot. To cancel the self-timer after it starts Press the Y button again. Increasing the brightness of the monitor (Backlight boost) Press in shooting mode. The monitor becomes brighter. If there is no operation for 10 seconds, the previous brightness resumes. Using the FUNC menu The FUNC menu provides the following menu functions that can be quickly accessed and set. • [WB] (p. 24) • [A IMAGE QUALITY] (p. 23) • [ISO] (p. 24) 1 Press the B button. P WB AUTO ISO AUTO 12M NORM WB AUTO AUTO 5 3 1 w x y 2 Use kl to select the menu function and mn to select the desired setting option, and then press the B button to set. EN 21
-
 1
1 -
2
-
3
-
4
-
5
-
6
-
7
-
8
-
9
-
10
-
11
-
12
-
13
-
14
-
15
-
 16
16 -
 17
17 -
 18
18 -
 19
19 -
 20
20 -
 21
21 -
 22
22 -
 23
23 -
 24
24 -
 25
25 -
 26
26 -
27
-
28
-
29
-
30
-
31
-
32
-
33
-
34
-
35
-
36
-
37
-
38
-
39
-
40
-
41
-
42
-
43
-
44
-
45
-
46
-
47
-
48
-
49
-
50
-
51
-
52
-
53
-
54
-
55
-
56
-
57
-
58
-
59
-
60
-
61
-
62
-
63
 |
 |
