Olympus SP 510 SP-510UZ Advanced Manual (English)
Olympus SP 510 - UZ Digital Camera Manual
 |
UPC - 050332158252
View all Olympus SP 510 manuals
Add to My Manuals
Save this manual to your list of manuals |
Olympus SP 510 manual content summary:
- Olympus SP 510 | SP-510UZ Advanced Manual (English) - Page 1
DIGITAL CAMERA SP-510UZ Advanced Manual Quick Start Guide This manual will help you get started using your camera right away. Button operations Menu operations Printing pictures Using OLYMPUS Master Getting to know your camera better Miscellaneous Thank you for purchasing an Olympus digital - Olympus SP 510 | SP-510UZ Advanced Manual (English) - Page 2
Contents Quick Start Guide P. 3 Button operations Menu operations Printing pictures Using OLYMPUS Master Getting to know your camera better Miscellaneous P. 10 Test out the functions of the camera buttons by following the illustrations and actually trying them out on the camera. P. 18 Learn - Olympus SP 510 | SP-510UZ Advanced Manual (English) - Page 3
Gather these items (box contents) Quick Start Guide Digital Camera Lens Cap/Lens Cap String Strap AA Batteries (four) USB Cable AV Cable OLYMPUS Master Software CD-ROM Items not shown: Advanced Manual (this manual), Basic Manual and warranty card. Contents may vary depending on purchase - Olympus SP 510 | SP-510UZ Advanced Manual (English) - Page 4
Prepare the battery 1 3 2 4 Quick Start Guide 7 5 6 For details on inserting an optional xD-Picture Card (hereinafter called the card), please refer to "Inserting and removing the card" (P. 78). 4 EN - Olympus SP 510 | SP-510UZ Advanced Manual (English) - Page 5
mode Quick Start Guide When shooting movies (Shooting mode) Still picture shooting modes h P A/S M r Allows you to take pictures with full automatic settings. The camera automatically sets the optimum aperture value and shutter speed. Allows you to set the aperture manually. / Allows you to - Olympus SP 510 | SP-510UZ Advanced Manual (English) - Page 6
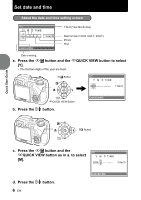
Press the sF button and the rQUICK VIEW button to select [Y]. • The first two digits of the year are fixed. sF Button X Y M D TIME 2006 Y / M / D rQUICK VIEW Button b. Press the q# button. CANCEL MENU Quick Start Guide q# Button c. Press the sF button and the rQUICK VIEW button as in a. to - Olympus SP 510 | SP-510UZ Advanced Manual (English) - Page 7
Quick Start Guide e. Press the sF button and the rQUICK VIEW button to select [D]. X Y M D TIME 2006.11.26 --:-- Y / M / D CANCEL MENU f. Press the q# button. g. Press the sF button and - Olympus SP 510 | SP-510UZ Advanced Manual (English) - Page 8
Shoot a. Hold the camera Horizontal grip Vertical grip Quick Start Guide b. Focus c. Shoot Place this mark over your subject. Shutter Button (Pressed Halfway) [] [IN] HQ 3072×2304 4 The number of storable still pictures is displayed. The - Olympus SP 510 | SP-510UZ Advanced Manual (English) - Page 9
View pictures a. Set the mode dial to q. Quick Start Guide Arrow Pad Mode Dial Next Picture [IN] HQ Prev. Picture '06.11.26 12:30 100-0001 1 Erase pictures a. As described in a. above, display the - Olympus SP 510 | SP-510UZ Advanced Manual (English) - Page 10
mode [] [IN] HQ 3072×2304 4 1 o button Turning the camera on and off Power on: Shooting mode • Monitor turns on • Lens extends Playback mode • Monitor turns on • Before turning the camera on in shooting mode, remove the lens cap, and then press o. 2 u button Toggles between the monitor - Olympus SP 510 | SP-510UZ Advanced Manual (English) - Page 11
shutter button again to stop recording. Button operations 4 Zoom lever Zooming while shooting/close-up playback Shooting mode: Zooming in on your subject Optical zoom: 10× Zoom out: Push the lever toward W. P 1/200 F4.0 P 1/200 F4.0 Zoom in: Pull the lever toward T. [] [] [IN] HQ 3072 - Olympus SP 510 | SP-510UZ Advanced Manual (English) - Page 12
digital image stabilization" (P. 25) Movie shooting mode: Shooting with digital image stabilization This function reduces the blur incurred by camera Press h/< again to reset the AF memory. • If the zoom is operated after engaging the AF lock, the picture may be out of focus. Engage the AF - Olympus SP 510 | SP-510UZ Advanced Manual (English) - Page 13
(When [NOISE REDUCT.] is set to [ON]: up to 4 sec.) Changing the shutter speed for shooting pictures Press sr after pressing sF. The camera automatically sets the aperture value. Shutter speed s : Sets the shutter speed faster. r : Sets the shutter speed slower. When the correct exposure cannot be - Olympus SP 510 | SP-510UZ Advanced Manual (English) - Page 14
to set each shooting function manually and use as your original the shooting guide for setting SHOOTING GUIDE 1/3 1 zoom cannot be used during the shooting. g "R (movies) Recording sound with movies" (P. 29) • To zoom in when [R] is set to [ON], set [DIGITAL ZOOM] to [ON]. g "DIGITAL ZOOM Zooming - Olympus SP 510 | SP-510UZ Advanced Manual (English) - Page 15
06.11.26 12:30 HQ F2.8 1/1000 +2.0 Histogram display*1 ISO 400 4 *1 Not displayed in case of n. *2 Not displayed if it is set to [OFF] in the menu. g "u Displaying guide EMSETPE/ RING With menu items selected, hold down DISP./E to display the menu guide. Release DISP./E to close the menu guide - Olympus SP 510 | SP-510UZ Advanced Manual (English) - Page 16
Checking the time While the camera is off, press DISP./E to display the set alarm time (when [ALARM CLOCK] is Cancels the macro mode. Allows you to shoot from as close as 7cm/2.88 in. (when the zoom is set for the zoom-out angle) to your subject. Allows you to shoot from as close as 3cm/1.19 in. to - Olympus SP 510 | SP-510UZ Advanced Manual (English) - Page 17
automatically varies the shutter speed. S (Shutter speed priority) Allows you to set the shutter speed yourself and the camera automatically varies the aperture. • Displayed when the mode dial is set to A/S. s /2/3/4 Switching the registered original shooting mode s/E/c/d • Displayed when - Olympus SP 510 | SP-510UZ Advanced Manual (English) - Page 18
3 DRIVE AUTO o 4 METERING ESP 5 FINE ZOOM OFF BACK MENU SET OK • When [CAMERA MENU], [PLAYBACK MENU], [EDIT], [ERASE], or [SETUP] is selected, the menu corresponding to the respective functions is displayed. • When your camera is set according to the shooting guide with the mode dial set at - Olympus SP 510 | SP-510UZ Advanced Manual (English) - Page 19
menu. • To cancel changes and continue menu operation, press m before pressing o. CAMERA MENU 1 DIGITAL ZOOM OFF 2 AF MODE iESP 3 FOCUS MODE AF 4 FULLTIME AF OFF 5 AF PREDICT OFF BACK MENU SET OK CAMERA MENU 1 DIGITAL ZOOM OFF 2 AF MODE ON 3 FOCUS MODE 4 FULLTIME AF 5 AF PREDICT BACK - Olympus SP 510 | SP-510UZ Advanced Manual (English) - Page 20
• Some functions are not available according to the selected mode. g "Functions available in shooting modes and scenes" (P. 72) g "SETUP menus" (P. 39) • The factory default settings are displayed in gray ( ). 1 IMAGE QUALITY Still picture image quality and their applications • Normal image - Olympus SP 510 | SP-510UZ Advanced Manual (English) - Page 21
Functions for returning the settings to the original when the reset function is executed Function FLASH & Y F IMAGE QUALITY WB ISO DRIVE METERING FINE ZOOM DIGITAL ZOOM AF MODE FOCUS MODE FULLTIME AF Factory default setting AUTO OFF YOFF 0.0 HQ AUTO AUTO o ESP OFF OFF iESP AF OFF Ref. Page P. 17 - Olympus SP 510 | SP-510UZ Advanced Manual (English) - Page 22
picture Press pq to scroll through the pictures. BACK MENU OK GO S Pictures with R are erased. Select the pictures to be erased. 4 CAMERA MENU WB Adjusting the color of a picture AUTO Adjusts the white balance automatically for natural color, regardless of the light source. PRESET Selects - Olympus SP 510 | SP-510UZ Advanced Manual (English) - Page 23
w BACK MENU SET OK When [V] is selected Menu operations P 1/4000 F8.0 o [] [IN] HQ 3072×2304 4 • With the [ONE TOUCH WB] screen displayed, point the camera at a sheet of white paper. Position the paper so that it fills the screen, making sure there are no shadows. • Press o. The new white - Olympus SP 510 | SP-510UZ Advanced Manual (English) - Page 24
The optical zoom area Red area: The digital zoom area Maximum magnification Still picture shooting mode: Optical zoom × digital zoom : Max. 50x Movie shooting mode: Optical zoom × digital zoom : Max. 30x AF MODE Changing the focusing area iESP SPOT AREA 24 EN The camera determines which subject - Olympus SP 510 | SP-510UZ Advanced Manual (English) - Page 25
Press the shutter button halfway. The camera automatically focuses. MF Adjust the focus manually. P 1/4000 F8.0 8m 5m the subject in front of the lens in focus at all times, camera movement or subject movement when taking pictures. OFF Digital image stabilization is deactivated. ON Digital - Olympus SP 510 | SP-510UZ Advanced Manual (English) - Page 26
external flash IN SLAVE Allows you to take pictures using the built-in flash. When using a commercially available slave flash that is synchronized with the camera flash, the amount of the light emitted by the flash can be adjusted in 10 levels. Selecting an emission level • When flash is set to - Olympus SP 510 | SP-510UZ Advanced Manual (English) - Page 27
create a panoramic picture, using the OLYMPUS Master software from the provided CD-ROM. An Olympus xD-Picture Card is required for panorama balance is adjusted, press o. SHARPNESS Adjusting the sharpness of the image CAMERA MENU 1 PANORAMA 2> 3 SHARPNESS 0 4 CONTRAST 5 SATURATION BACK MENU - Olympus SP 510 | SP-510UZ Advanced Manual (English) - Page 28
lights on the display. • When recording to either the internal memory or the card, and after the first picture is taken, the camera enters sleep mode. The camera automatically reactivates from sleep mode 4 seconds prior to taking the next picture. • When the preset number of pictures is taken, the - Olympus SP 510 | SP-510UZ Advanced Manual (English) - Page 29
the picture has been taken, all operation buttons, the mode dial and zoom lever do not function. • If the internal memory/card becomes full camera moves a lot or the subject is moving quickly, the digital image stabilization function may not operate effectively. • When taking pictures with the camera - Olympus SP 510 | SP-510UZ Advanced Manual (English) - Page 30
[OFF]. • Select the transition effect between pictures from [TYPE]. BGM ON / OFF BACK MENU SET OK TYPE NORMAL / SCROLL / FADER / SLIDE / ZOOM DOWN / ZOOM UP / SWIVEL / CHECKER BOARD / BLINDS / RANDOM • Only the first frame of each movie is displayed. • After setting [BGM] and [TYPE], press - Olympus SP 510 | SP-510UZ Advanced Manual (English) - Page 31
2 MOVIE PLAY Playing back movies [IN] Select [MOVIE PLAY] from the top menu, and press o to play back the movie. Another option is to select a picture with the movie icon (n), and press o to play back the movie. '06.11.26 12:30 100-0004 MOVIEPLAY OK 4 Operations during movie playback [IN] - Olympus SP 510 | SP-510UZ Advanced Manual (English) - Page 32
of a still picture and saves it as a new file. • Press pq to select the image to crop, and press o. • Use the arrow pad and the zoom lever to set the position and size of the picture, and press o. O WT SET OK REDEYE FIX Fixing the red-eye in pictures Corrects the - Olympus SP 510 | SP-510UZ Advanced Manual (English) - Page 33
the frame with pq, and press o. (Press sr to turn the picture 90 degrees clockwise or 90 degrees counterclockwise.) • Use the arrow pad and the zoom lever to adjust the position and size of O W T MOVE SET OK the picture, and press o. LABEL Add a label to your picture Allows you to select - Olympus SP 510 | SP-510UZ Advanced Manual (English) - Page 34
LIGHTING FIX Controlling the lighting of the picture Allows you to control the tone of the whole picture so that the dark part becomes brighter and store it as a new picture. BRIGHTNESS Change the brightness of the picture Allows you to adjust the brightness of the picture, and store it as a new - Olympus SP 510 | SP-510UZ Advanced Manual (English) - Page 35
frames in succession. When a picture is protected, [0] is displayed on the monitor. y...Rotating pictures +90° / 0° / -90° Pictures taken with the camera held vertically are displayed horizontally. This function allows you to turn such pictures so that they are displayed vertically. New picture - Olympus SP 510 | SP-510UZ Advanced Manual (English) - Page 36
• Use the arrow pad to select a frame. Push or pull the zoom lever to change the number of displayed index frames. • Press o. Movie playback begins from the selected frame. R...Adding sound to still pictures YES R BACK MENU / - Olympus SP 510 | SP-510UZ Advanced Manual (English) - Page 37
pictures you want to keep. • When erasing the picture in the internal memory, do not insert a card into the camera. • When erasing the picture from a card, insert the card into the camera in advance. SEL. IMAGE Erase by selecting the single-frame SEL. IMAGE [ I N ] • Use the arrow pad to select - Olympus SP 510 | SP-510UZ Advanced Manual (English) - Page 38
ALL ERASE Erase all the pictures in the internal memory and the card • Select [YES], and press o. Album playback menus • The card on which album is registered is required. g "ALBUM ENTRY Adding pictures to an album" (P. 36) When the still picture is selected 2 2 PLAYBACK MENU SLIDESHOW EDIT - Olympus SP 510 | SP-510UZ Advanced Manual (English) - Page 39
is formatted, the data of the frames and titles downloaded with the provided OLYMPUS Master software will be deleted. • Be sure that the card is inserted in the camera when formatting the card. • Before using non-Olympus cards or cards which have been formatted on a computer, you must format them - Olympus SP 510 | SP-510UZ Advanced Manual (English) - Page 40
You can select a language for on-screen display. Available languages vary depending on the area where you purchased this camera. You can add other languages to your camera with the provided OLYMPUS Master software. PW ON SETUP/PW OFF SETUP Setting the startup/shutdown screen and sound SCREEN OFF - Olympus SP 510 | SP-510UZ Advanced Manual (English) - Page 41
number are reset every time a new card is inserted in the camera. The folder number returns to [No. 100] and the 9999) and folder names (100 to 999), and are named as follows. Folder name File name \DCIM\***OLYMP\Pmdd****.jpg Folder No. Month (1 - C) File No. (100 - 999) (0001 - 9999) Month - Olympus SP 510 | SP-510UZ Advanced Manual (English) - Page 42
formats (Y-M-D, M-D-Y, D-M-Y) Minute Hour MENU: Exits a setting. • The first two digits of [Y] are fixed. • The time is displayed in the 24-hour format. • The date format is the same as that set with [X]. • The first two digits of [Y] are fixed. • The time is displayed in the 24-hour format. MENU: - Olympus SP 510 | SP-510UZ Advanced Manual (English) - Page 43
and audio input (white) terminals. Menu operations AV cable (provided) Multi-connector Settings on the TV Turn the TV on, and set it to video input mode. • For details of switching to video input, refer to your TV's instruction manual. Settings on the camera Press o in playback mode to turn the - Olympus SP 510 | SP-510UZ Advanced Manual (English) - Page 44
OK CURRENT MY MODE SETUP SET CURRENT SETTING SET CANCEL SET OK Saves the current camera settings. • Select [SET], and press o. Select a MY MODE to save. m/ft Setting the measurement unit during manual focus m Displays in meters and centimeters ft Displays in feet and inches Menu - Olympus SP 510 | SP-510UZ Advanced Manual (English) - Page 45
AF ILLUMINAT Setting to light the illuminator in a dark place OFF ON AF illuminator does not light Press the shutter button halfway. The AF illuminator automatically lights. CUSTOM BUTTON Assigning functions to the custom buttons Press sr to select the function you want to set, and press o. g " - Olympus SP 510 | SP-510UZ Advanced Manual (English) - Page 46
with the camera into the multi-connector of the camera and the printer's USB port. Connector cover USB cable Multi-connector • The easy print start screen is displayed. • For details of how to turn the printer on and the position of the USB port, refer to the printer's instruction manual. 46 EN - Olympus SP 510 | SP-510UZ Advanced Manual (English) - Page 47
USB cable from the camera with the picture selection screen displayed. 4 Remove the USB cable from the camera. EASY PRINT START PC / CUSTOM PRINT OK EXIT PRINT 5 Remove the USB cable Select [CUSTOM PRINT], and press o. USB [IN] PC EASY PRINT CUSTOM PRINT EXIT Operation guide SET OK EN 47 - Olympus SP 510 | SP-510UZ Advanced Manual (English) - Page 48
3 Make the print settings according to the operation guide. Selecting the picture to print ALL IMAGES ALBUM ALL IMAGES ALBUM SET OK Selecting a print mode . Press pq to select the picture you want to print. You can also use the zoom button and select a picture from the index display. 48 EN - Olympus SP 510 | SP-510UZ Advanced Manual (English) - Page 49
file name. Use the arrow pad or the zoom lever to adjust trimming size and position, and . 6 Disconnect the USB cable from the camera. 7 Disconnect the USB cable from the printer. Select supports DPOF. DPOF is a standard format used to record automatic print information from digital cameras. - Olympus SP 510 | SP-510UZ Advanced Manual (English) - Page 50
instruction manual. A PC card adapter may also be necessary. Note • DPOF reservations set by another device cannot be changed by this camera menu [PRINT ORDER] [ - Olympus SP 510 | SP-510UZ Advanced Manual (English) - Page 51
6 Select [SET], and press o. - Olympus SP 510 | SP-510UZ Advanced Manual (English) - Page 52
OLYMPUS Master software, also provided with the camera. Prepare the following items before starting. Install the OLYMPUS Master software gP. 53 OLYMPUS Master CD-ROM USB cable Connect the camera to USB the computer cable guide and OLYMPUS Master reference manual. Using OLYMPUS Master 52 EN - Olympus SP 510 | SP-510UZ Advanced Manual (English) - Page 53
computer operation and the need to reboot. • Disconnect the cable connecting the camera to the computer • Turn off the camera • Open the camera's battery compartment cover/card cover Windows 1 Insert the CD-ROM into the CD-ROM drive. • The OLYMPUS Master setup screen is displayed. • If the screen - Olympus SP 510 | SP-510UZ Advanced Manual (English) - Page 54
OLYMPUS Master. If the QuickTime screen is not displayed, QuickTime 6 or later is already installed on the computer. In this case, go to step 4. 3 Click "Next" and follow the on-screen instructions Adobe Reader is required to read the OLYMPUS Master instruction manual. If this screen is not displayed - Olympus SP 510 | SP-510UZ Advanced Manual (English) - Page 55
computer using the provided USB cable. • Refer to your computer's instruction manual to locate the position of the USB port. • The camera turns on automatically. • The monitor turns on and the selection screen for the USB connection is displayed. Connector cover Using OLYMPUS Master 3 Select [PC - Olympus SP 510 | SP-510UZ Advanced Manual (English) - Page 56
connected to a computer. • Connecting the camera to a computer via a USB hub may cause unstable operation. In this case, do not use a hub, but connect the camera directly to the computer. Start up the OLYMPUS Master software Windows 1 Double-click the "OLYMPUS Master" icon on the desktop. • The - Olympus SP 510 | SP-510UZ Advanced Manual (English) - Page 57
and saving images 1 Click "Transfer Images" on the OLYMPUS Master main menu. • The menu for selecting the source is displayed. 2 Click "From Camera" . • The window for selecting images is displayed. All the images in the camera are displayed. 3 Select the image files and click "Transfer - Olympus SP 510 | SP-510UZ Advanced Manual (English) - Page 58
USB cable. Windows 98SE 1 Double-click the "My Computer" icon and right-click the "Removable Disk" icon to display the menu. 2 Click "Eject" on the menu. Using OLYMPUS Drag and drop it on the eject icon. 3 Disconnect the USB cable from the camera. Note • Windows Me/2000/XP: When you click "Unplug - Olympus SP 510 | SP-510UZ Advanced Manual (English) - Page 59
printed from the photo, index, postcard and calendar menus. The explanation 1below uses the photo menu. Click "Print Images at Home" on the OLYMPUS Master main menu. • The print menu is displayed. 2 Click "Photo" . • The "Photo Print" window is displayed. 3 Click "Settings" in the "Photo Print - Olympus SP 510 | SP-510UZ Advanced Manual (English) - Page 60
is running Windows 98SE, you will need to install the USB driver. Before connecting the camera to your computer with the USB cable, double-click the files from the following folders on the provided OLYMPUS Master CD-ROM. (Drive name): \USB\INSTALL.EXE • Data transfer is not guaranteed in the - Olympus SP 510 | SP-510UZ Advanced Manual (English) - Page 61
Using OLYMPUS Master 2 Plug the USB cable into the USB port on the computer. 3 Plug the other end of the USB cable into the camera's USB connector. • The camera turns on automatically. • The monitor turns on and the selection screen for the USB connection is displayed. 4 Select [PC], and press o. 5 - Olympus SP 510 | SP-510UZ Advanced Manual (English) - Page 62
zoom button or other buttons to restore the camera from sleep mode before taking a picture. If the camera is left for 4 hours, it automatically turns off (the lens taken when the shooting guide is being displayed. Take a picture after making the settings following the shooting guide, or turn the mode - Olympus SP 510 | SP-510UZ Advanced Manual (English) - Page 63
, and then recompose your picture. • Set [AF MODE] to [iESP]. g "AF MODE Changing the focusing area" (P. 24) The subject is moving quickly • Focus the camera on a point roughly the same distance away as the subject you want to shoot (by pressing the shutter button halfway), and then recompose your - Olympus SP 510 | SP-510UZ Advanced Manual (English) - Page 64
cases, focus camera in a correct posture and press the shutter button slowly. To stabilize the digital image, take pictures with h/< pressed. The digital images are not stabilized when: • images are shot using a zooming function of high magnification, i.e., using both optical zoom and digital zoom - Olympus SP 510 | SP-510UZ Advanced Manual (English) - Page 65
is the light source illuminating the subject. [WB] is the function that allows the camera to determine the correct colors. Normally, the [AUTO] setting provides the optimal white too bright or too dark. In this case, use the arrow pad to change the settings. g "A/S Switching aperture priority / shutter speed - Olympus SP 510 | SP-510UZ Advanced Manual (English) - Page 66
either erase the pictures from the card or use a new card. • Pictures are not recorded to the internal memory when a card is inserted in the camera. Pictures in the internal memory can be copied to the card using the [BACKUP] function. g "BACKUP Copying pictures in the internal memory to the card - Olympus SP 510 | SP-510UZ Advanced Manual (English) - Page 67
the cards other than TypeH. Using a new card • If you use a non-Olympus card or a card used for another application, such as for a computer, the message [CARD ERROR] is displayed. To use this card with this camera, use the [FORMAT] function to format the card. g "MEMORY FORMAT (FORMAT) Formatting - Olympus SP 510 | SP-510UZ Advanced Manual (English) - Page 68
Getting to know your camera better Extending the useful life of the battery • Performing any of the following operations when not actually taking pictures can deplete the battery power. • Repeatedly pressing the shutter button halfway • Repeatedly using the zoom • [FULLTIME AF] is set to [ON]. - Olympus SP 510 | SP-510UZ Advanced Manual (English) - Page 69
guide/Checking the time" (P. 15) Playback help and troubleshooting before operating the camera. Understanding the settings Zooming while shooting/close-up playback" (P. 11) Erasing sound recorded to still pictures • Once sound is added to a picture, it is not possible to erase the sound. In this case - Olympus SP 510 | SP-510UZ Advanced Manual (English) - Page 70
software • Install the OLYMPUS Master software from the provided CD-ROM. Change the monitor setting • The icons on the computer desktop may be rearranged. For details of changing the settings on your computer, refer to the computer's instruction manual. When you get an error message on the camera - Olympus SP 510 | SP-510UZ Advanced Manual (English) - Page 71
NO INK JAMMED SETTINGS CHANGED PRINT ERROR r CANNOT PRINT The paper is jammed. Remove the jammed paper. The printer's paper tray has been removed or the printer has been operated while changing settings on the camera. There is a problem with the printer and/or camera. Do not operate the printer - Olympus SP 510 | SP-510UZ Advanced Manual (English) - Page 72
speed FLASH MODE & Y MONITOR(u)*1 ZOOM*2 DIS MODE AE LOCK AF LOCK IMAGE QUALITY WB ISO DRIVE METERING FINE ZOOM DIGITAL ZOOM MY MODE SETUP 9 9 9 9 Select and set either the monitor or the viewfinder to light when the camera is turned on. *2 For [ZOOM], select from 38 mm, 50 mm, 100 mm, 200 mm or - Olympus SP 510 | SP-510UZ Advanced Manual (English) - Page 73
zoom DIS MODE DIS MOVIE MODE AE lock AF lock IMAGE QUALITY WB ISO DRIVE METERING FINE ZOOM DIGITAL ZOOM 9 *2 9 9 *3 9 9 9 9 9 9 9 9 9 9 9 - 9 9 9 9 s A - - - - - - 9 - - 9 9 - 9 9 - 9 - - 9 9 - - - 9 - - 9 - - - - - - EN 73 Getting to know your camera better - Olympus SP 510 | SP-510UZ Advanced Manual (English) - Page 74
ASSIST 9 - u 9 - MY MODE SETUP - 9 - m/ft 9 AF ILLUMINAT. 9 9 CUSTOM BUTTON - 9 - *1 [RAW] is not available. *2 [AUTO] is not available. *3 [BKT] is not available. Getting to know your camera better 74 EN - Olympus SP 510 | SP-510UZ Advanced Manual (English) - Page 75
9 - 9 9 - 9 Optical zoom 9 IMAGE QUALITY DRIVE 9 - FINE ZOOM 9 DIGITAL ZOOM 9 AF MODE 9 FOCUS MODE 9 - 9 *5 9 - V dief 9 - 9 *1 9 9 *2 9 9 9 9 9 - 9 - *4 9 *3 - 9 9 9 - 9 9 9 - 9 9 - 9 9 - 9 - - - - 9 Getting to know your camera better EN 75 - Olympus SP 510 | SP-510UZ Advanced Manual (English) - Page 76
chemically treated cloth. • Mold may form on the lens surface if the lens is left dirty. Storage • When storing the camera for extended periods, remove the battery, AC adapter batteries) Olympus NiMH batteries are rechargeable and economical. For details, refer to the instruction manual for your - Olympus SP 510 | SP-510UZ Advanced Manual (English) - Page 77
the battery level warning more quickly. Useful use of the accessories The card Pictures can be recorded on the optional card. The internal memory and card are the camera's media for recording pictures, similar to film in a film camera. Pictures recorded to the internal memory or card can be - Olympus SP 510 | SP-510UZ Advanced Manual (English) - Page 78
30 100-0004 4 Memory indicator [IN]: When internal memory is used. [xD]: When the card is used. Inserting and removing the card 1 Turn off the camera. 2 Open the card cover. Miscellaneous Inserting the card 3 Orient the card as shown, and insert it into the card slot as shown in the illustration - Olympus SP 510 | SP-510UZ Advanced Manual (English) - Page 79
4 Close the card cover. Note • The card access lamp blinks while the camera is reading the images. Reading of images may take some time. Do not AC adapter. • The camera is not water resistant during AC adapter use. • Be sure to read the instruction manual for the AC adapter. Miscellaneous EN 79 - Olympus SP 510 | SP-510UZ Advanced Manual (English) - Page 80
SERVICEABLE PARTS INSIDE. REFER SERVICING TO QUALIFIED OLYMPUS SERVICE PERSONNEL. DANGER WARNINGS CAUTION An exclamation mark enclosed in a triangle alerts you to important operating and maintenance instructions accessories recommended by Olympus the Camera WARNING Do not use the camera near - Olympus SP 510 | SP-510UZ Advanced Manual (English) - Page 81
cause parts to deteriorate and, in some circumstances, cause the camera to catch fire. Do not use the charger or AC DANGER • Use only the Olympus brand NiMH batteries and proper • Insert the battery carefully as described in the operating instructions. • Do not use batteries if their body is not - Olympus SP 510 | SP-510UZ Advanced Manual (English) - Page 82
products with weatherproof designs, read their manuals as well. • In places prone to strong vibrations. • Never drop the camera or subject it to severe shocks or cause fires. • Do not push or pull severely on the lens. • Before storing the camera for a long period, remove the batteries. Select a cool - Olympus SP 510 | SP-510UZ Advanced Manual (English) - Page 83
for use only with Olympus digital cameras. Never use these batteries necessary. In some cases, alkaline batteries may have a shorter service life than NiMH. Alkaline camera before storing the camera for a long period. • Before using NiMH or NiCd batteries, always read the provided instructions - Olympus SP 510 | SP-510UZ Advanced Manual (English) - Page 84
software or equipment. Some countries do not allow the exclusion or limitation of liability for consequential or incidental damages, so the above limitations may not apply to you. • Olympus reserves all rights to this manual digital instructions USB cable should be used to connect the camera to USB - Olympus SP 510 | SP-510UZ Advanced Manual (English) - Page 85
of Conformity Model Number : SP-510UZ Trade Name : OLYMPUS Responsible Party Class B digital apparatus meets protection. "CE" mark cameras are intended for sales in Olympus service station within the business area of Olympus Imaging Europa GmbH as stipulated on the website: http://www.olympus - Olympus SP 510 | SP-510UZ Advanced Manual (English) - Page 86
instructions, etc.) (b) Any defect that occurs due to repair, modification, cleaning, etc. performed by anyone other than Olympus or an Olympus authorized service not apply to any other accessory equipment, such as the case, strap, lens cap and batteries. 5. Olympus's sole liability under this - Olympus SP 510 | SP-510UZ Advanced Manual (English) - Page 87
380,000 pixels (gross) : Olympus lens 6.3 to 63.0 mm, f2.8 to 3.7 (equivalent to 38 to 380 mm on a 35 mm camera) : Digital ESP metering, spot metering system at room temperature using a new fully charged battery) : DC-IN jack USB connector, A/V OUT jack (multi-connector) : 2000 up to 2099 : - Olympus SP 510 | SP-510UZ Advanced Manual (English) - Page 88
CAMERA DIAGRAM Camera Strap Eyelet (P. 3) DC-IN jack Microphone Shutter Button (P. 8) Flash (P. 14) Multi-Connector (P. 43, P. 46, P. 55) Strap Eyelet Miscellaneous Card Cover (P. 78) Card Slot (P. 78) Lens Tripod Socket Zoom Lever (P. 11) Mode Dial (P. 5, P. 12) h Button (Digital Image - Olympus SP 510 | SP-510UZ Advanced Manual (English) - Page 89
standby # (Lit) Camera movement warning / Flash charge # (Blinks) 4 Digital image stabilization h 5 Silent mode f 6 White balance WB AUTO, 5, 3, 1, w - y, V 7 White balance compensation B1 - B7, R1 - R7 8 ISO 9 Drive Macro mode 10 Super macro mode Manual - Olympus SP 510 | SP-510UZ Advanced Manual (English) - Page 90
Items 22 Self-timer 23 Shutter speed 24 Noise reduction 25 Aperture 26 Exposure compensation 27 Image quality 28 AF target mark 29 Image size 30 Alarm 31 Number of storable still pictures Remaining recording time 32 Current memory h, g Indications 15" - 1/1000, BULB O F2.8 - F8.0 -2.0 - +2.0 - Olympus SP 510 | SP-510UZ Advanced Manual (English) - Page 91
(Monitor - Playback mode 12 3 4 5 6 12 3 45 6 7 12 [IN] X10 HQ 10 7 3072x2304 11 12 [IN] HQ 10 320x240 11 8 F2.8 1/1000 +2.0 12 9 13 ISO 1600 14 '06.11.26 12:30 15 1 0 0 0 - 0 0 0 4 16 13 '06.11.26 12:30 15 1 0 0 0 - 0 0 0 4 16 00:00/00:3366 17 4 17 Still picture Movie Items 1 - Olympus SP 510 | SP-510UZ Advanced Manual (English) - Page 92
16 h/< button (digital image stabilization/ print 12 BKT 23 92 EN Auto focus AF 25 Auto-flash 17 AV cable 3, 43 AVAILABLE LIGHT c 21 B BACKUP 40 Batteries 76 BEACH WHITE 32 BRIGHTNESS 34 C CALENDAR (edit 33 CALENDAR (playback 31 CAMERA MENU 19, 22 CANDLE b 21 CAPTURE 34 Card 77 Card - Olympus SP 510 | SP-510UZ Advanced Manual (English) - Page 93
DIGITAL ZOOM 24 DIRECT (Histogram 44 Direct printing 46 DIS MODE h 12, 25 DIS MOVIE MODE h 12, 29 DISP./E button 15 DOCUMENTS d 21 DPOF 49 DRIVE 23 DUALTIMEl 42 E EASY PRINT 46 EDIT 34 ERASE 37 Error m/ft 44 Macro mode 16 Manual focus MF 25 Manual mode M 5, 13 MEMORY FORMAT 39 EN 93 - Olympus SP 510 | SP-510UZ Advanced Manual (English) - Page 94
gauge 62 Memory indicator 78 MENU button 16, 18 Menu guide 15 METERING 24 Mode dial 5 Monitor 10, 41, Number of prints 49 Number of storable still pictures . . . . 8 O OLYMPUS Master 52 One-touch WB V 22 Optical zoom 24 P PAL 43 PANORAMA 27 PC 55 PictBridge 46 Picture rotation y 35 - Olympus SP 510 | SP-510UZ Advanced Manual (English) - Page 95
37 SHARPNESS N 27 SHOOT & SELECT1/2 e f . . . . . 21 Shooting guide (g 5, 14 Shooting mode 10, 19 SHQ 20, 66 Shutter button 8, 10 Shutter 22 U UNDO ALL 38 UNDO ENTRY (ALBUM ENTRY) . . 38 USB cable 3, 46, 47, 52, 55 USB driver 53, 60 V VIDEO OUT 43 Viewfinder 10 VOLUME 40 W Warning - Olympus SP 510 | SP-510UZ Advanced Manual (English) - Page 96
2006 VH685501
-
 1
1 -
 2
2 -
 3
3 -
 4
4 -
 5
5 -
 6
6 -
 7
7 -
8
-
9
-
10
-
11
-
12
-
13
-
14
-
15
-
16
-
17
-
18
-
19
-
20
-
21
-
22
-
23
-
24
-
25
-
26
-
27
-
28
-
29
-
30
-
31
-
32
-
33
-
34
-
35
-
36
-
37
-
38
-
39
-
40
-
41
-
42
-
43
-
44
-
45
-
46
-
47
-
48
-
49
-
50
-
51
-
52
-
53
-
54
-
55
-
56
-
57
-
58
-
59
-
60
-
61
-
62
-
63
-
64
-
65
-
66
-
67
-
68
-
69
-
70
-
71
-
72
-
73
-
74
-
75
-
76
-
77
-
78
-
79
-
80
-
81
-
82
-
83
-
84
-
85
-
86
-
87
-
88
-
89
-
90
-
91
-
92
-
93
-
94
-
95
-
96
 |
 |

Advanced
Manual
Menu operations
Button operations
Printing pictures
Using OLYMPUS Master
Getting to know your
camera better
Miscellaneous
Thank you for purchasing an Olympus digital camera. Before you start to use your new camera, please
read these instructions carefully to enjoy optimum performance and a longer service life. Keep this manual
in a safe place for future reference.
±
We recommend that you take test shots to get accustomed to your camera before taking important photographs.
±
In the interest of continually improving products, Olympus reserves the right to update or modify information
contained in this manual.
±
The screen and camera illustrations shown in this manual were produced during the development
stages and may differ from the actual product.
±
DIGITAL CAMERA
Quick Start Guide
This manual will help you
get started using your
camera right away.
SP-510UZ