JVC GZ MC100 Separate volume2 - Page 1
JVC GZ MC100 - Everio Camcorder - 2.12 MP Manual
 |
View all JVC GZ MC100 manuals
Add to My Manuals
Save this manual to your list of manuals |
Page 1 highlights
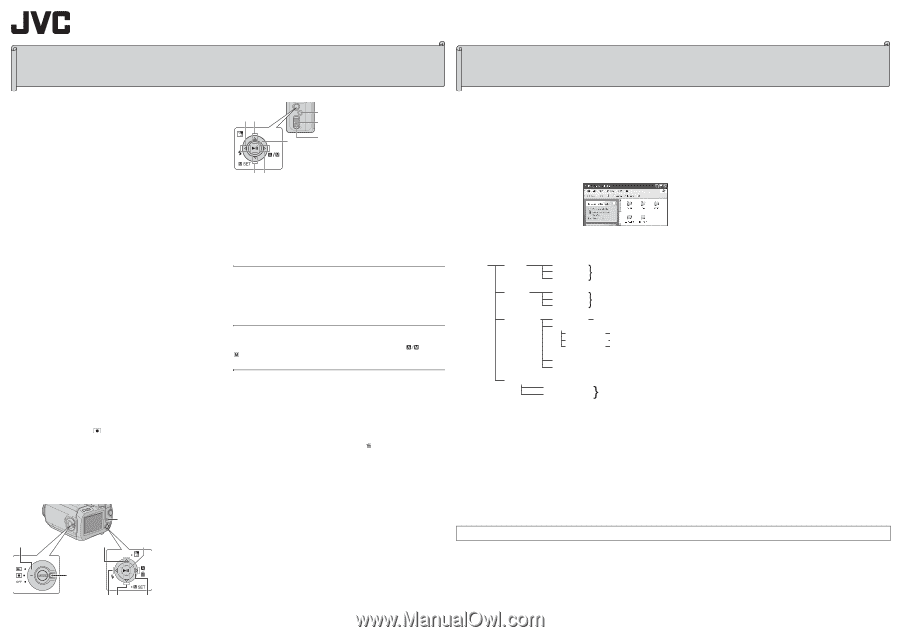
Read this first! - How to handle the Digital Media Camera - ENGLISH Read this first! - Software Installation And USB Connection Guide Supplement - ENGLISH Please read this together with the instruction manual before using the camera. The advanced operation manual is provided as HTML format in the provided CD-ROM. Refer to "For Advanced Operations" page 32 of the instruction manual (printed edition). 8 Make a backup of important recorded data Protect your important recorded data by copying the files to PC. It is recommended to copy it from your PC to a DVD or other recording media for storage. Refer to "Connections" on page 10 of "SOFTWARE INSTALLATION AND USB CONNECTION GUIDE". 8 Make a trial run before recording important data Play back the recorded data to check that the video and sound have been recorded correctly. Refer to "BASIC OPERATIONS" on page 19 - 25 of the instruction manual (printed edition). 8 Reset the camera if it does not operate correctly This camera uses a microcomputer. Factors such as background noise and interference can prevent it from operating correctly. If the camera does not operate correctly, press and hold MENU and MODE simultaneously for approx. 5 seconds to reset the camera. If the problem still exists, set the power switch to [OFF] and remove the power supply (battery pack or AC adapter) from the camera, then put it back again. 8 Check the compatible recording media The following recording media have been guaranteed to work with this camera. Others are not guaranteed to work, so buy such products with caution. Removable hard disks: Microdrive® from Hitachi, JVC Microdrive® (CUMD04) CompactFlash cards: By LEXAR, SanDisk and Hagiwara Sys-com SD memory cards: By Panasonic, TOSHIBA and SanDisk ● If other media are used, they may fail to record data correctly, or they may lose data that has already been recorded. ● Microdrive® of 1GB or below are not supported. ● MultiMediaCards are not supported. ● For video recording and continuous shooting of still images, use a removable hard disk, high-speed CompactFlash card (at least 40x speed) or SD memory card (at least 10 MB/s). 8 Format recording medium before using Before using this camera, use the Format function [FORMAT] in the menu to format the provided removable hard disk. Also, be sure to format newlypurchased CF cards (removable hard disk/CompactFlash card) and SD cards with this camera before using them. This enables stable speeds and operation when accessing the recording medium. To format (1) Set the power switch to while pressing down the lock button located on the switch. (2) Press MENU. (3) Press rt to select [MEMORY CARD SETTING], then press 49. (4) Press rt to select [FORMAT], then press 49. (5) Press rt to select [CF SLOT] or [SD SLOT], then press 49. ● [CF SLOT]: Removable hard disk or CompactFlash card ● [SD SLOT]: SD memory card (6) Press rt to select [EXECUTE], then press 49. GZ-MC200 MENU Power Switch r 49 GZ-MC100 wr MENU Lock Button Power Switch 49 te 8 Take care to hold the camera correctly during recording Do not cover the area near the lens, stereo microphone, camera sensor, flash, or flash sensor with your finger or any object while recording. Refer to "Index" on page 6 - 7 of the instruction manual (printed edition). 8 Bring your camera together with the removable hard disk When requesting repairs for breakdowns by your dealer or JVC service center, be sure to bring your camera together with the removable hard disk. If one of them is not included, the cause cannot be diagnosed, and the repair cannot be made properly. Power supply 8 When a certain length of time passes without operation ● When using the battery, the power is turned off automatically to conserve power. Use the power switch to turn on the power again. ● When using the AC adapter, the access lamp lights up, and the LCD turns off (the camera enters the sleep mode). Operation is restored once any operation is made. Recording 8 Switching to manual mode Switch to manual mode when you want to adjust the focus manually or add video effects etc. when recording. Press and hold e ( ) so that is displayed at the top left of the screen. Miscellaneous points 8 Direct printing with a PictBridge printer After selecting [DIRECT PRINT] in the menu, connect the USB cable. If the printer is not recognized, or to print again after direct printing with a PictBridge Printer, remove the USB cable, select [DIRECT PRINT] in the menu again, and then reconnect the cable. 8 DPOF index screen ● While a still image is selected and the zoom lever is pushed to [T] side, the preview of the selected still image is displayed. ● If [CHECK SETTINGS] is selected to confirm the DPOF setting, it is not possible to cancel the setting by pressing on the index screen. To cancel the setting, set the number of prints to "0". 8 Video file names Video file names are assigned as sequential hexadecimal numbers. NOTE: For the manual focus, video effects, format, direct printing and DPOF, refer to the advanced operation manual provided as HTML format in the CD-ROM. See page 32 of the instruction manual (printed edition) for details. Please read this together with the instruction manual before using the software. 8 When playing back a file in the recording medium on your PC Copy the file to your PC, and then play it back. If video file is played back directly from recording medium (i.e. the camera is connected through USB to your PC), it may be not played back properly due to the inadequate processing speeds or other problems. Also use the provided PowerDVD 5 NE software to play back video files. 8 When copying the file in the recording medium to your PC File transfer takes considerable time in PCs using USB 1.1. Usage of a PC that supports USB 2.0 is recommended. 8 Folder structure within the recording medium Video files: Stored in the [PRGxxx] folder (where xxx is a number), within the [SD_VIDEO] folder. Still image files: Stored in the [xxxJVCSO] folder (where xxx is a number), within the [DCIM] folder. Voice files: Stored in the [xxxJVCMC] folder (where xxx is a number), within the [DCVC] folder. Recording medium [DCIM] [100JVCSO] [101JVCSO] [102JVCSO] Still image file folder ... [DCVC] [SD_VIDEO] [100JVCMC] [101JVCMC] Voice file folder [102JVCMC] ... [MGR_INFO] Management information for the media as a whole [PRG001] Management [PRG001.PGI] information [MOV001.MOD] Video file [MOV001.MOI] [PRG002] ... Management information for the video file [PRG003] ... [EXTMOV] MOV_0001.MPG MOV_0002.MPG Video file produced on a PC ... Management information: Information such as the date and time of recording, recorded with the video file. NOTES: ● Any folders or files other than those described above are recorded in the recording medium. ● Do not delete, move or rename folders and files within the medium on PC. 8 File types and extensions Video files: MPEG2 files, extension is ".mod" Still image files: JPEG files, extension is ".jpg" Voice files: WAVE files, extension is ".wav" 8 How to copy video files from the PC To use the camera to play back video files (MPEG2 files, with the extension ".mpg") which have been edited using the provided software, change the file name to "MOV_xxxx.mpg" (where xxxx is a number) and move it to the [EXTMOV] folder. The following video files cannot be played back on the camera: ● Files which do not have correct file names ● Files which are not in MPEG2 format ● Files prepared on any application other than the provided software ● Edited files which were not produced on a JVC Digital Media Camera Also, be sure to turn off the SVRT function when editing the video files using PowerDirector Express NE. (Do not check the checkbox [Use SVRT to save rendering time].) 8 How to play back video files from the [EXTMOV] folder On the index display of video files, press the recording start/stop button to display "MPG" on the screen. After that, follow the usual operation for playback. However, the forward/reverse skip search, frame-by-frame playback and playlist functions are not available. 8 Even if PowerDirector/PowerProducer/PowerDVD have already been installed on the PC Video files captured with this camera can only be handled on the provided software. Please install and use the provided software (PowerDirector Express NE, Power Producer 2 Gold NE, PowerDVD 5 NE). If PowerDirector/PowerProducer/PowerDVD have already been installed, uninstall them before installing the provided software. 8 CyberLink Technical Support For details of CyberLink technical support, refer to the following website: http://www2.cli.co.jp/products/ne/ After reading this sheet, store it together with the instruction manual, and refer to it when necessary. Lock Button wt e © 2004 Victor Company of Japan, Limited LYT1332-005B 1204HOH-AL-VP
-
 1
1
 |
 |