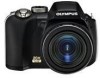
Olympus SP-565 UZ SP-565UZ Instruction Manual (English)
Olympus SP-565 UZ - Digital Camera - Compact Manual
 |
UPC - 050332165977
View all Olympus SP-565 UZ manuals
Add to My Manuals
Save this manual to your list of manuals |
Olympus SP-565 UZ manual content summary:
- Olympus SP-565 UZ | SP-565UZ Instruction Manual (English) - Page 1
DIGITAL CAMERA DIGITAL CAMERA Instruction Manual ● Thank you for purchasing an Olympus digital camera. Before you start to use your new camera, please read these instructions carefully to enjoy optimum performance and a longer service life. Keep this manual in a safe place for future reference. ● We - Olympus SP-565 UZ | SP-565UZ Instruction Manual (English) - Page 2
Print reservations (DPOF) (p. 67) Contents Names of Parts 6 Preparing the Camera 10 Shooting, Playback and Erasing ........14 Using Shooting Modes 17 Using Shooting Printing Functions 48 Menus for Other Camera Settings .....55 Printing 64 Using OLYMPUS Master 2 70 Usage Tips 72 Appendix 77 - Olympus SP-565 UZ | SP-565UZ Instruction Manual (English) - Page 3
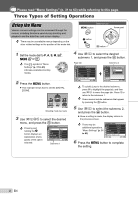
select the desired menu, and press the o button. Pressing and holding the E button displays an explanation (menu guide) of the option selected. CAMERA MENU 1 WB 2 ISO 3 DRIVE 4 FINE ZOOM 5 DIGITAL ZOOM EXIT MENU AUTO AUTO o OFF OFF SET OK Submenu 1 4 Use 78 to select the desired submenu 1, and - Olympus SP-565 UZ | SP-565UZ Instruction Manual (English) - Page 4
(self-timer) (p. 24) q/P button (playback/print) (p. 15, p. 64) g/E button (menu guide/information display change/date and time check) (p. 3, p. 25, p. 60) f/D button (SHADOW ADJ/ 4 PANORAMA EXIT MENU 1 IMAGE QUALITY 2 CAMERA MENU 3 SCN 6 SETUP 7 SILENT MODE SET OK Shooting mode top menu 4 EN - Olympus SP-565 UZ | SP-565UZ Instruction Manual (English) - Page 5
Menus for Shooting Functions - continued 1 D IMAGE QUALITY......... p.31 2 K CAMERA MENU WB p.32 ISO p.33 DRIVE p.34 FINE ZOOM p.35 DIGITAL ZOOM p.35 METERING p.35 AF MODE p.36 FOCUS MODE p.36 FULLTIME AF p.37 AF PREDICT p.37 AF ILLUMINAT p.37 IMAGE STABILIZER.... p.37 w (Flash intensity - Olympus SP-565 UZ | SP-565UZ Instruction Manual (English) - Page 6
Names of Parts Camera unit 2 1 3 4 9 10 5 11 6 12 13 7 8 1 Self-timer lamp/ AF illuminator p.24, 37 2 Flash p.22 3 Microphone p.53 4 Lens 5 Battery compartment cover........... p.10 6 Battery compartment lock p.10 7 - Olympus SP-565 UZ | SP-565UZ Instruction Manual (English) - Page 7
23 9 button (macro p.24 8button (self-timer p.24 : button (flash p.22 10 o button p.26 11 f/D button (SHADOW ADJ/ erase p.16, 22 12 g/E button (menu guide/information display change/date and time check) ...p.25, 29 13 Card slot p.11 14 Card cover p.11 15 Mode dial p.3, 13 16 Zoom lever p.21 - Olympus SP-565 UZ | SP-565UZ Instruction Manual (English) - Page 8
image 1 Shooting mode p.17, 31 2 Flash mode p.23 3 Silent mode p.63 4 Digital image stabilization p.37 5 Macro/super macro mode p.24 6 SHADOW ADJ p.22 7 Noise 10, 73 10 AF lock (s p.63 Manual focus (a p.36 AF predict p.37 11 Flash standby/camera shake warning/flash charge p.72 12 Flash - Olympus SP-565 UZ | SP-565UZ Instruction Manual (English) - Page 9
Playback mode display 1 2 3456 x10 7 1/1000 F3.5 8 +2.0 9 ISO 1600 10 11 NORM 10M 100-0004 12 17 2008.10.26 12:30 IN 4 13 16 15 14 Still image 1 Silent mode p.63 2 Print reservation/ number of prints p.66, 67 3 Sound record p.39 4 Protect p.52 5 Sequential playback (index/slideshow - Olympus SP-565 UZ | SP-565UZ Instruction Manual (English) - Page 10
the box Loading the batteries 1 2 Digital camera Lens cap and lens cap strap 3 Camera strap Four AA batteries Battery compartment lock USB cable AV cable OLYMPUS Master 2 CD-ROM microSD Attachment Other accessories not shown: Instruction Manual warranty card Contents may vary depending - Olympus SP-565 UZ | SP-565UZ Instruction Manual (English) - Page 11
Attachment" (p.80) 1 Insert the microSD card into the attachment. Insert the card to the end. 1 o button 2 Insert the microSD Attachment into the camera. Card cover Notch 2 Notch 3 Contact area To remove the microSD card Contact area Insert the card straight in until it clicks into place - Olympus SP-565 UZ | SP-565UZ Instruction Manual (English) - Page 12
2 Use 78 to select the year for [Y]. X 2 J Arrow pad Y M D TIME 2008 Y M D Operation guides displayed at the bottom of the screen indicate that the m button, o button, zoom lever or D button is used. IMAGE QUALITY CAMERA RESET MENU SETUP PANORAMA EXIT MENU SCN SILENT MODE SET OK SEL. IMAGE - Olympus SP-565 UZ | SP-565UZ Instruction Manual (English) - Page 13
the menu. [X (Date/time)] (p. 59) 4 Use 78 to select [W] and press the o button. To check the date and time Press the g button while the camera is turned off. The current time and alarm time are displayed for approx. 3 seconds. Changing the display language 5 Use 789: to select your language and - Olympus SP-565 UZ | SP-565UZ Instruction Manual (English) - Page 14
79) AUTO $ 10M NORM IN 4 Monitor (standby mode screen) Vertical grip 5 Press the shutter button halfway down to focus on the subject. ● When the camera focuses on the subject, the exposure is locked (shutter speed and aperture value are displayed), and the AF target mark changes to green. ● The - Olympus SP-565 UZ | SP-565UZ Instruction Manual (English) - Page 15
the picture, gently press the shutter button all the way down while being careful not to shake the camera. AUTO $ Viewing images 1 Set the mode dial to q. Number of frames Press fully Image review screen To view images during shooting Pressing the q button enables playback of images. To return to - Olympus SP-565 UZ | SP-565UZ Instruction Manual (English) - Page 16
To play back movies Select a movie, and press the o button. Erasing images during playback (Single image erase) 2008.10.26 12:30 100-0004 MOVIE PLAY OK IN 4 Movie Operations during movie playback Volume: During playback, press 78. Fast-forward/rewind: Select with 9:. Each time a button is - Olympus SP-565 UZ | SP-565UZ Instruction Manual (English) - Page 17
displayed as well by pressing down the E button. 2 Use 78 to select the best shooting mode for the scene, and press the o button to set. Icon indicating optimum aperture value and shutter speed (P mode) In this mode, automatic camera shooting can be used while also allowing changes to a wide range of - Olympus SP-565 UZ | SP-565UZ Instruction Manual (English) - Page 18
to A. A mode indicator A NR Selecting the shutter speed for shooting pictures (S mode) In this mode, the aperture value is automatically set by the camera. This is useful for shooting a moving subject, such as sports photos. 1 Set the mode dial to S. S mode indicator S NR 10M NORM 1/1000 F4 - Olympus SP-565 UZ | SP-565UZ Instruction Manual (English) - Page 19
the aperture value and shutter speed for shooting pictures (M mode) This mode enables the user to set the aperture value and shutter speed manually. 1 Set the mode dial to M. M mode indicator M NR Long-exposure (bulb) shooting Set the shutter speed to [BULB]. The shutter stays open while - Olympus SP-565 UZ | SP-565UZ Instruction Manual (English) - Page 20
IN 00:34 To record audio when shooting [R (Movie REC)] (p. 42) To zoom while recording audio The optical zoom is not available when recording. Use [DIGITAL ZOOM] (p. 35). 2 Press the shutter button halfway down to focus on the subject, and gently press the button all the way down to start recording - Olympus SP-565 UZ | SP-565UZ Instruction Manual (English) - Page 21
with the telephoto zoom. To take larger images without reducing image quality [FINE ZOOM] (p. 35) To take larger images [DIGITAL ZOOM] (p. 35) The zoom bar appearance identifies the status of the fine zoom/digital zoom. When using optical zoom Optical zoom range When using fine zoom When using - Olympus SP-565 UZ | SP-565UZ Instruction Manual (English) - Page 22
The flash functions can be selected to best match the shooting conditions and render the desired image. 1 Press the # button to flip up the built-in flash. SET OK SHADOW ADJ OFF ON 2 Use 9: to select [ON], and press the o button to set. 3 Point the camera toward the subject. Check the frame - Olympus SP-565 UZ | SP-565UZ Instruction Manual (English) - Page 23
backwards. *1 This cannot be set in S and M modes. Adjusting the brightness (Exposure compensation) The standard brightness (correct exposure) set by the camera based on the shooting mode (except for M) can be adjusted brighter or darker to obtain the desired shot. 1 Press 7. P +2.0 1/1000 F8 - Olympus SP-565 UZ | SP-565UZ Instruction Manual (English) - Page 24
on a tripod, this function enables the user to take a picture of himself/ herself at a distance from the camera (h) or to take pictures without the camera shake (k). 1 Press 8. P$ Y OFF SET OK 12s SELFTIMER 2s 10M OFF NORM 1/400 F3.5 2 Use 78 to select the setting option, and press the - Olympus SP-565 UZ | SP-565UZ Instruction Manual (English) - Page 25
In such cases, use of the view finder is helpful when composing a shot. 1 Press the u button. ● Each time the button is pressed, the camera display switches between display The display of the screen information can be changed to best match the situation, such as clearing the view of the screen - Olympus SP-565 UZ | SP-565UZ Instruction Manual (English) - Page 26
Locking the exposure and/or focus position for shooting (AE LOCK/AF LOCK) Once the exposure and/or focus position are/is set for a subject in shooting mode, you can continue shooting at the same exposure, focus positior or both (AE LOCK, AF LOCK or AF LOCK + AE LOCK) even if the composition of the - Olympus SP-565 UZ | SP-565UZ Instruction Manual (English) - Page 27
Shooting into backlight. 4 Set particular lighting. 5 Blurring background. SET OK 2 Follow the guide by using 789: to proceed. ● Pressing the o button completes the setting and makes the camera ready for shooting. GUIDE # MODE CHANGED 10M NORM IN 17 To adjust another setting, press the m button - Olympus SP-565 UZ | SP-565UZ Instruction Manual (English) - Page 28
Using Playback Features Index view, calendar view and closeup view Index view and calendar view enable quick selection of a target image, and closeup view (up to 10x magnification) allows checking of image details. 1 Turn the zoom lever. W side T side To select an image in index view Use 789: to - Olympus SP-565 UZ | SP-565UZ Instruction Manual (English) - Page 29
Changing the image information display Shooting information displayed on the screen can be changed. 1 Press the g button. ● The displayed image information changes in the order shown below each time the button is pressed. Normal Histogram 2008.10.26 12:30 NORM 10M 100-0004 IN 4 2008.10.26 12: - Olympus SP-565 UZ | SP-565UZ Instruction Manual (English) - Page 30
Playing back panoramic images Panorama images that were combined together using [COMBINE IN CAMERA 1] or [COMBINE IN CAMERA 2] can be scrolled for viewing. [v PANORAMA] (p. 45) 1 Select a panorama image during playback. "Viewing images" (p. 15) 2008.10.26 12:30 2 Press the o button. NORM 100- - Olympus SP-565 UZ | SP-565UZ Instruction Manual (English) - Page 31
Adjust the settings for the functions while referring to "Using the Menu" (p. 3). Menus for Shooting Functions When the mode dial is set to a shooting mode, settings can be made. The icon next to indicates the position to adjust the mode dial to when setting functions. The default settings of the - Olympus SP-565 UZ | SP-565UZ Instruction Manual (English) - Page 32
setting For setting a more precise white balance than preset white screen.) balance, [AUTO] or [PRESET]. To set the One-touch WB Select [V], and aim the camera at a sheet of white paper which fills the screen, making sure there are no shadows, and then press the o button. One-touch WB icon ONE - Olympus SP-565 UZ | SP-565UZ Instruction Manual (English) - Page 33
ISO] K CAMERA MENU X camera shake and motion of the subject. 64/100/200/400/800/1600/ 3200/6400 The ISO sensitivity is set to a specific value. If set to [3200] [6400], [IMAGE SIZE] is limited to [H] or lower. The ISO setting of [3200] [6400] is not available when [FINE ZOOM] (p. 35) or [DIGITAL - Olympus SP-565 UZ | SP-565UZ Instruction Manual (English) - Page 34
Shooting pictures sequentially while the shutter button is held down [DRIVE] K CAMERA MENU X DRIVE : P A S M r s Submenu 2 o j*1 c Submenu 3 - Submenu 4 - d PRE-CAPTURE OFF/ PRE-CAPTURE ON - i - - 7 ±0.3/±0.7/±1.0 ×3/×5 Application One frame is shot each time the shutter button is - Olympus SP-565 UZ | SP-565UZ Instruction Manual (English) - Page 35
When set to [ESP], the center can appear dark when shooting against strong backlighting. Shooting at magnifications higher than optical zoom [DIGITAL ZOOM] K CAMERA MENU X DIGITAL ZOOM : P A S M r s A Submenu 2 Application OFF Only optical zoom is used to zoom in for shooting. Optical zoom and - Olympus SP-565 UZ | SP-565UZ Instruction Manual (English) - Page 36
until the mark changes to V. Changing the focus method [FOCUS MODE] K CAMERA MENU X FOCUS MODE : P A S M r s Submenu 2 AF MF Application Press the shutter button halfway. The camera automatically focuses. Adjust the focus manually. When set to [MF] Rough indication of shooting distance (MF bar - Olympus SP-565 UZ | SP-565UZ Instruction Manual (English) - Page 37
the focus. When the shutter button is pressed halfway down, the camera tracks the focusing subject, and it continues to keep the subject in focus while the button is held halfway down. This reduces focusing time. The camera may not be able to bring some subjects into focus even when set to [ON - Olympus SP-565 UZ | SP-565UZ Instruction Manual (English) - Page 38
to CH4) can be selected. The commercially-available slave flash that is synchronized with the camera flash is used for taking pictures. The flash intensity setting can be adjusted. "Taking pictures with the Olympus Wireless RC Flash System" (p. 80) When set to [SLAVE], the flash setting automatically - Olympus SP-565 UZ | SP-565UZ Instruction Manual (English) - Page 39
about the picture. When recording, aim the microphone (p. 53) at the source of the sound you want to record. Adjusting the white balance [>] K CAMERA MENU X > : P A S M r s A 1 Use 78 to adjust the white balance and press the o button to set. The white balance can be adjusted in 7 steps in - Olympus SP-565 UZ | SP-565UZ Instruction Manual (English) - Page 40
a crisper image. Adjusting in the - direction softens the overall impression of the image. Adjusting the color saturation [SATURATION] K CAMERA MENU X SATURATION : P A S M r s A Submenu 2 Application −5 to +5 This adjusts the color saturation. Adjusting in the + direction produces deeper colors - Olympus SP-565 UZ | SP-565UZ Instruction Manual (English) - Page 41
MENU X 1 : P A S M r s A Submenu 2 Application OFF No conversion lens is used (camera body only). The camera takes pictures by ON attaching a conversion lens specified by Olympus (sold separately). When a conversion lens is attached, light from the built-in flash can cause vignetting where - Olympus SP-565 UZ | SP-565UZ Instruction Manual (English) - Page 42
movies. Sounds may not be recorded clearly if the camera is more than 1m away from the sound source. / Y PRE-CAPTURE MOVIE/ r QUICK SHUTTER Application The camera takes a picture in the mode for the shooting scene. locked at the first frame. *3 The camera focuses for each frame. The sample image - Olympus SP-565 UZ | SP-565UZ Instruction Manual (English) - Page 43
Adjust the settings for the functions while referring to "Using the Menu" (p. 3). Making an overlay image with fireworks ([b MULTI FIREWORKS] mode) 1 Select [b MULTI FIREWORKS]. 10M NORM IN 4 2 Press the shutter button to take the first frame. ● The exposure is locked at the first frame. The saved - Olympus SP-565 UZ | SP-565UZ Instruction Manual (English) - Page 44
the subject. ● The self-timer lamp turns on. When a smiling face is detected, the camera automatically takes 3 sequential shots. Pictures can also be taken manually by pressing the shutter button. The camera may not be able to detect a smiling face for some subjects. Capturing the perfect moment - Olympus SP-565 UZ | SP-565UZ Instruction Manual (English) - Page 45
An Olympus xD-Picture Card is required for panoramic shooting. Cards by other manufacturers do not support panoramic shooting camera. The user composes the shots using the guide frame and manually releases the shutter. The frames that were taken are combined into a panorama image using the OLYMPUS - Olympus SP-565 UZ | SP-565UZ Instruction Manual (English) - Page 46
mark overlap. ● The camera releases the shutter automatically. Taking pictures with [COMBINE IN CAMERA2] 1 Use 789: to select the direction that the frames are combined. Direction for combining the next frame CANCEL MENU 2 Press the shutter button to take the first frame. ● A guide frame appears as - Olympus SP-565 UZ | SP-565UZ Instruction Manual (English) - Page 47
way as steps 3 to 4. ● After the third frame is taken, the camera automatically processes the frames and the combined panoram image is displayed. To cancel a is possible for up to 10 frames. Refer to the OLYMPUS Master 2 help guide for details on how to create panoramic images. Submenu 1 - Olympus SP-565 UZ | SP-565UZ Instruction Manual (English) - Page 48
Menus for Playback, Editing and Printing Functions Settings can be made when mode dial is set to q. Playing back pictures automatically [y SLIDESHOW] y SLIDESHOW Submenu 1 ALL*1*2/ STILL PICTURE/ MOVIE*1*2/ CALENDAR*1*2*3 Submenu 2 NORMAL/SCROLL/ FADER/SLIDE/ ZOOM DOWN/ZOOM UP/ CHECKERBOARD/ - Olympus SP-565 UZ | SP-565UZ Instruction Manual (English) - Page 49
Adjust the settings for the functions while referring to "Using the Menu" (p. 3). Selecting pictures from a calendar [+ CALENDAR] + CALENDAR "To select images in calendar view" (p. 28) Editing RAW data [RAW DATA EDIT] E EDIT X RAW DATA EDIT This function saves images recorded in RAW data format as - Olympus SP-565 UZ | SP-565UZ Instruction Manual (English) - Page 50
Changing the color tone of image [COLOR EDIT] E EDIT X COLOR EDIT Adding a calendar to an image [CALENDAR] E EDIT X CALENDAR Submenu 2 Application Black & white This changes the image to black and white. Sepia This changes the image to a sepia tone. Saturation (hard) This increases the - Olympus SP-565 UZ | SP-565UZ Instruction Manual (English) - Page 51
Adjust the settings for the functions while referring to "Using the Menu" (p. 3). Highlighting a face with blurry effect around it [FACE FOCUS] E EDIT X FACE FOCUS A face that is largest and facing front in the picture is detected as a target. In some images, such target may not be detected, and - Olympus SP-565 UZ | SP-565UZ Instruction Manual (English) - Page 52
Extracting a clip from a movie [EDIT] E EDIT X EDIT Submenu 2 NEW FILE OVERWRITE Application The original movie is left unchanged, and a clip from the movie is saved as a separate movie. A portion of the original movie overwrites and replaces the original movie. 1 Use 9: to select a movie. 2 Use - Olympus SP-565 UZ | SP-565UZ Instruction Manual (English) - Page 53
press the o button. ● Playback starts from the selected position. Adding sound to still pictures [R] q PLAYBACK MENU X R Submenu 2 YES NO Application The camera adds (records) sound for approx. 4 seconds while playing back the image. This is useful for recording notes or comments about the image - Olympus SP-565 UZ | SP-565UZ Instruction Manual (English) - Page 54
Erasing images [D ERASE] D ERASE Check if there is any important data before erasing images. Submenu 1 SEL. IMAGE ALL ERASE Application Images are individually selected and erased. All images in the internal memory or card are erased. Recording print settings to the image data [< PRINT ORDER] < - Olympus SP-565 UZ | SP-565UZ Instruction Manual (English) - Page 55
Before formatting, check that no important data is left in the internal memory or card. Non-Olympus cards and cards that have been formatted by a computer must be formatted with this camera before use. Submenu 2 YES NO Application Completely erases the image data in the internal memory*1 or - Olympus SP-565 UZ | SP-565UZ Instruction Manual (English) - Page 56
OFF (No sound)/ LOW/HIGH 5 levels excluding OFF (No sound) Submenu 4 Application 1/2 Selects the operating sound and volume of the OFF (No sound)/ camera buttons (except the shutter button). LOW/HIGH 1/2/3 Selects the operating sound and volume of the OFF (No sound)/ shutter button. LOW/HIGH - Olympus SP-565 UZ | SP-565UZ Instruction Manual (English) - Page 57
MAdajkuesththeesestettitninggssfofor rththeefufunnctcitoionnsswwhhileilererfeefrerrirninggtoto"U"UsisninggththeeMMenenuu" "(p(p. 3. )3.). Viewing the image immediately after shooting [REC VIEW] x SETUP X REC VIEW Submenu 2 Submenu 3 OFF - LCD ONLY ON CURRENT Application The image being - Olympus SP-565 UZ | SP-565UZ Instruction Manual (English) - Page 58
so no adjustment is needed right after purchase. Approximately once a year is recommended. For best results, wait at least 1 minute after taking or viewing pictures before performing pixel mapping. If the camera is turned off during pixel mapping, repeat the pixel mapping process. Adjusting the CCD - Olympus SP-565 UZ | SP-565UZ Instruction Manual (English) - Page 59
- time set in [X (Date/time)]. ON (Proceeds to the setting screen*1.) Switches to the date and time that were set in [DUALTIME] when using the camera in another time zone. *1 The setting procedure is identical to that in "Setting the date and time" (p. 12) The date display order is the same - Olympus SP-565 UZ | SP-565UZ Instruction Manual (English) - Page 60
the alarm is stopped once, the alarm will be activated every 5 minutes, up to 7 times. To check the alarm time, press the g button while the camera is turned off. The current and alarm set times are displayed for approx. 3 seconds. To activate the alarm After making the detailed settings of [ONE - Olympus SP-565 UZ | SP-565UZ Instruction Manual (English) - Page 61
"VIDEO (an input jack connected to the camera)". For details on changing the input source of the TV, refer to the TV's instruction manual. 4 Set the mode dial to q, histogram is displayed. A histogram (a brightness distribution as a guide for determining the exposure) is displayed. White-out areas - Olympus SP-565 UZ | SP-565UZ Instruction Manual (English) - Page 62
31) • [WB] (p. 32) • [ISO] (p. 33) • [DRIVE] (p. 34) • [FINE ZOOM] (p. 35) • [DIGITAL ZOOM] (p. 35) • [METERING] (p. 35) • [AF MODE] (p. 36) • [FOCUS MODE] (p.36) • [FULLTIME AF screen ([LCD] or [EVF]). To select the zoom position at camera startup [ZOOM] Select [CUSTOM] (submenu 2) X desired my - Olympus SP-565 UZ | SP-565UZ Instruction Manual (English) - Page 63
units during manual focus [m/ (p. 31)/IMAGE SIZE (p. 31)/ COMPRESSION (p. 31)/FINE ZOOM (p. 35)/ DIGITAL ZOOM (p. 35)/AF MODE (p. 36)/ FOCUS MODE (p.36)/FULLTIME AF (p. is activated. When the camera is not being used for approx. 12 minutes in sleep mode, the camera automatically turns off. To - Olympus SP-565 UZ | SP-565UZ Instruction Manual (English) - Page 64
you can print images directly without using a computer. To find out if your printer supports PictBridge, refer to the printer's instruction manual. *1 PictBridge is a standard for connecting digital cameras and printers of different makers and printing out pictures directly. The printing modes, paper - Olympus SP-565 UZ | SP-565UZ Instruction Manual (English) - Page 65
Changing the printer's settings for printing [CUSTOM PRINT] 1 Follow steps 1 and 2 for [EASY PRINT] (p. 64), and press the o button. USB PC EASY PRINT CUSTOM PRINT EXIT SET OK 2 Use 78 to select [CUSTOM PRINT], and press the o button. 3 Use 78 to select print mode, and press the o button. - Olympus SP-565 UZ | SP-565UZ Instruction Manual (English) - Page 66
6 Use 9: to select an image. 7 Press the < button to set the displayed image for single reservation. Press 8 to make detailed printer settings for the displayed image. To make the detailed printer settings 1 Use 789:, and press the o button. PRINT INFO - Olympus SP-565 UZ | SP-565UZ Instruction Manual (English) - Page 67
card. This enables easy printing at a printer or print shop supporting DPOF by using only the print reservations on the card without a computer or a camera. *1 DPOF is a standard for storing automatic printout information from digital cameras. Print reservations can be set only for the images stored - Olympus SP-565 UZ | SP-565UZ Instruction Manual (English) - Page 68
4 Use 9: to select the image for print reservation. Use 78 to select the quantity. Press the o button. X BACK MENU NO DATE TIME SET OK To crop an image for printing Adjust the cropping settings before pressing the o button in step 4. "To crop an image (P)" (p. 66) 5 Use 78 to select the [X] ( - Olympus SP-565 UZ | SP-565UZ Instruction Manual (English) - Page 69
Resetting the print reservation data for selected images 1 Follow steps 1 and 2 of "Resetting all print reservation data" (p. 68). 2 Use 78 to select [ - Olympus SP-565 UZ | SP-565UZ Instruction Manual (English) - Page 70
" and "Registration" screen appear. Follow the instructions on the screen. Locate the position of the USB port by referring to your computer instructions manual. 3 Use 78 to select [PC], and press the o button. ● The computer automatically detects the camera as a new device on the first connection - Olympus SP-565 UZ | SP-565UZ Instruction Manual (English) - Page 71
the Guide. For details on the operation, refer to the help guide of the software. Transferring and saving images without OLYMPUS Master 2 This camera is has USB ports, proper operation is not guaranteed in the following cases. ● computers with USB ports installed using an expansion card, etc - Olympus SP-565 UZ | SP-565UZ Instruction Manual (English) - Page 72
does not work as intended, or if an error message is displayed on the screen, refer to the information below to fix the problem(s). Troubleshooting Battery "The camera does not work even when batteries are installed" ● Insert new or recharged batteries in the correct direction. "Loading the batteries - Olympus SP-565 UZ | SP-565UZ Instruction Manual (English) - Page 73
. Next, use 78 to select [YES], and press the o button.*2 Recording has stopped to allow camera to cool. Please wait a moment. Camera is cooling. Please wait a moment. Operation problem Allow the camera to cool down before you begin shooting again. L NO PICTURE r PICTURE ERROR r THE IMAGE CANNOT - Olympus SP-565 UZ | SP-565UZ Instruction Manual (English) - Page 74
Taking a picture of subjects where autofocus is difficult In the following cases, after focusing on an object (by pressing the shutter button halfway down) *1 It is also effective to compose the shot by holding the camera vertically to focus and then returning to the horizontal position to take the - Olympus SP-565 UZ | SP-565UZ Instruction Manual (English) - Page 75
[IMAGE STABILIZER] (p. 37) The CCD*1 shifts to correct for camera shake even if the ISO speed is not increased. This function is the same shade as they appear" ● Taking pictures by selecting [WB] (p. 32) Best results in most environments can normally be obtained with the AUTO setting, but for some - Olympus SP-565 UZ | SP-565UZ Instruction Manual (English) - Page 76
Taking sharper pictures" ● Taking pictures with the optical zoom Avoid using [DIGITAL ZOOM] (p. 35) to take pictures. ● Taking pictures at a in the original image) can occur, and the image can appear grainy. This camera is provided with [NOISE REDUCT.] (p. 40), but when the ISO sensitivity is - Olympus SP-565 UZ | SP-565UZ Instruction Manual (English) - Page 77
to the batteries provided with the camera, the following types of battery can be used. Choose the power source best suited to the situation. AA alkaline (rechargeable batteries) Olympus NiMH batteries are rechargeable and economical. For details, refer to the instruction manual for your charger. - Olympus SP-565 UZ | SP-565UZ Instruction Manual (English) - Page 78
• Do not use travel voltage converters as they could damage your AC adapter. Cards compatible with this camera xD-Picture Card (16MB to 2GB) (TypeH/M/M+, Standard) Using a new card Before using a non-Olympus card or a card that was used for another purpose in a computer or other device, use [MEMORY - Olympus SP-565 UZ | SP-565UZ Instruction Manual (English) - Page 79
seconds when using a TypeM or Standard xD-Picture Card. Increasing the number of pictures that can be taken Either erase unwanted images, or connect the camera to a computer or other device to save the images, and then erase the images in the internal memory or card. Single image erase (p. 16 - Olympus SP-565 UZ | SP-565UZ Instruction Manual (English) - Page 80
Using a microSD Attachment Do not use the attachment with Olympus digital cameras that do not support this microSD Attachment, as well as with other brands of digital cameras, computers, printers and other devices that support xD-Picture Card. Doing so not only may damage the pictures taken, but may - Olympus SP-565 UZ | SP-565UZ Instruction Manual (English) - Page 81
charge level of the camera and wireless flash before SERVICEABLE PARTS INSIDE. REFER SERVICING TO QUALIFIED OLYMPUS SERVICE PERSONNEL. DANGER WARNING CAUTION An exclamation mark enclosed in a triangle alerts you to important operating and maintenance instructions accessories recommended by Olympus - Olympus SP-565 UZ | SP-565UZ Instruction Manual (English) - Page 82
. • Do not insert anything other than an xD-Picture Card or the microSD Attachment into the camera. If you insert a card by mistake, such as a microSD card, do not use force. Contact authorized distributors/service centers. Damages such as scratches on the attachment or card could result in the - Olympus SP-565 UZ | SP-565UZ Instruction Manual (English) - Page 83
used. DANGER • Use only the Olympus brand NiMH batteries and proper fitting • Insert the battery carefully as described in the operating instructions. • Do not use batteries if their body is not in any other way during operation, stop using the camera. • If a battery leaks fluid onto your clothing - Olympus SP-565 UZ | SP-565UZ Instruction Manual (English) - Page 84
camera's manual. Battery Handling Precautions • Olympus NiMH batteries (included in some areas) are intended for use only with Olympus digital cameras unless it is absolutely necessary. In some cases, alkaline batteries may have a shorter service life than NiMH. Alkaline battery performance is - Olympus SP-565 UZ | SP-565UZ Instruction Manual (English) - Page 85
a long time to turn on or its color may change temporarily. When using the camera in extremely cold places, it is a good idea to occasionally place it in a warm limitations may not apply to you. • Olympus reserves all rights to this manual. Warning Unauthorized photographing or use of copyrighted - Olympus SP-565 UZ | SP-565UZ Instruction Manual (English) - Page 86
limits for a Class B digital device, pursuant to Part 15 in accordance with the instructions, may cause harmful camera to USB enabled personal computers (PC). For customers in North and South America For customers in USA Declaration of Conformity Model Number : SP-565UZ Trade Name : OLYMPUS - Olympus SP-565 UZ | SP-565UZ Instruction Manual (English) - Page 87
LIMITED WARRANTY - IMAGING PRODUCTS Olympus warrants that the enclosed Olympus® imaging product(s) and related Olympus® accessories (individually a "Product" and collectively the "Products") will be free from defects in materials and workmanship under normal use and service for a period of one - Olympus SP-565 UZ | SP-565UZ Instruction Manual (English) - Page 88
on the Product (unless it is a model on which Olympus does not place and record serial numbers). 3 A detailed description of the problem. 4 Sample prints, negatives, digital prints (or files on disk) if available and related to the problem. When service is completed, the Product will be returned - Olympus SP-565 UZ | SP-565UZ Instruction Manual (English) - Page 89
names are registered trademarks and/or trademarks of their respective owners. • The standards for camera file systems referred to in this manual are the "Design rule for Camera File system/DCF" standards stipulated by the Japan Electronics and Information Technology Industries Association (JEITA - Olympus SP-565 UZ | SP-565UZ Instruction Manual (English) - Page 90
Image pickup device : 1/2.33" CCD (primary color filter), 10,700,000 pixels (gross) Lens : Olympus lens 4.6 to 92 mm, f2.8 to 4.5 (equivalent to 26 to 520 mm on a 35 mm camera) Photometric system : Digital ESP metering, spot metering, center weighted metering Shutter speed : 15 to 1/2000 sec - Olympus SP-565 UZ | SP-565UZ Instruction Manual (English) - Page 91
34 Bracket shooting 34 C CALENDAR 49 CALENDAR (edit 50 Calendar view 28 CAMERA MENU 31 Card 11, 45, 55, 78 Center-weighted metering 4 35 Closeup BUTTON 26, 63 CUSTOM PRINT 65 D Date and time X 12, 59 DIGITAL ZOOM 35 Direct printing 64 DIRECT(Histogram 61 DPOF 67 DRIVE 34 DUALTIME l - Olympus SP-565 UZ | SP-565UZ Instruction Manual (English) - Page 92
63 Macro mode 24 Macro shooting 24 Manual mode M 19 MEMORY FORMAT 55 MENU COLOR 56 MENU DISPLAY 57 Menu guide 3 METERING 35 microSD 11, 80 60 Number of prints 66 Number of storable still pictures 79 O OLYMPUS Master 2 70 Olympus Wireless RC Flash System.... 80 One-touch WB V 32 Optical - Olympus SP-565 UZ | SP-565UZ Instruction Manual (English) - Page 93
a language W 13, 55 Self-timer Y 24 Sequential playback 29 Sequential shooting j 34 Shadow adjustment technology f...... 22 SHARPNESS N 39 Shooting guide g 27 Shooting mode 4 Shooting movies n 20 Shutter priority mode S 18 SHUTTER SOUND 56 Shutter speed 18 SILENT MODE j 63 Single image - Olympus SP-565 UZ | SP-565UZ Instruction Manual (English) - Page 94
Printed in China 1AG6P1P4956-- VS716701
-
 1
1 -
 2
2 -
 3
3 -
 4
4 -
 5
5 -
 6
6 -
 7
7 -
8
-
9
-
10
-
11
-
12
-
13
-
14
-
15
-
16
-
17
-
18
-
19
-
20
-
21
-
22
-
23
-
24
-
25
-
26
-
27
-
28
-
29
-
30
-
31
-
32
-
33
-
34
-
35
-
36
-
37
-
38
-
39
-
40
-
41
-
42
-
43
-
44
-
45
-
46
-
47
-
48
-
49
-
50
-
51
-
52
-
53
-
54
-
55
-
56
-
57
-
58
-
59
-
60
-
61
-
62
-
63
-
64
-
65
-
66
-
67
-
68
-
69
-
70
-
71
-
72
-
73
-
74
-
75
-
76
-
77
-
78
-
79
-
80
-
81
-
82
-
83
-
84
-
85
-
86
-
87
-
88
-
89
-
90
-
91
-
92
-
93
-
94
 |
 |

DIGITAL CAMERA
DIGITAL CAMERA
Instruction Manual
● Thank you for purchasing an Olympus digital camera. Before you start to
use your new camera, please read these instructions carefully to enjoy
optimum performance and a longer service life. Keep this manual in a safe
place for future reference.
● We recommend that you take test shots to get accustomed to your camera
before taking important photographs.
● In the interest of continually improving products, Olympus reserves the right
to update or modify information contained in this manual.
● The screen and camera illustrations shown in this manual were produced
during the development stages and may differ from the actual product.