Olympus SP-590 UZ SP-590UZ Instruction Manual (English) - Page 43
Restoring the shooting functions to the default settings, Taking pictures with, COMBINE IN CAMERA2] - reset
 |
UPC - 050332168497
View all Olympus SP-590 UZ manuals
Add to My Manuals
Save this manual to your list of manuals |
Page 43 highlights
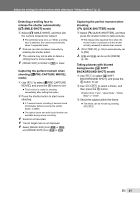
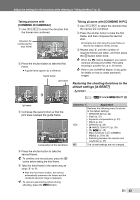
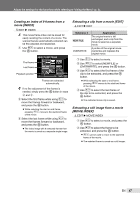
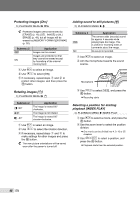
Adjust the settings for the functions while referring to "Using the Menu" (p. 3). Taking pictures with [COMBINE IN CAMERA2] 1 Use 789: to select the direction that the frames are combined. Direction for combining the next frame CANCEL MENU 2 Press the shutter button to take the first frame. ● A guide frame appears as a reference. Guide frame Joint area CANCEL MENU 1st frame CANCEL MENU SAVE OK 3 Compose the second shot so that the joint area overlaps the guide frame. CANCEL MENU SAVE OK Composition of the 2nd frame 4 Press the shutter button to take the second frame. To combine only two pictures, press the o button before taking the third frame. 5 Take the third frame in the same way as steps 3 to 4. ● After the third frame is taken, the camera automatically processes the frames and the combined panoram image is displayed. To cancel a panoramic picture during shooting, press the button. Taking pictures with [COMBINE IN PC] 1 Use 789: to select the direction that the frames are combined. 2 Press the shutter button to take the first frame, and then compose the second shot. ● Compose the shot using the guide frame so that the two adjacent frames overlap. 3 Repeat step 2 until the number of required frames are taken, and then press the o button when done. When the g mark is displayed, you cannot continue shooting any further. Panorama shooting is possible for up to 10 frames. Refer to the OLYMPUS Master 2 help guide for details on how to create panoramic images. Restoring the shooting functions to the default settings [D RESET] D RESET : h P A S M I A Submenu 1 Application YES Restores the following menu functions to the default settings. • SHADOW ADJ (p. 22) • Flash (p. 22) • Exposure compensation (p. 23) • Macro (p. 24) • Self-timer (p. 24) • [A IMAGE QUALITY] (p. 29) • [J s] (p. 40) • Menu functions in [K CAMERA MENU] (p. 30 to 39) • Switching between the monitor and viewfinder (p. 25) NO The current settings are not changed. EN 43
-
 1
1 -
2
-
3
-
4
-
5
-
6
-
7
-
8
-
9
-
10
-
11
-
12
-
13
-
14
-
15
-
16
-
17
-
18
-
19
-
20
-
21
-
22
-
23
-
24
-
25
-
26
-
27
-
28
-
29
-
30
-
31
-
32
-
33
-
34
-
35
-
36
-
37
-
 38
38 -
 39
39 -
 40
40 -
 41
41 -
 42
42 -
 43
43 -
 44
44 -
 45
45 -
 46
46 -
 47
47 -
 48
48 -
49
-
50
-
51
-
52
-
53
-
54
-
55
-
56
-
57
-
58
-
59
-
60
-
61
-
62
-
63
-
64
-
65
-
66
-
67
-
68
-
69
-
70
-
71
-
72
-
73
-
74
-
75
-
76
-
77
-
78
-
79
-
80
-
81
-
82
-
83
-
84
-
85
-
86
 |
 |
